Camera
It takes about 20 minutes to read this article
This page outlines how to modify various properties of the camera to achieve various camera effects.
What is a camera?
TIP
Camera, like our eyes, determines what players see in the 3D gaming world.
- In the "Object Manager" - "World" of the new project, there will be a camera object that cannot be deleted. When the game starts, the screen seen by this camera will be displayed by default.
- You can also drag any camera objects from the Asset Library - Gameplay Object or create them dynamically in the script. These camera objects can be placed in any position in the scene or mounted under other objects as child objects.
- Both Camera objects, camera in the World or camera in the Gameplay Object, can be used to adjust effects through the properties/interfaces of the Camera class in the script.
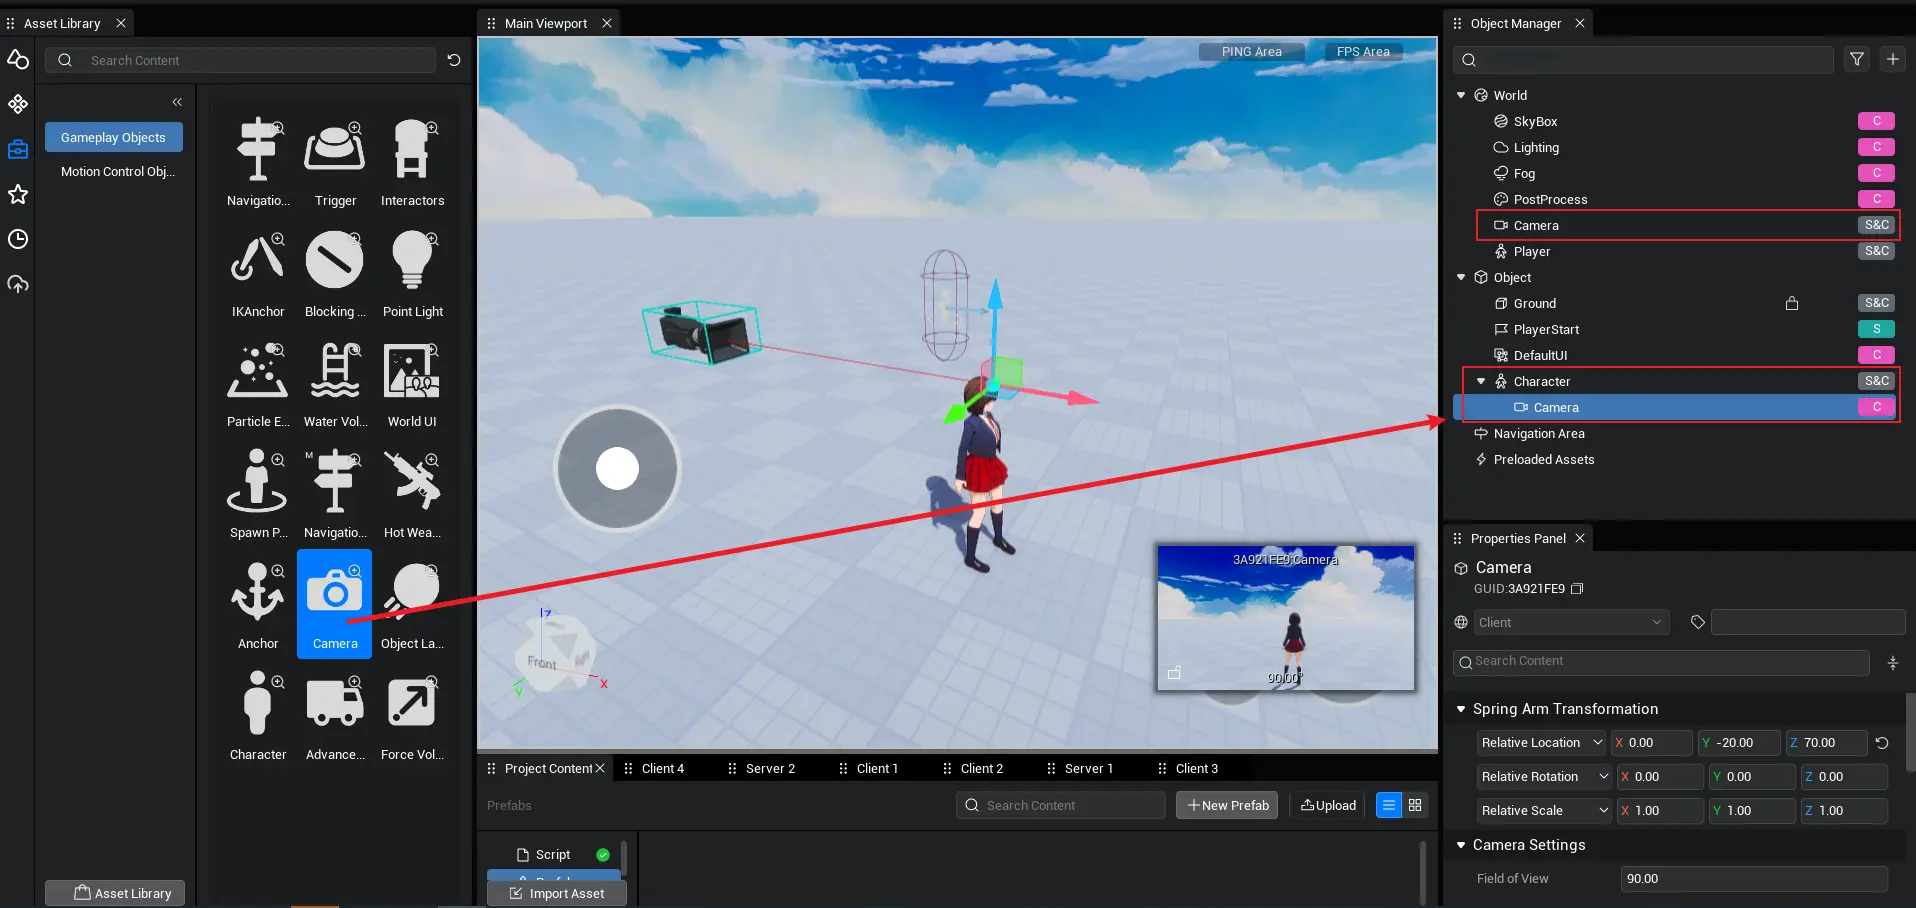
Camera Properties
2.1 Camera Settings
Relative Position and Relative Rotation
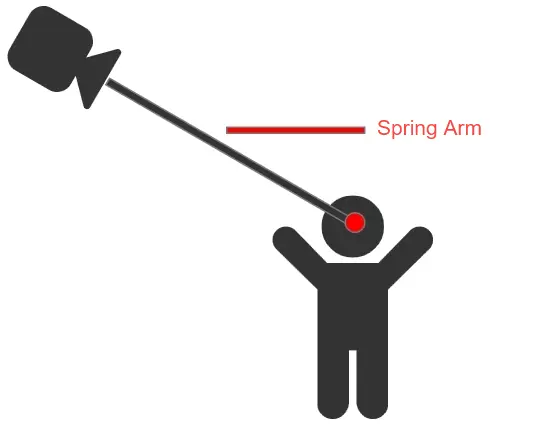
- i. e., that offset and rotation of the camera relative to the spring arm, the definition of which will be described in detail below. At present, we can interpret the red thin line in the main viewport as a spring arm.
- It is recommended to adjust the camera relative rotation only when the camera orientation mode is “Fixed”/“Follow Orientation”, if the camera orientation mode is “Control Orientation”, make sure to clear the relative rotation to zero, otherwise the player will not be able to reasonably maneuver the camera orientation.
- Also, carefully adjust the relative position of the camera; when the relative position is not in the original position, it may cause the spring arm to trigger the camera to collide, and the camera position cannot be followed to retract to the same side of the obstacle; for example, if you want the camera to stay away from the character, it is recommended to adjust the length of the spring arm rather than the relative position of the camera.
- Pay attention to the difference between the relative position/rotation of the camera and the relative position/rotation of the spring arm, the role of which will be described in detail below.
Camera Preset Mode
- In order for developers to quickly select the desired view mode, editor provides several sets of Camera Preset Modes. Developers can quickly select the camera mode they want to use in the Properties Panel or the currentCameraMode property in the script, without having to manually adjust numerous parameters.
- When a camera mode is used, the relevant camera properties are automatically refreshed according to the preset values for this preset mode.
TIP
Due to the complexity of camera parameters, these camera preset modes are highly recommended for newcomers; or fine-tuned from these preset camera modes.
| Enumeration Name | English Name | Enumeration Value | Notes |
|---|---|---|---|
| First Person | FirstPerson | 0 | Camera Effect from First Person |
| Third Person | ThirdPerson | 1 | Camera effects from a third-person perspective. |
| TopDownAngle | TopDownAngle | 2 | Camera with a 45-degree top-down angle view. |
| Default | Default | 3 | Default effect. |
| TPSOverShoulderAngle | TPSOverShoulderAngle | 4 | Camera effect from a third-person over-the-shoulder perspective. |
| FPSShootingAngle | FPSShootingAngle | 5 | Camera Effect from First Person Shooting Perspective |
- TPS Over-Shoulder Angle and FPS Shooting Angle are recommended for shooting games.
- In FPS shooting, the camera can only see the weapons held by the player's character, but not the player's character.
- In TPS over-shoulder view, the camera can see the player's upper body, and the player is in the lower left area of the screen, not obscuring the forward view.
Field of View
- Field of View (FOV), which is the horizontal field of view angle in perspective mode. The larger the FOV, the larger the visible field of view angle.
| Field of view: 60 degree | 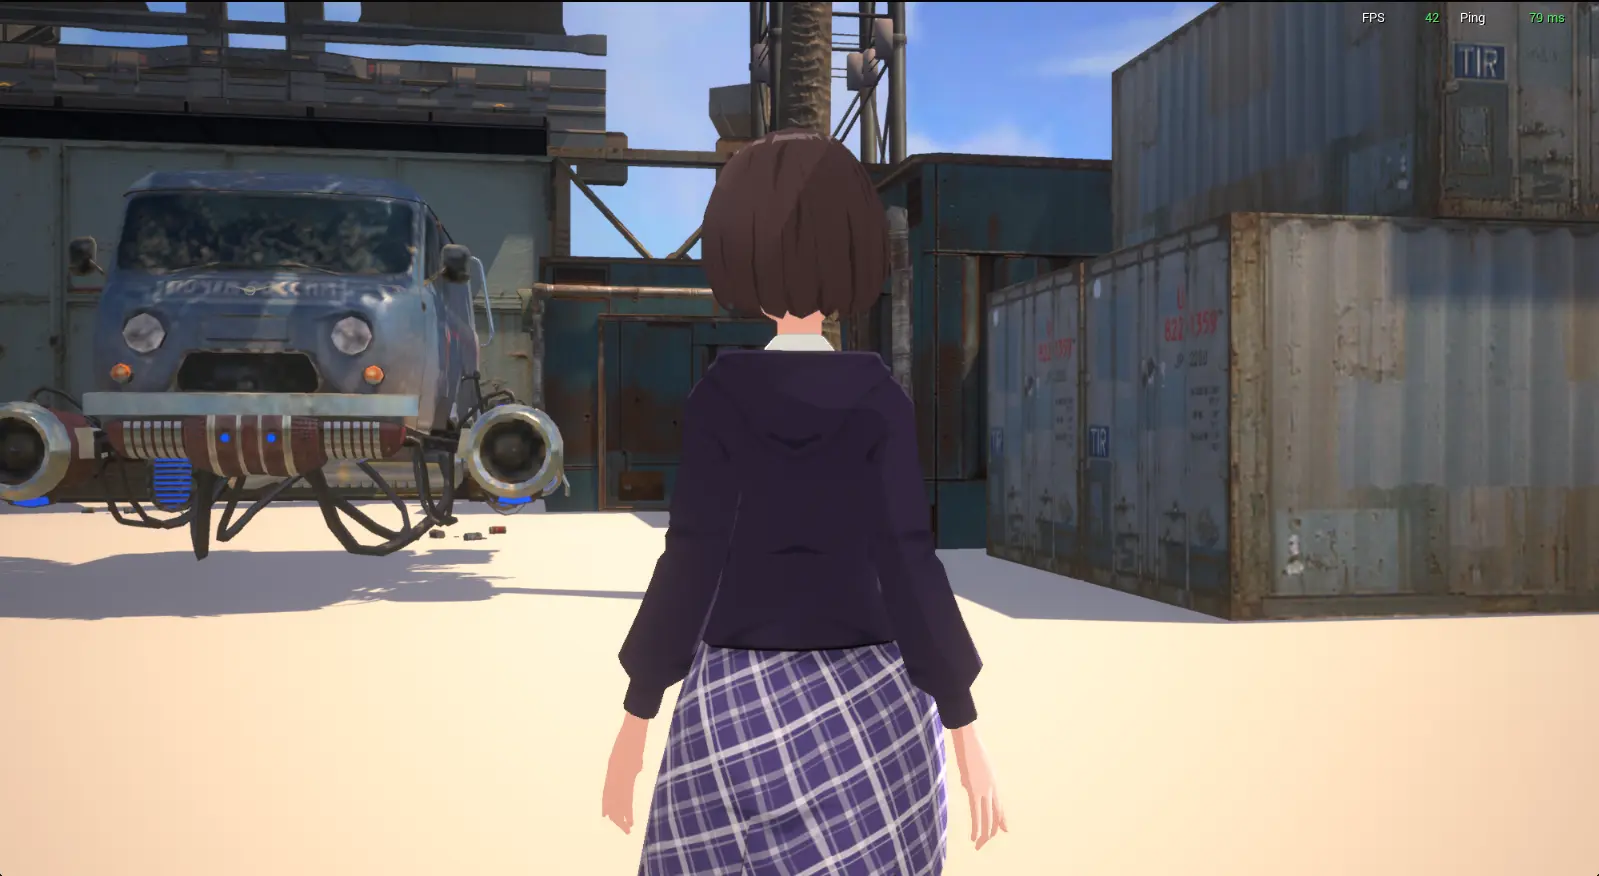 |
|---|---|
| Field of view: 90 degree | 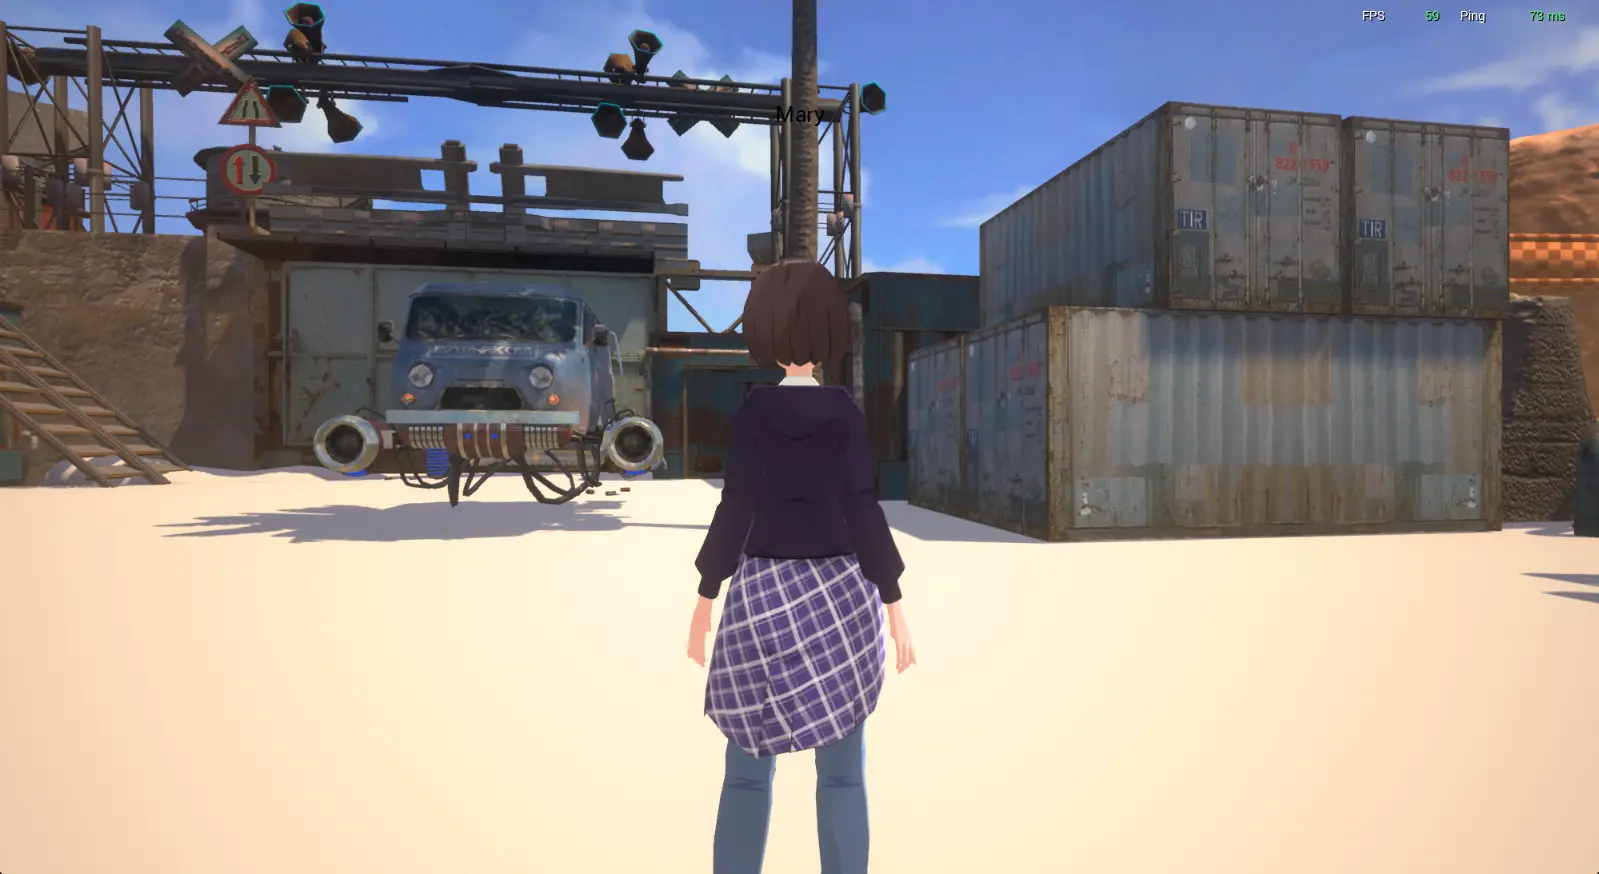 |
| Field of view: 120 degree | 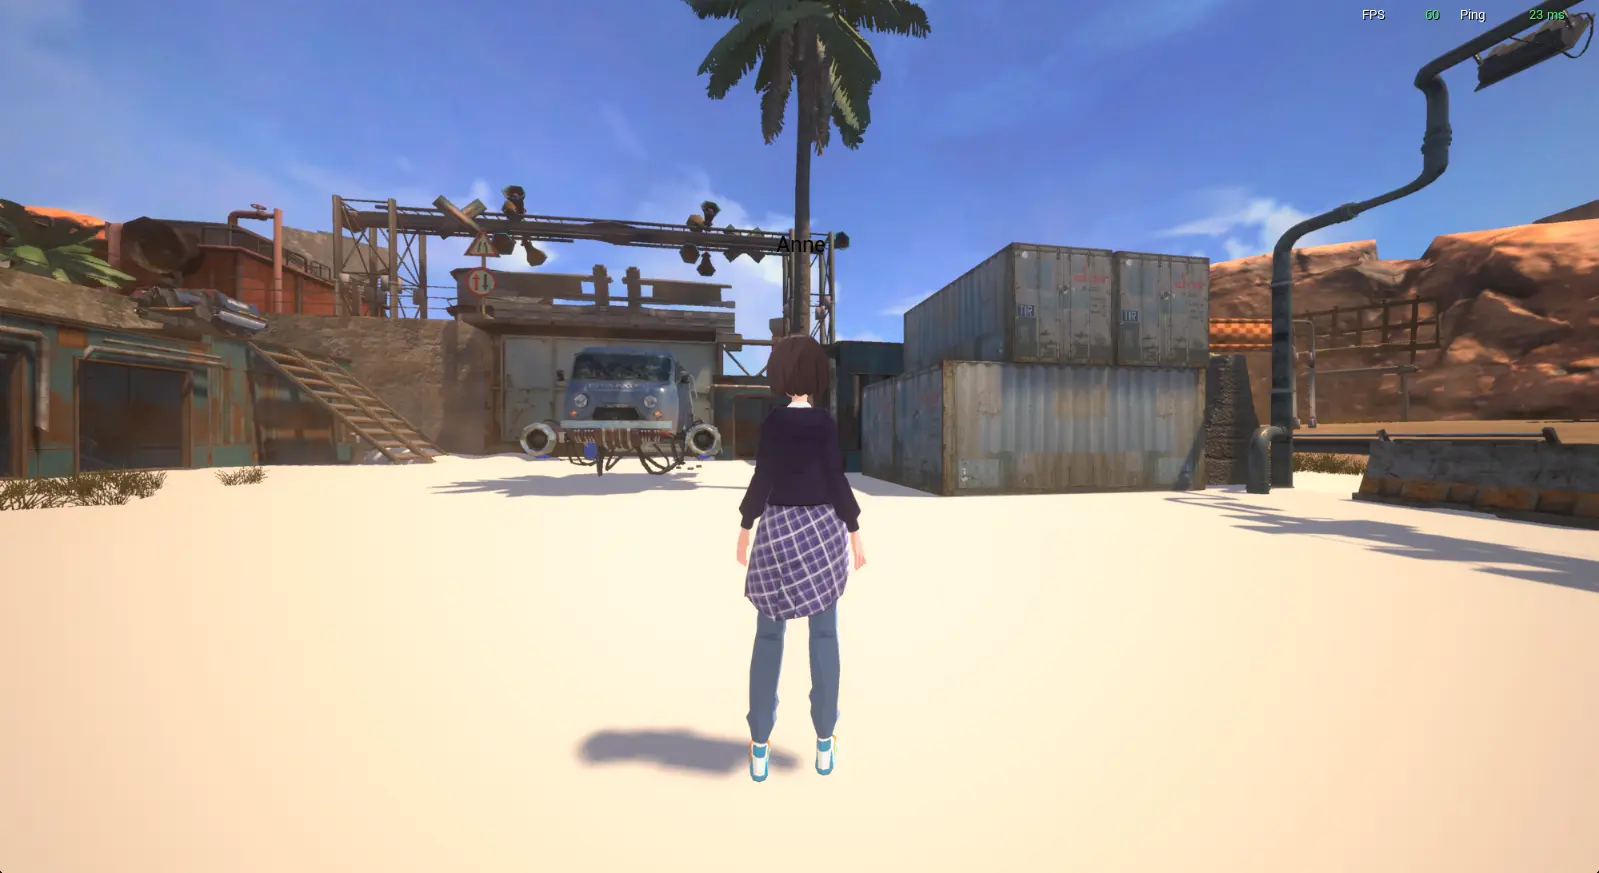 |
TIP
If you need to use an orthogonal view (e.g. to create a 2D casual game with 3D effects), it is recommended to use FOV = 35 and adjust camera distance, position, angle and other parameters to simulate orthogonal viewing angle
Camera Position Mode
- Fixed Position Mode
- The camera is fixed in a certain position and cannot be moved.
- Follow Target Mode
- The camera follows an object (default player character) all the way.
Camera orientation mode/control camera rotation with controller
- Fixed orientation: The camera is fixedly oriented in a certain direction.
- Follow Direction: The camera follows the target face towards the direction.
- Control Orientation: The relative rotation of the spring arm of this camera is controlled by the UI control - Camera Slide Zone. The dynamically set relative rotation of the spring arm will not take effect.
- Use Controller Rotation: When on, this has the same effect as if the camera orientation mode were ‘Control Orientation’; when off, this has the effect of if the camera orientation mode were ‘Fixed Orientation/Follow Orientation’, so adjusting both the camera orientation mode and the Control Camera Rotation with Controller property also affects the other property.
- Note: When Use Controller Rotation (or camera orientation mode=Controller Orientation) is turned on, the orientation of the spring arm needs to be obtained or set by controller rotation (Player.getControllerRotation/Player.setControllerRotation); when Use Controller Rotation (or camera orientation mode=fixed orientation/following orientation), the direction of the spring arm is obtained or set by the relative rotation of the spring arm (springArm.localTransform.rotation).
Fixed Camera on Z-axis
- Fixed camera coordinates on the Z-axis, for example, when the character is jumping or going up stairs, the camera does not change height with the character, is used to craft top-view games.
2.2 Spring Arm Settings
- First, briefly explain what the spring arm of the camera does?
- Spring arms provide the camera with the ability to expand or retract according to the scene, such as automatically moving the camera's position when encountering obstacles, preventing obstruction of view.
- The direction of the spring arms can be controlled by the UI widget, the Touch Pad or the Joystick, to facilitate in-game rotation of the viewing angle.
- Currently, we can interpret the red thin line in the main viewport as a spring arm.
Relative Position and Relative Rotation
- Relative position, that is, the position of the spring arm pendant relative to the parent node, which is typically a player character, to which the camera is connected through the spring arm pendant.
- The position of the spring arm points determines which point the camera revolves around when the player rotates the camera. Most third-person games place the spring arm points on the player's head or neck to ensure that the player's upper body is always in the center of the screen.
- Relative rotation is the angle of the spring arm relative to the default orientation. Dragging the screen to rotate the viewpoint in the game is equivalent to dynamically adjusting this property, which can be used to create fixed top-down or oblique 45° viewpoints. Attention:
- When Camera Orientation Mode is Control Orientation (when Camera Rotation is turned on using the controller), the relative rotation of the spring arm of this camera is controlled by the UI control - Touch Pad, and the dynamically set relative rotation of the spring arm will not take effect.
- The dynamically set relative rotation of the spring arm takes effect when the camera orientation mode = fixed orientation/follow orientation (i.e. when Use Controller Rotation is off)
TIP
Note the difference: relative position/rotation of the camera vs. relative position/rotation of the spring arms
- The relative position/rotation of the camera only changes the camera,but does not affect the spring arm.When adjusting the relative position/rotation of the spring arm,the position and direction of the camera will change together.
- It can be understood that the spring arm is a selfie rod,the proximal end of the selfie rod is held by the selfie taker,the distal end holds the camera;the relative position/relative rotation of the camera only adjusts the position and orientation of the distal camera,but does not affect the selfie rod;while the relative position/relative rotation of the spring arm adjusts the position and orientation of the selfie rod (which will attach the camera). :::
- If you want to dynamically redirect the spring arm, for example by resetting the camera to the front of the character, but still want the spring arm to continue to be oriented by the player, you can use two methods:
// Method 1: Turn off Use Controller Rotation, then set the relative rotation of the spring arm to (0,0,0)
    attackBtn.onPressed.add(()=>{
        Camera.currentCamera.springArm.useControllerRotation = false;
        Camera.currentCamera.springArm.localTransform.rotation=new Rotation(0,0,0);
        Camera.currentCamera.springArm.useControllerRotation = true;
    })
    // Method 2: If the state of using the controller to control camera rotation is turned on at this time, you can achieve the same effect directly by overwriting the value of controller rotation.
    attackBtn.onPressed.add(()=>{
        Player.setControllerRotation(new Rotation(0,0,0));
    })
// Method 1: Turn off Use Controller Rotation, then set the relative rotation of the spring arm to (0,0,0)
attackBtn.onPressed.add(()=>{
Camera.currentCamera.springArm.useControllerRotation = false;
Camera.currentCamera.springArm.localTransform.rotation=new Rotation(0,0,0);
Camera.currentCamera.springArm.useControllerRotation = true;
})
// Method 2: If the state of using the controller to control camera rotation is turned on at this time, you can achieve the same effect directly by overwriting the value of controller rotation.
attackBtn.onPressed.add(()=>{
Player.setControllerRotation(new Rotation(0,0,0));
})Springy Arm Length
- Think of this red line in the scene as a camera spring arm, and modifying it will also modify the red line length.
- The actual distance between the camera and the character is determined by the relative position of the camera,the relative position of the spring arm,and the length of the spring arm.
- if both that relative position of the camera and the relative position of the spring arms are (0, 0, 0), the spring arm length is the distance between the camera and the character.
- When making a first-person game, it is recommended to resize this property to 0.
- The spring arm length (i.e. distance adjustment) is as follows:
Whether or not there is a camera collision
- The spring arm of the camera collides with other objects, causing the camera position to be moved forward upon collision, preventing mode-piercing or blocking of the player's character.
- It can be understood that if an object which has collision blocking the red thin line in main viewport, a camera collision will occur.
- Enable Camera Collision
Whether to turn on camera zoom distance
- Whether to activate the two-finger or mouse scroll wheel to shrink the camera spring arm length, the default is on.
- To meet the need for players to draw closer to their characters when recording in-game videos, it is highly recommended to activate this feature for each third-person perspective project; if you do not want players to be able to zoom in with two fingers during mirroring or during certain game stages, you can dynamically turn this feature off.
- Note: Since the two-finger zoom feature uses Touch events to calculate the number of fingers in contact with the screen, and button with precise tap mode (touchMethod=PreciseTap, recommended only for buttons in scroll boxes) will conflict with Touch events, causing bug performance, it is recommended to use the normal tapping mode (touchMethod=DownAndUp) for buttons in the main HUD in the game.
Zoom Distance Range
- Used to set a maximum and minimum value for the player's two-finger/roller retractable camera spring arm length, which only works when the current camera spring arm length is within the camera retraction distance. The default value is 60-500.
Zoom Scale
- Used to set the sensitivity of the player's two-finger/roller zoom camera spring arm length.
- Example of a camera zoom effect:
2.3 Other Settings
Enable Camera Position Delay
- Camera delay is to delay and lag the rotation of the camera following the character's motion and perspective,making the mirror smoother and more representative. Turn on camera position delay will delay the movement of the camera following the character when the character is displaced.
Enable Camera Position Delay
- Controls the speed at which the camera reaches the target position when the character is displaced. Low values are slow (high latency), high values are fast (low latency), and zeros are immediate (no latency).
- In addition, the delay effect is affected by the maximum distance of the position delay (which is adjusted with the maxLagDistance property in the script). For example, in the following screenshots, the maximum distance of the position delay is 100 cm.
| Position delay speed = 8 | 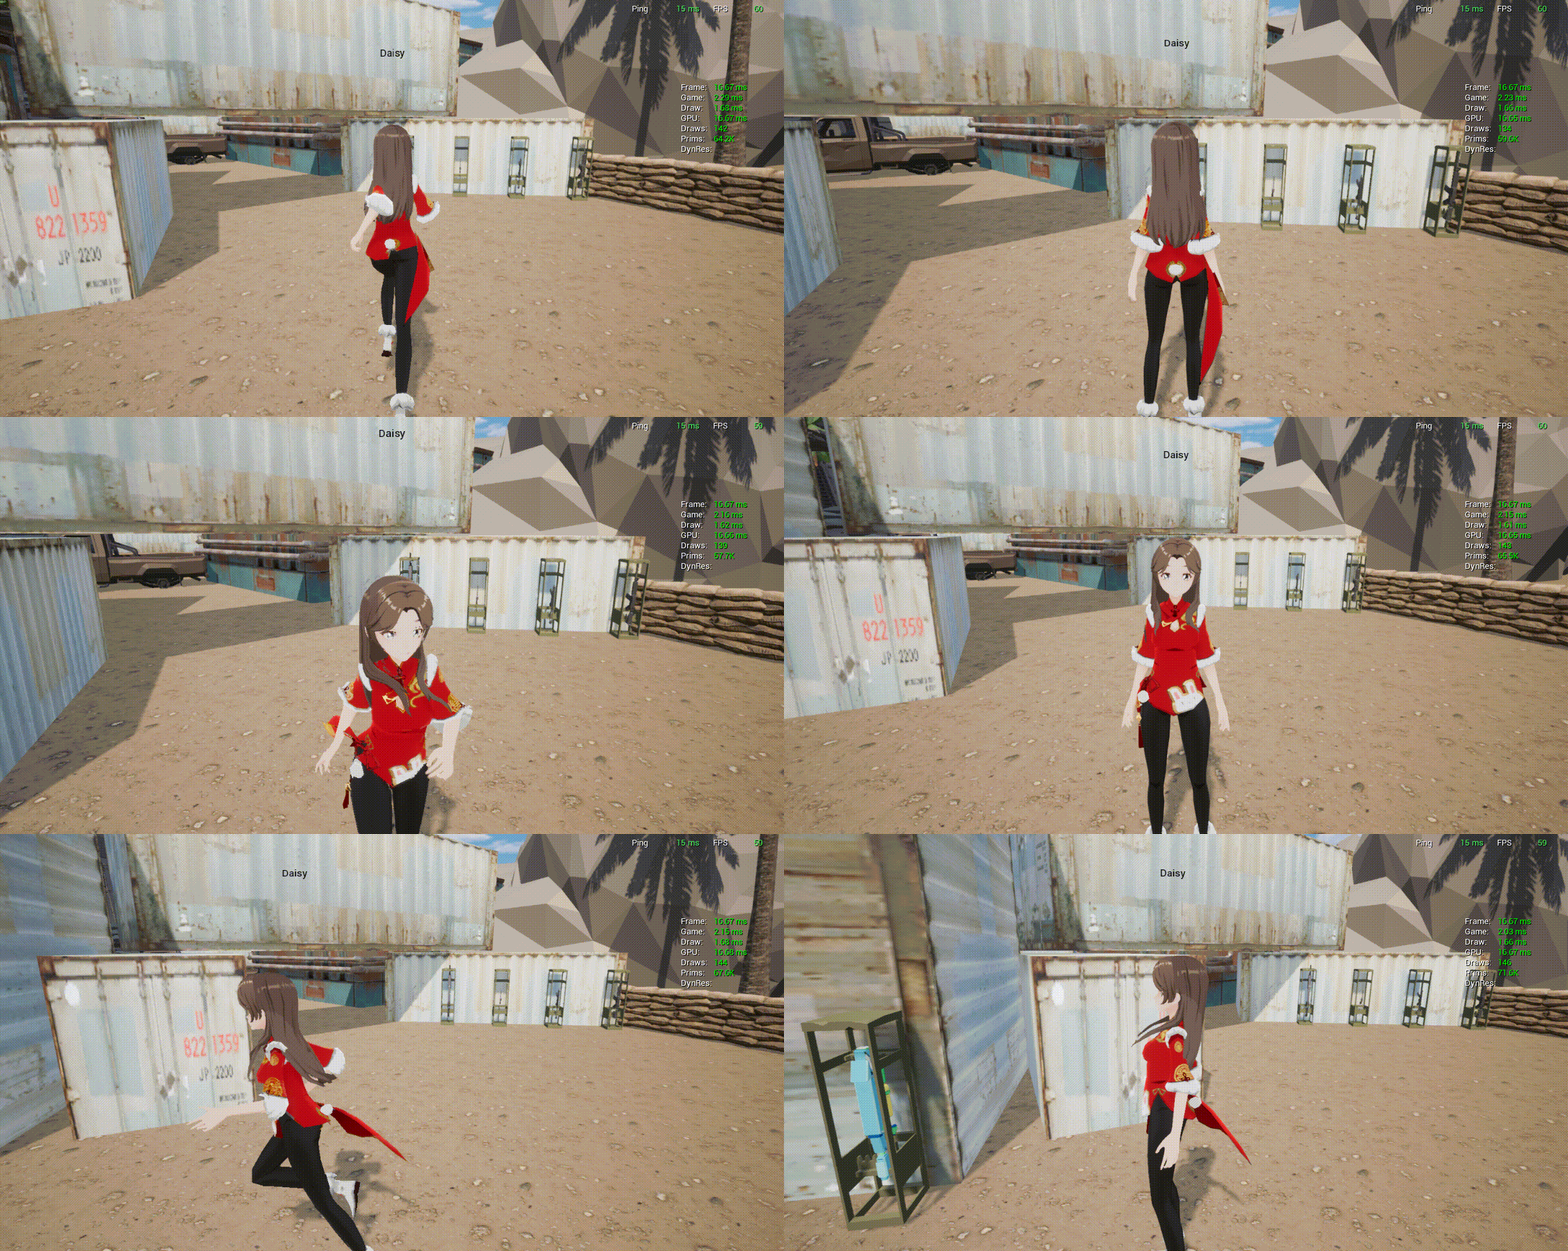 |
|---|---|
| Position delay speed = 2 | 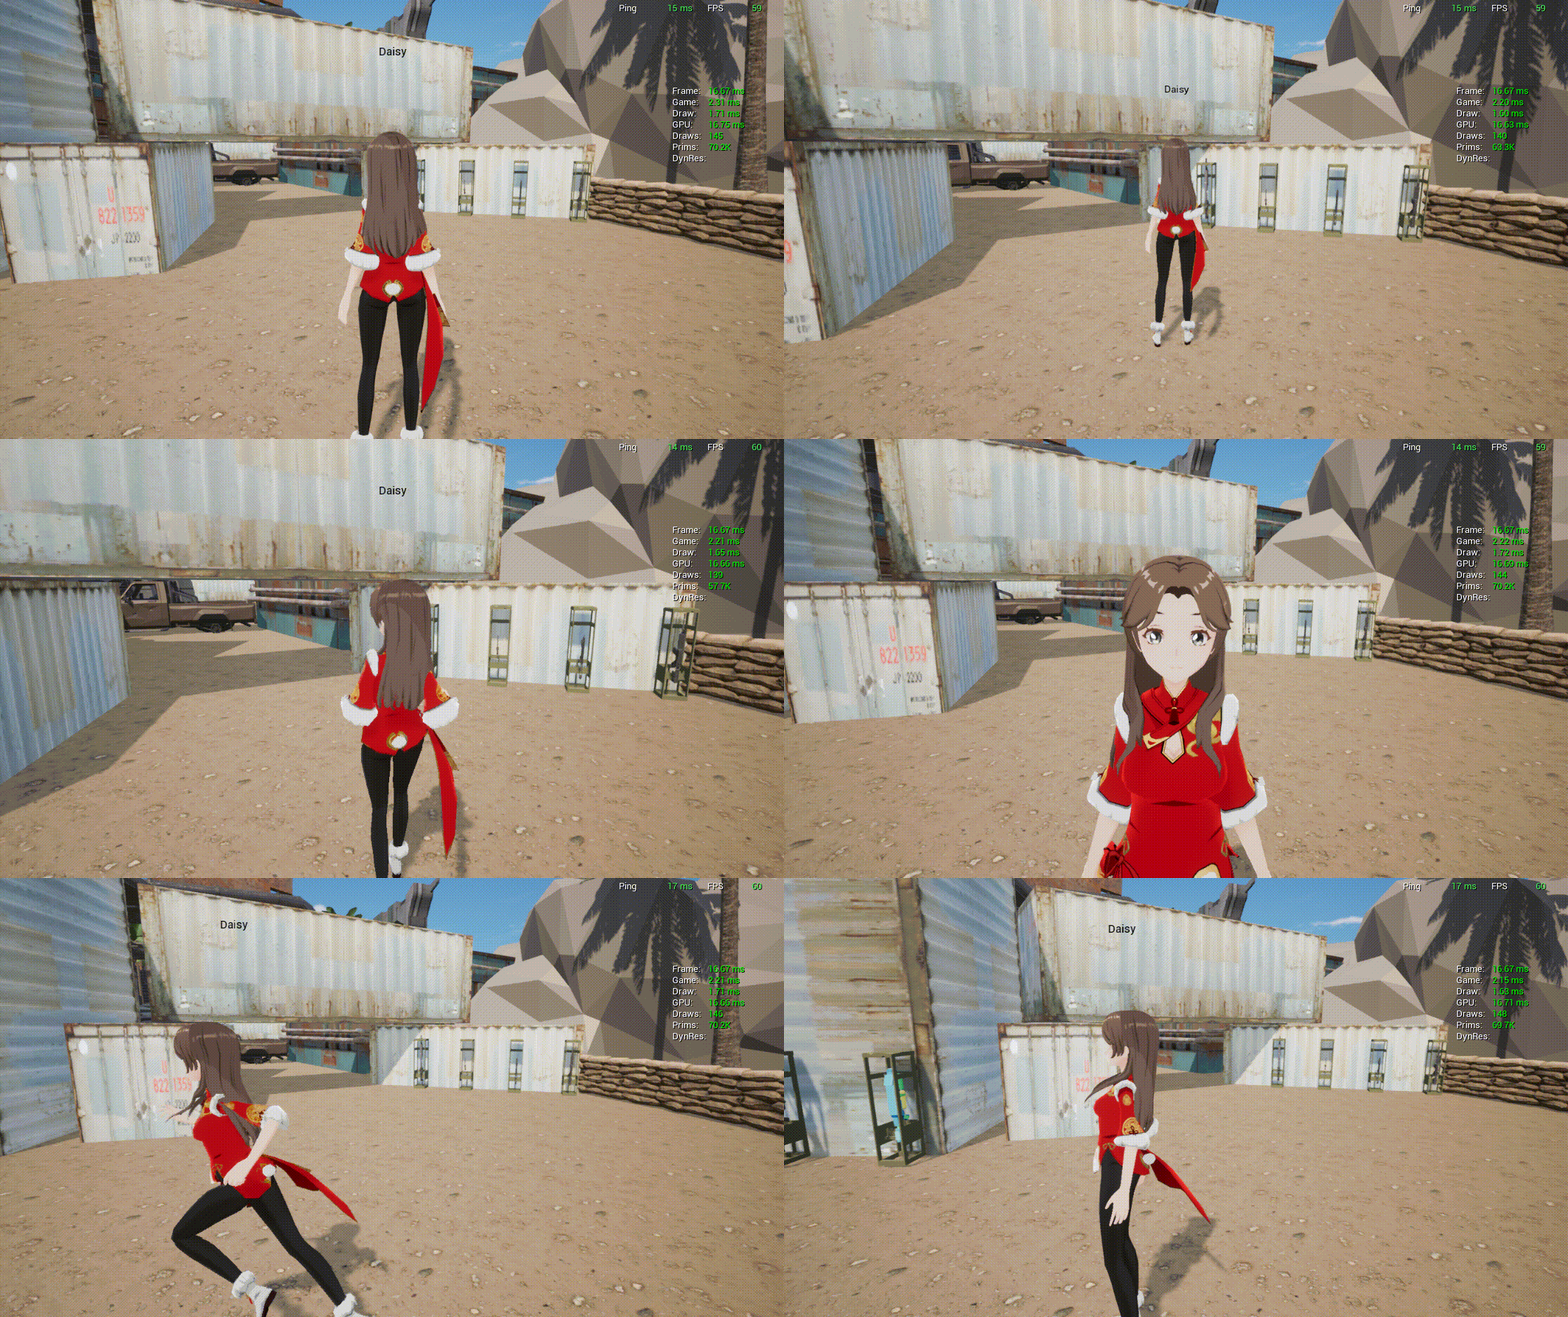 |
| Position delay speed = 0 or OFF | 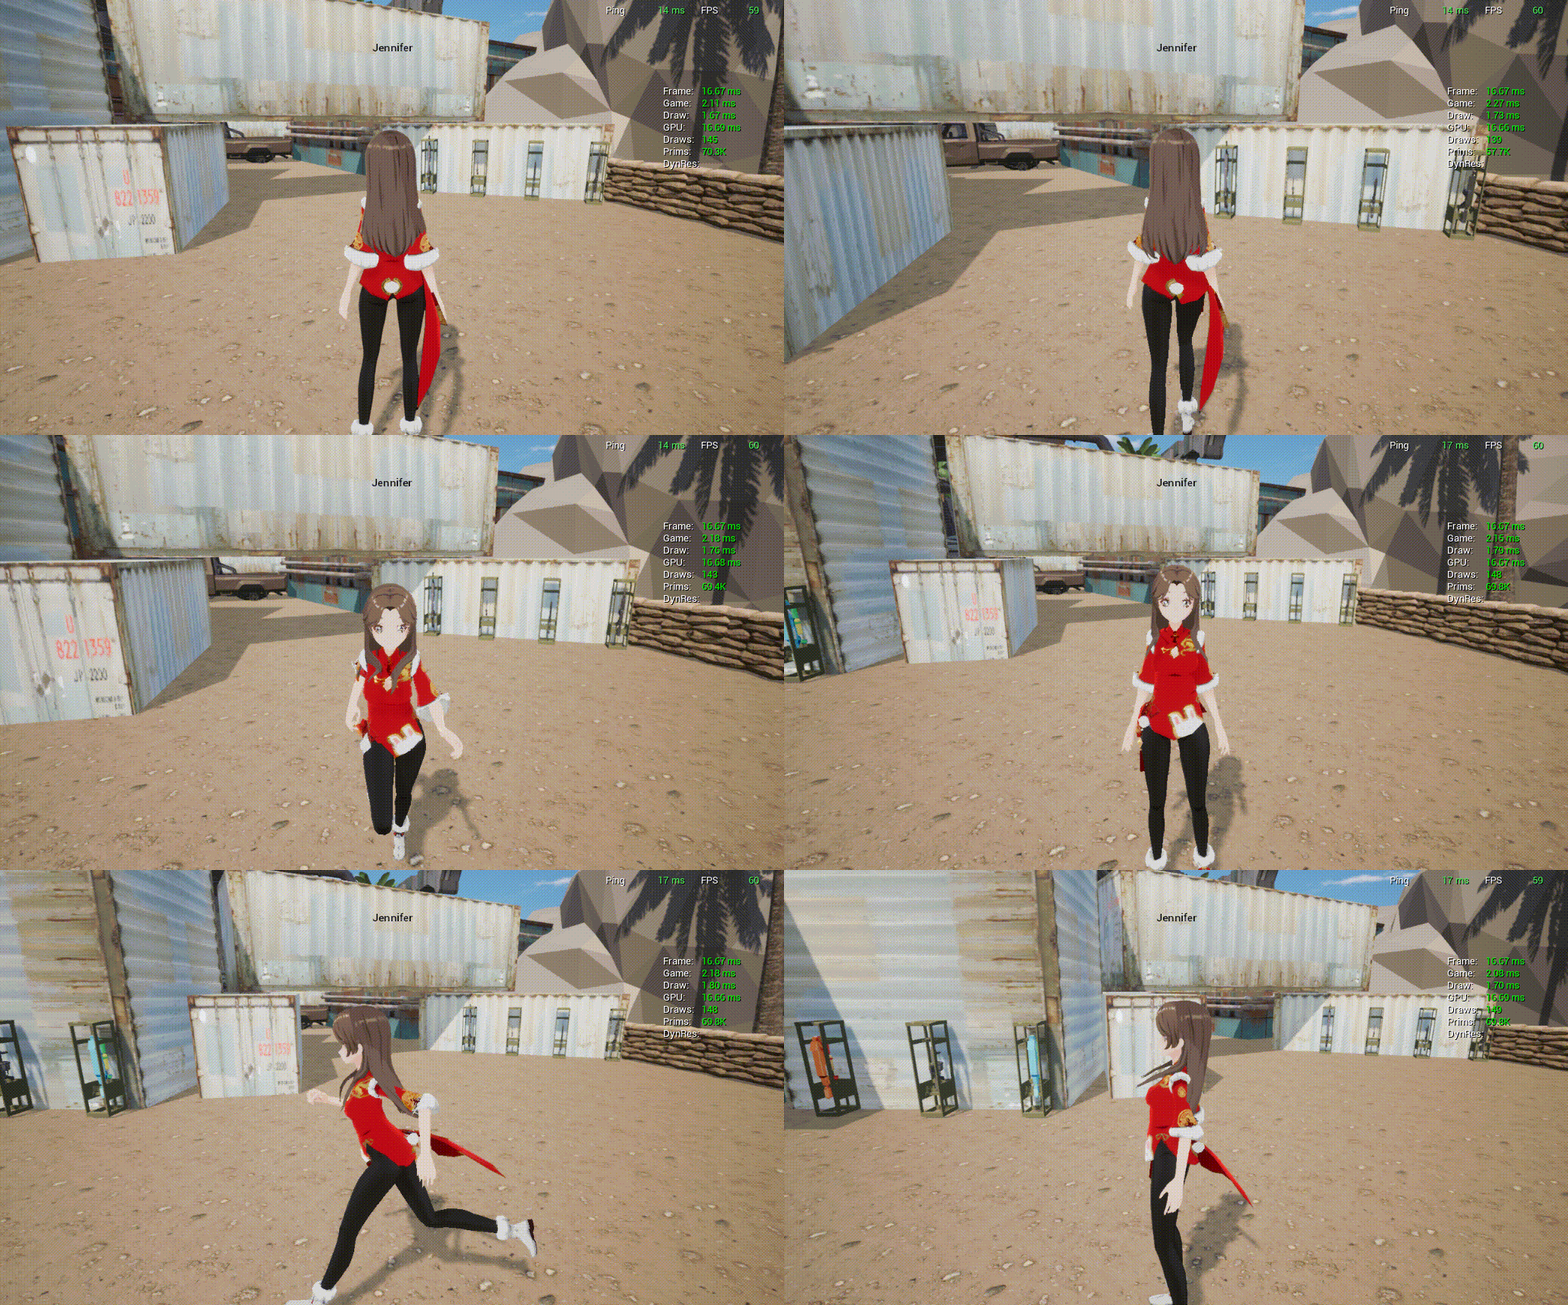 |
Enable Camera Rotation Delay
- When camera rotation delay is turned on, there is a delay effect when the finger/mouse controls the camera slide area for angle rotation.
Enable Camera Rotation Delay
- Controls the speed at which the camera reaches the target position when the viewing angle is rotating. Low values are slow (high latency), high values are fast (low latency), and zeros are immediate (no latency).
| Rotation delay speed = 8 | 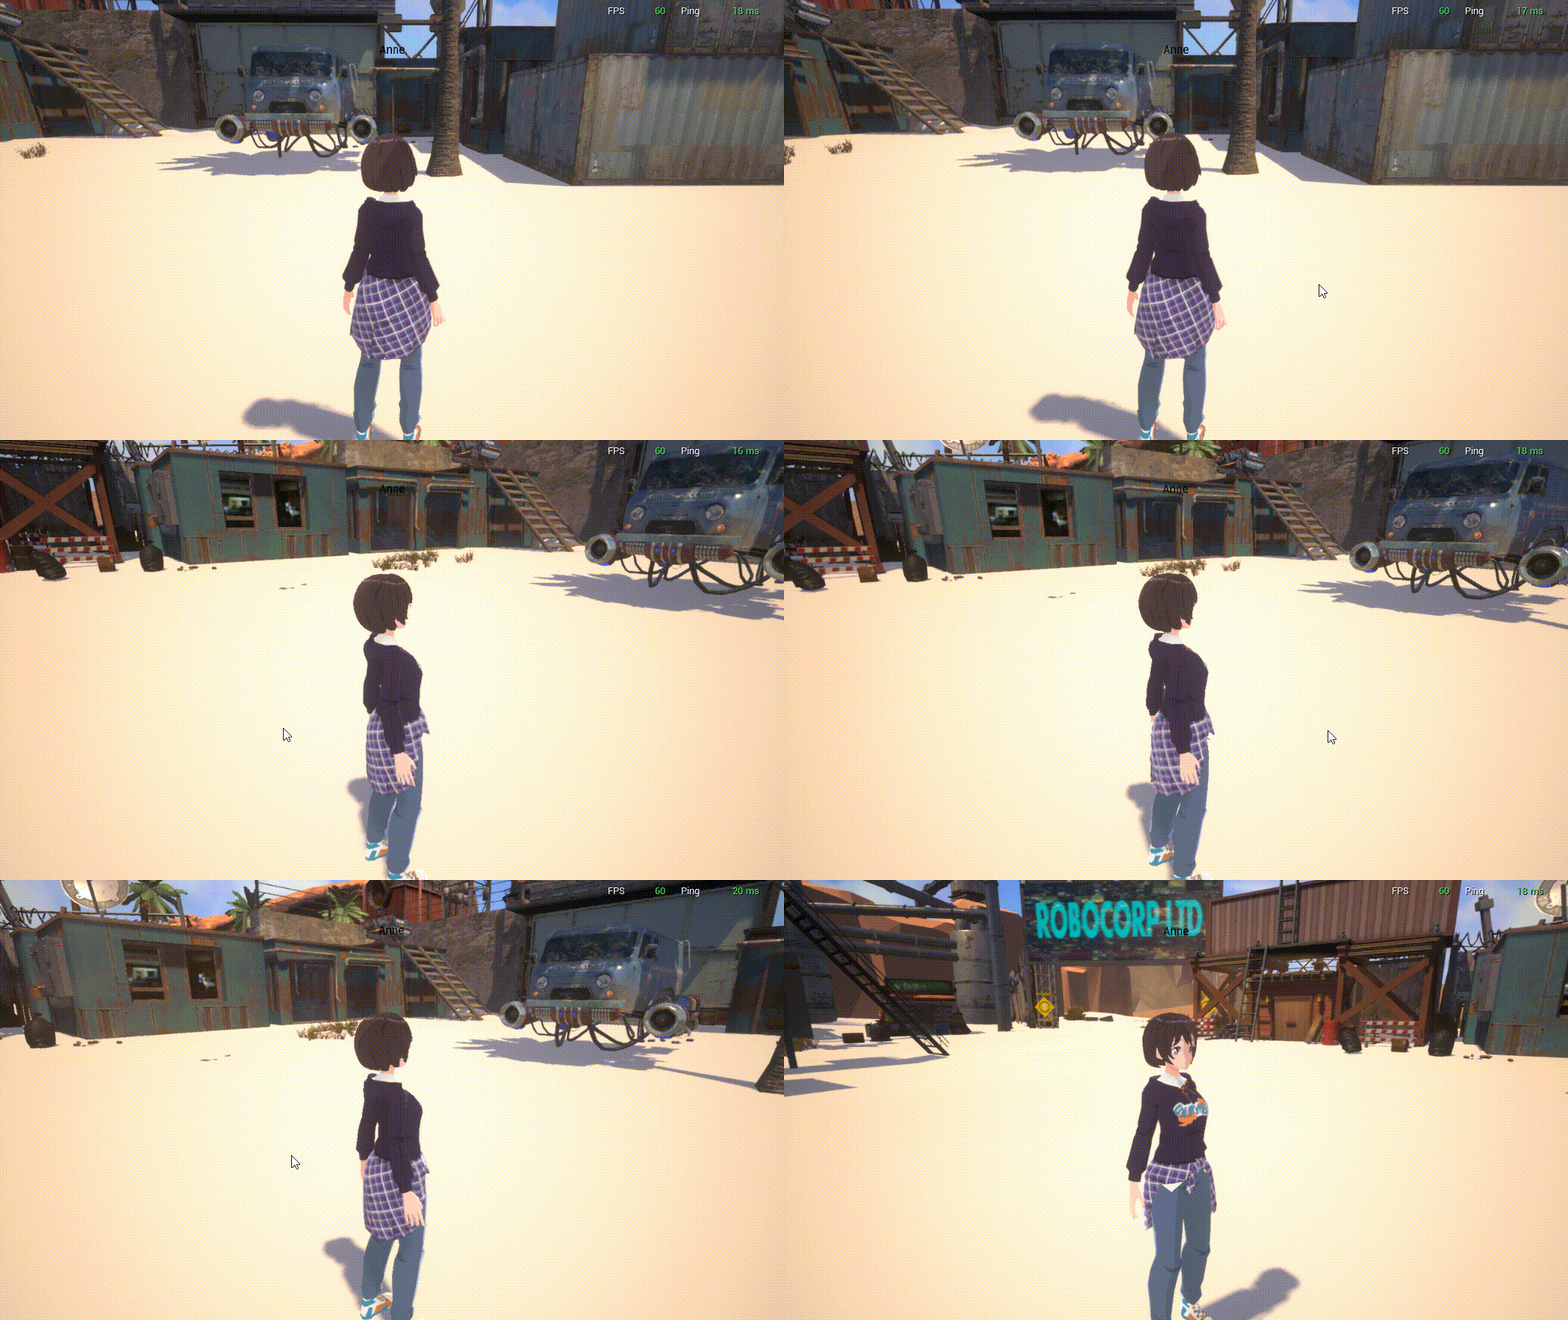 |
|---|---|
| Rotation delay speed = 2 | 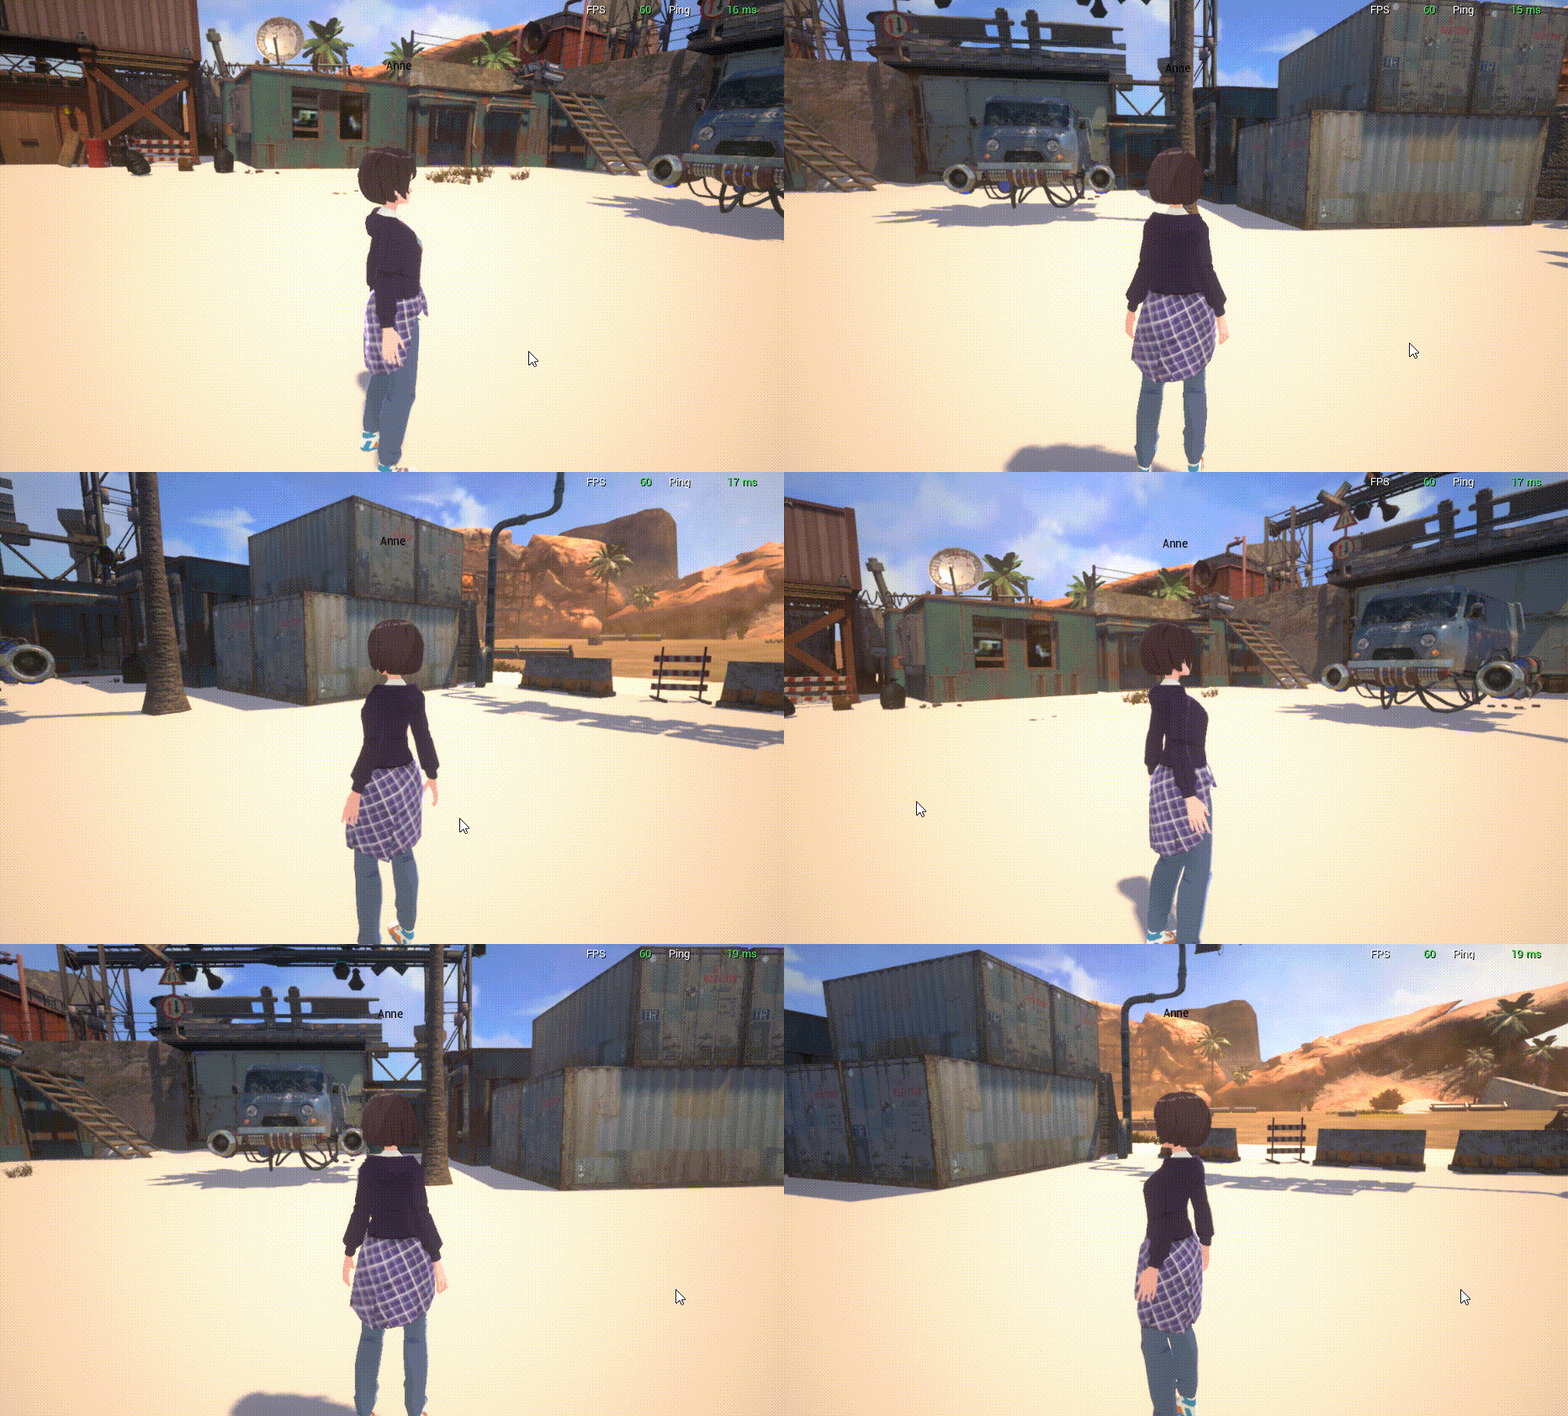 |
| Rotation delay speed = 0 or OFF | 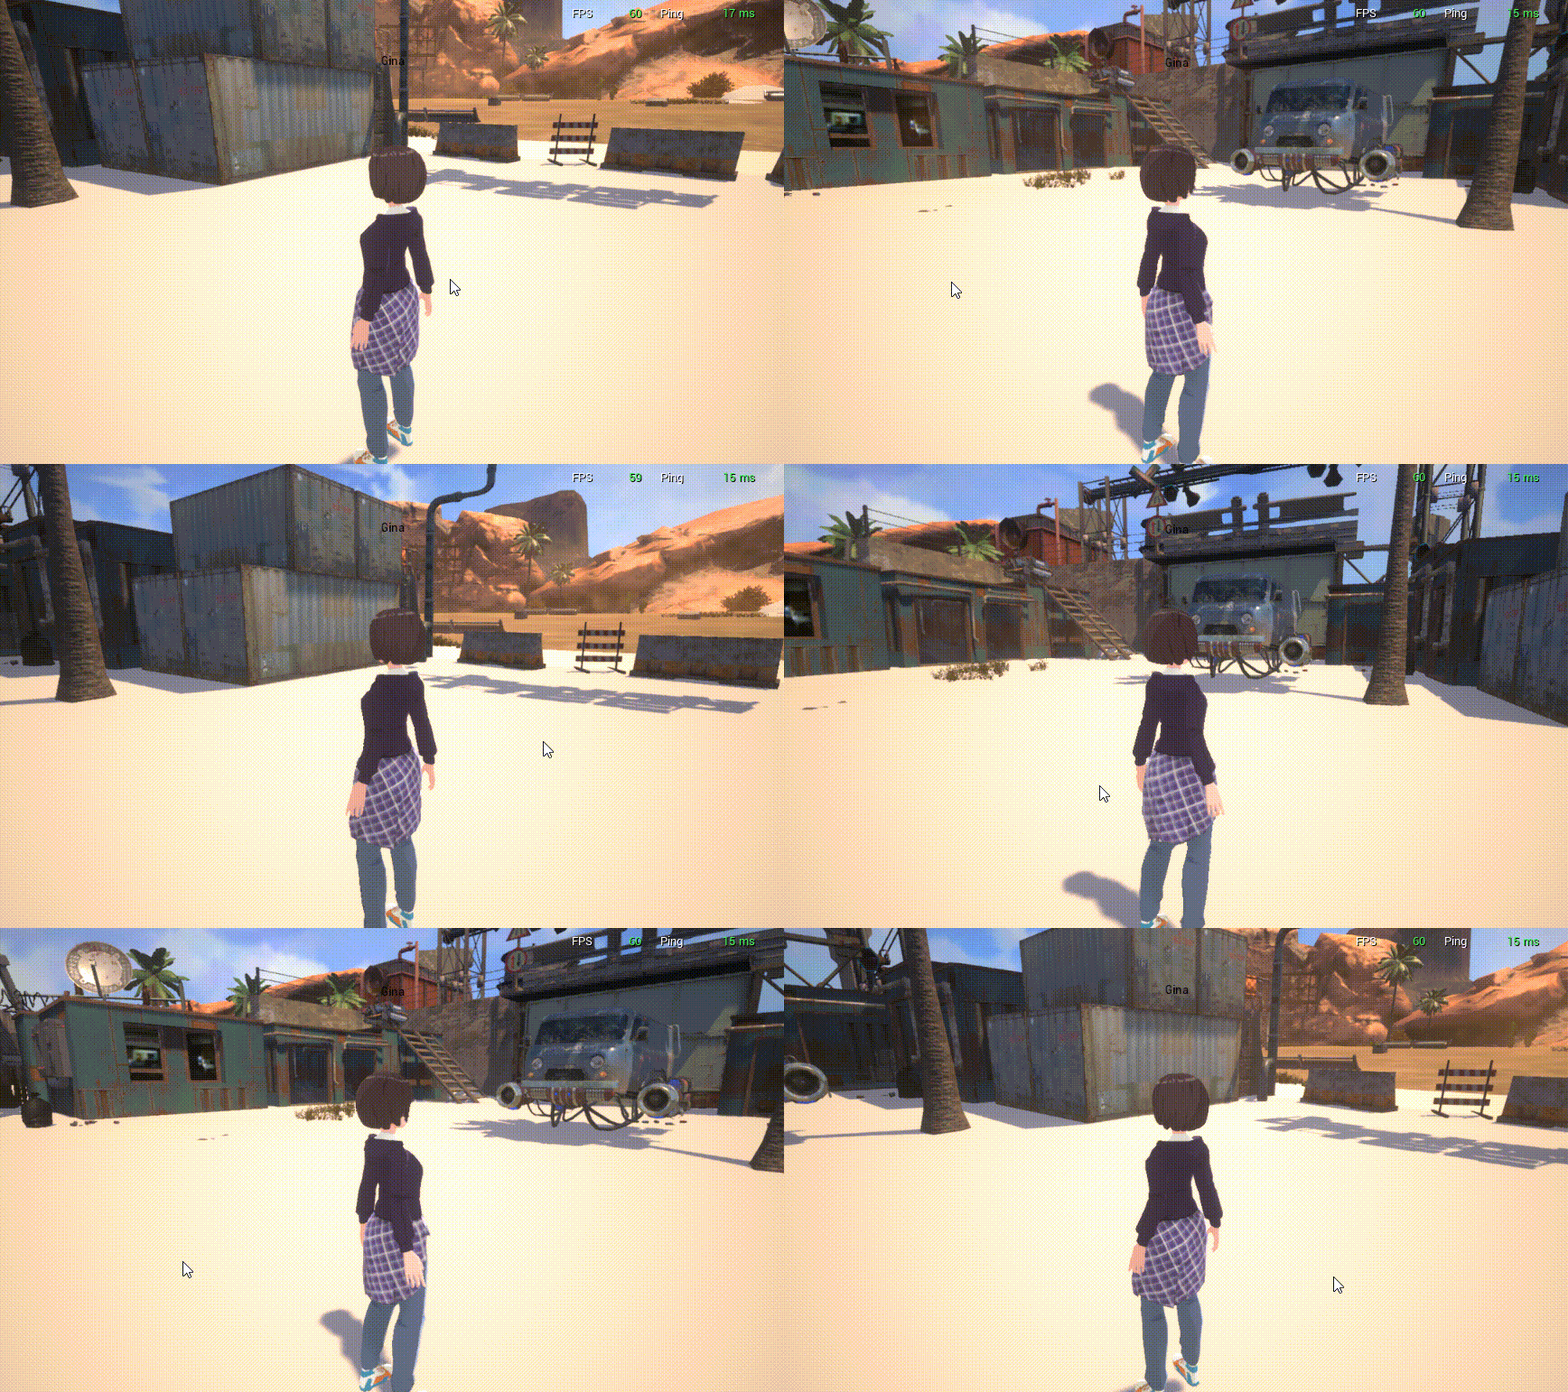 |
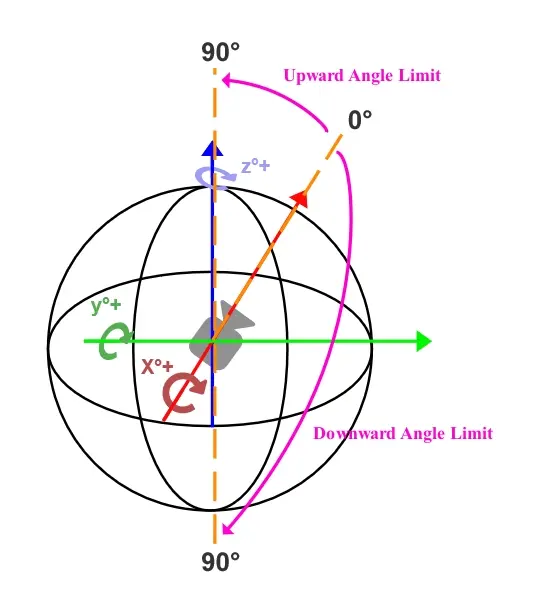
Upward Angle Limit
- The maximum angle at which the camera rotates upwards, preventing rotation below the character model, resulting in a model clipping effect.
- Range: 0~90° The greater the value, the greater the angle of rotation.
Downward Angle Limit
- The maximum angle at which the camera rotates down, preventing rotation above the character model, resulting in a model clipping effect.
- Range: 0~90° The greater the value, the greater the angle of rotation.
- Picture of Angle Limit:
Enable Fade Obstruction
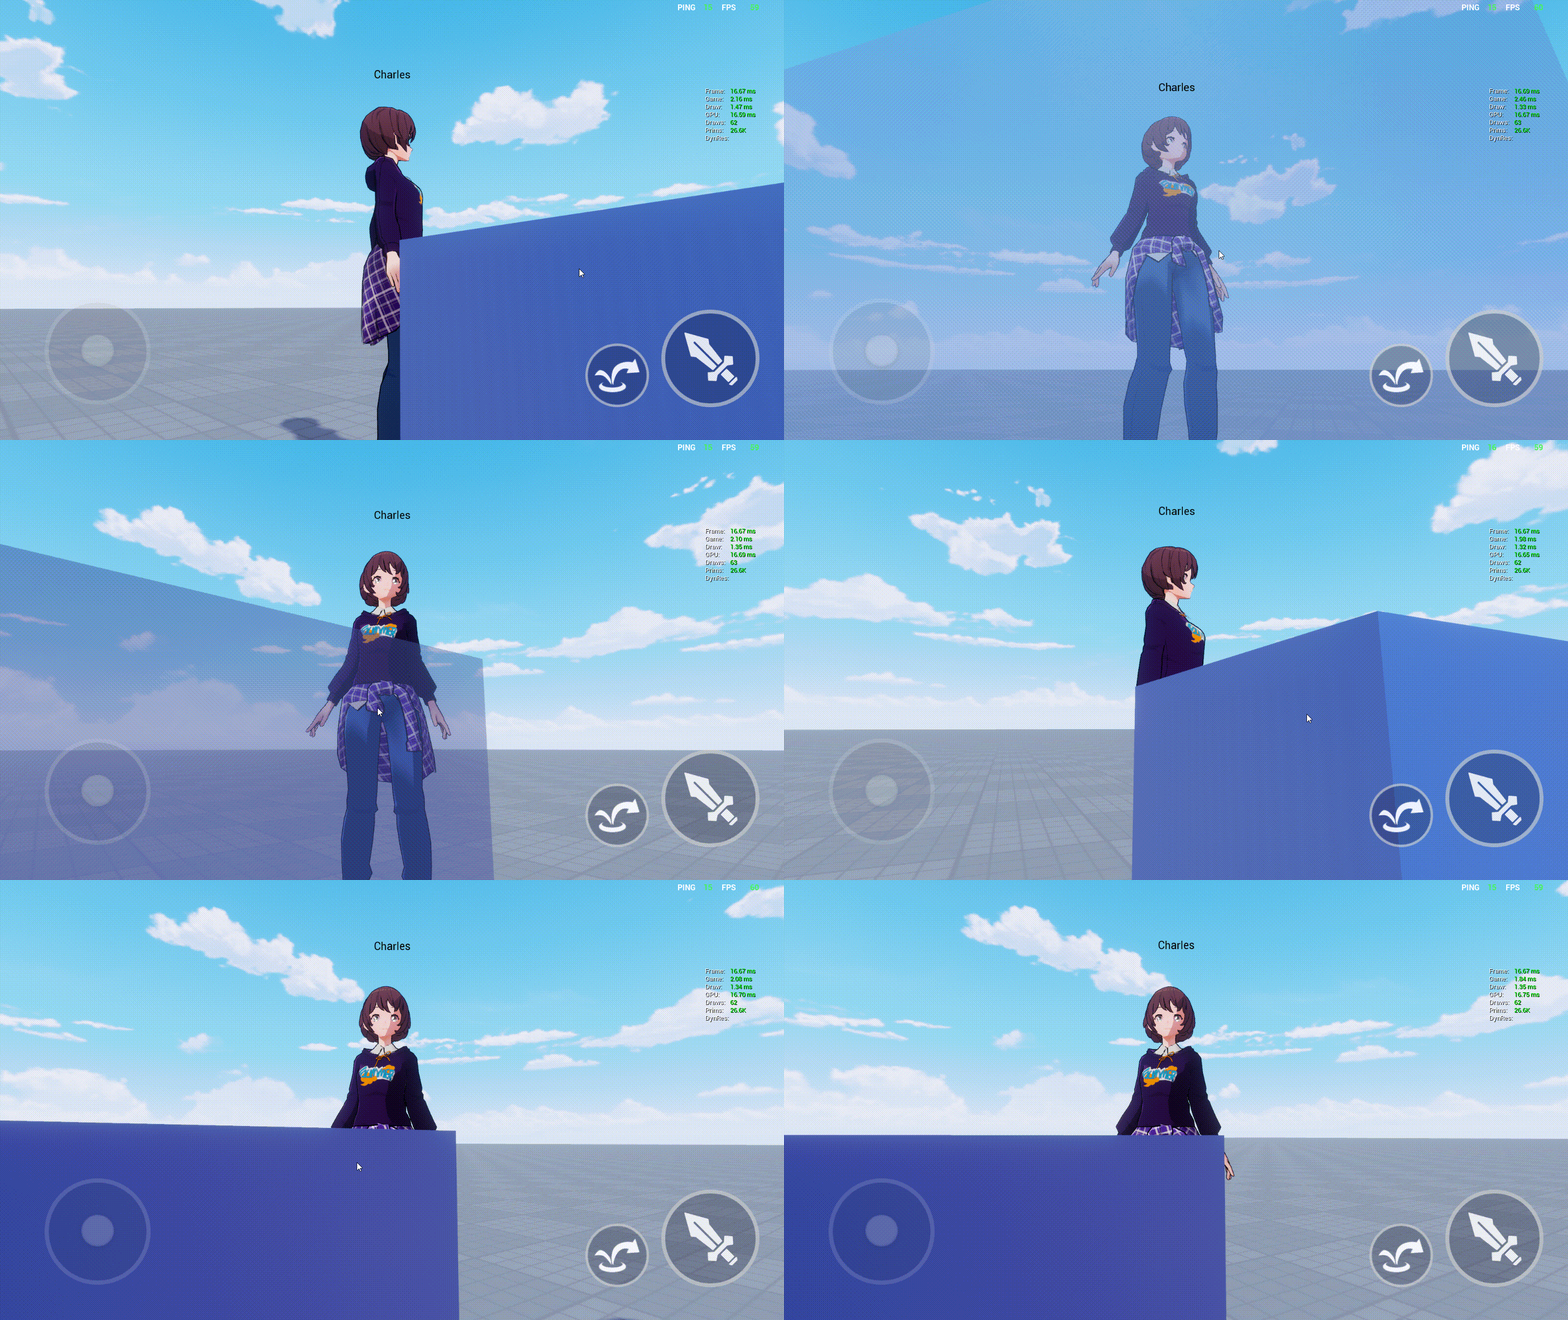
- When activated, it makes obstacles transparent when there are other obstacles between the camera and the character.
Fade Obstruction Opacity
- Adjust the opacity of obstacles when they become transparent.
How to dynamically modify camera effects through API?
Example 1: Adjust Field of View and Camera Position to Achieve Sniper Gun Aim
- Now, let's create an aiming effect of the sniper rifle in an FPS shooting game. Using the preset FPS shooting angle in the non-aiming state, the camera can see the handheld sniper rifle; when in the aiming state, the camera displays the screen seen in the scope and can no longer see the handheld sniper rifle.
- So, we need to deal with the logic:
- Reduce the field of view to simulate the image in the scope.
- Move the camera position forward to remove the sniper rifle from the screen.
- Reduce the sensitivity of the shooting joystick to prevent adjusting the aiming direction when aiming.
- Example script:
// Press the shooting joystick to aim
		fireButton.onJoyStickDown.add(() => {
			// Reduce the field of view to simulate the image in the scope.
			Camera.currentCamera.fov=70
			// Move the camera position forward to remove the sniper rifle from the screen
			let cameradata=Camera.currentCamera.localTransform
			cameradata.position.x+=100
			Camera.currentCamera.localTransform=cameradata
			// Reduce the sensitivity of the shooting joystick to prevent adjusting the aiming direction when aiming.
			fireButton.inputScale=(new Vector2(0.04, 0.03))
		});

		// Release the joystick to fire bullets and return to the original TPS shooting angle
		fireButton.onJoyStickUp.add(() => {
			Event.dispatchToLocal("FIRE_CLICK_Gun");
			// Restore the preset TPS shooting angle and reset the camera position and field of view.
			Camera.currentCamera.preset=4
			// Restore the original shooting joystick sensitivity
			fireButton.inputScale=(new Vector2(0.08, 0.06))
		});
// Press the shooting joystick to aim
fireButton.onJoyStickDown.add(() => {
// Reduce the field of view to simulate the image in the scope.
Camera.currentCamera.fov=70
// Move the camera position forward to remove the sniper rifle from the screen
let cameradata=Camera.currentCamera.localTransform
cameradata.position.x+=100
Camera.currentCamera.localTransform=cameradata
// Reduce the sensitivity of the shooting joystick to prevent adjusting the aiming direction when aiming.
fireButton.inputScale=(new Vector2(0.04, 0.03))
});
// Release the joystick to fire bullets and return to the original TPS shooting angle
fireButton.onJoyStickUp.add(() => {
Event.dispatchToLocal("FIRE_CLICK_Gun");
// Restore the preset TPS shooting angle and reset the camera position and field of view.
Camera.currentCamera.preset=4
// Restore the original shooting joystick sensitivity
fireButton.inputScale=(new Vector2(0.08, 0.06))
});Example 2: Dynamically switch camera position and orientation modes
- Dynamically switch camera position mode and fixed mode by adjusting the positionMode and rotationMode properties
- You can also enable the controller to operate the camera useControllerRotation to switch the camera orientation mode
- When rotationMode=RotationControl, the direction of the spring arm does not correspond to the relative rotation of the spring arm.localTransform.rotation, but needs to be obtained or set with the controller rotation (Player.getControllerRotation/Player.setControllerRotation ).
- Example script:
import DefaultUI_generate from "./ui-generate/DefaultUI_generate";

@UIBind('')
export default class UIDefault extends DefaultUI_generate {

    /** Call non-template instances only once during game time */
    protected onStart() {
        // Set whether onUpdate can be triggered per frame
        this.canUpdate = false;


        //LocationFixed
        this.mStaleButton.onClicked.add(() => {
			Camera.currentCamera.positionMode=0
        })
        //LocationFollow
		this.mStaleButton_1.onClicked.add(() => {
			Camera.currentCamera.positionMode=1
        })

        //RotationFixed
        this.mStaleButton_2.onClicked.add(() => {
			Camera.currentCamera.rotationMode=0
		})
        //RotationFollow
        this.mStaleButton_3.onClicked.add(() => {
			Camera.currentCamera.rotationMode=1
		})
        //RotationControl
        this.mStaleButton_4.onClicked.add(() => {
			Camera.currentCamera.rotationMode=2
		})
    }
}
import DefaultUI_generate from "./ui-generate/DefaultUI_generate";
@UIBind('')
export default class UIDefault extends DefaultUI_generate {
/** Call non-template instances only once during game time */
protected onStart() {
// Set whether onUpdate can be triggered per frame
this.canUpdate = false;
//LocationFixed
this.mStaleButton.onClicked.add(() => {
Camera.currentCamera.positionMode=0
})
//LocationFollow
this.mStaleButton_1.onClicked.add(() => {
Camera.currentCamera.positionMode=1
})
//RotationFixed
this.mStaleButton_2.onClicked.add(() => {
Camera.currentCamera.rotationMode=0
})
//RotationFollow
this.mStaleButton_3.onClicked.add(() => {
Camera.currentCamera.rotationMode=1
})
//RotationControl
this.mStaleButton_4.onClicked.add(() => {
Camera.currentCamera.rotationMode=2
})
}
}Example 3: Switching between multiple cameras
- As mentioned above, in addition to the Object Manager - World having its own camera object that can't be deleted, we can also create any camera object dynamically by dragging it from the Asset Library - Gameplay Object. Here's how to use the switch interface to switch freely between multiple camera objects.
- When switching cameras, you can switch to a new camera in an instant. You can also use various mixing effects provided by the editor to complete the mirror movement effect with uniform/variable speed.
- Tips: The property values of each camera object and its spring arm are independent. If you want to transform various camera effects in the game, you can consider two implementation ideas.
- If the effects of various cameras are not very different, we can use the same camera object to switch the effects by modifying the properties; or if you want to make the cameras mount on different characters or models, you can modify the parent of this camera object with the parent interface (when using the parent interface, remember that if the parent is set to the character will keep the relative position of the previous spring arm unchanged, while the world position will change. If the parent is set to other objects, the world position of spring arm will remain unchanged, while the relative position will change. if you want to keep relative position of the spring arm unchanged before and after switching parents, it is recommended to store the value of the relative position of spring arm first and reset it after switching parents)
- If the various camera effects are quite different and need to adjust more properties, we can create multiple camera objects, each of which is used to achieve a specific effect, or each mounted on a different character or model, and then switch the effects through the switch interface.
- Example script:
@Component
 export default class Example_Camera_Switch extends Script {
     // This function is called before the first frame update when the script is instanced
     protected onStart(): void {
         // The following code executes only on the client side
         if(SystemUtil.isClient()) {
             // Get the current camera
             let myCamera = Camera.currentCamera;
             let curCameraIndex = -1;
             // Randomly create 5 cameras in the scene
             let cameraArray = new Array<Camera>();
             for (let i = 0; i< 5;i++) {
                 let camera = GameObject.spawn("Camera") as Camera;
                 camera.worldTransform.position = new Vector(MathUtil.randomInt(-1000, 1000), MathUtil.randomInt(-1000, 1000),MathUtil.randomInt(0, 1000));
                 camera.worldTransform.rotation = new Rotation(MathUtil.randomInt(-90, 90), MathUtil.randomInt(-30, 30),MathUtil.randomInt(-150, 150));
                 cameraArray.push(camera);
                 camera.onSwitchComplete.add(() => {
                     console.log("Current Camera Index" + i);
                     curCameraIndex = i;
                 });
             }
             // Add a button method: press keyboard "1" to switch cameras
             InputUtil.onKeyDown(Keys.One, () => {
                 console.log("Switch Camera");
                 let newCamera = (curCameraIndex + 1) % 5;
                 Camera.switch(cameraArray[newCamera], 5, CameraSwitchBlendFunction.Linear);
             });
             // Add a button method: press keyboard "2" to switch back to the default camera
             InputUtil.onKeyDown(Keys.Two, () => {
                 console.log("Switch Default Camera");
                 Camera.switch(myCamera);
             });
         }
     }
 }
@Component
export default class Example_Camera_Switch extends Script {
// This function is called before the first frame update when the script is instanced
protected onStart(): void {
// The following code executes only on the client side
if(SystemUtil.isClient()) {
// Get the current camera
let myCamera = Camera.currentCamera;
let curCameraIndex = -1;
// Randomly create 5 cameras in the scene
let cameraArray = new Array<Camera>();
for (let i = 0; i< 5;i++) {
let camera = GameObject.spawn("Camera") as Camera;
camera.worldTransform.position = new Vector(MathUtil.randomInt(-1000, 1000), MathUtil.randomInt(-1000, 1000),MathUtil.randomInt(0, 1000));
camera.worldTransform.rotation = new Rotation(MathUtil.randomInt(-90, 90), MathUtil.randomInt(-30, 30),MathUtil.randomInt(-150, 150));
cameraArray.push(camera);
camera.onSwitchComplete.add(() => {
console.log("Current Camera Index" + i);
curCameraIndex = i;
});
}
// Add a button method: press keyboard "1" to switch cameras
InputUtil.onKeyDown(Keys.One, () => {
console.log("Switch Camera");
let newCamera = (curCameraIndex + 1) % 5;
Camera.switch(cameraArray[newCamera], 5, CameraSwitchBlendFunction.Linear);
});
// Add a button method: press keyboard "2" to switch back to the default camera
InputUtil.onKeyDown(Keys.Two, () => {
console.log("Switch Default Camera");
Camera.switch(myCamera);
});
}
}
}Example implementation effect:
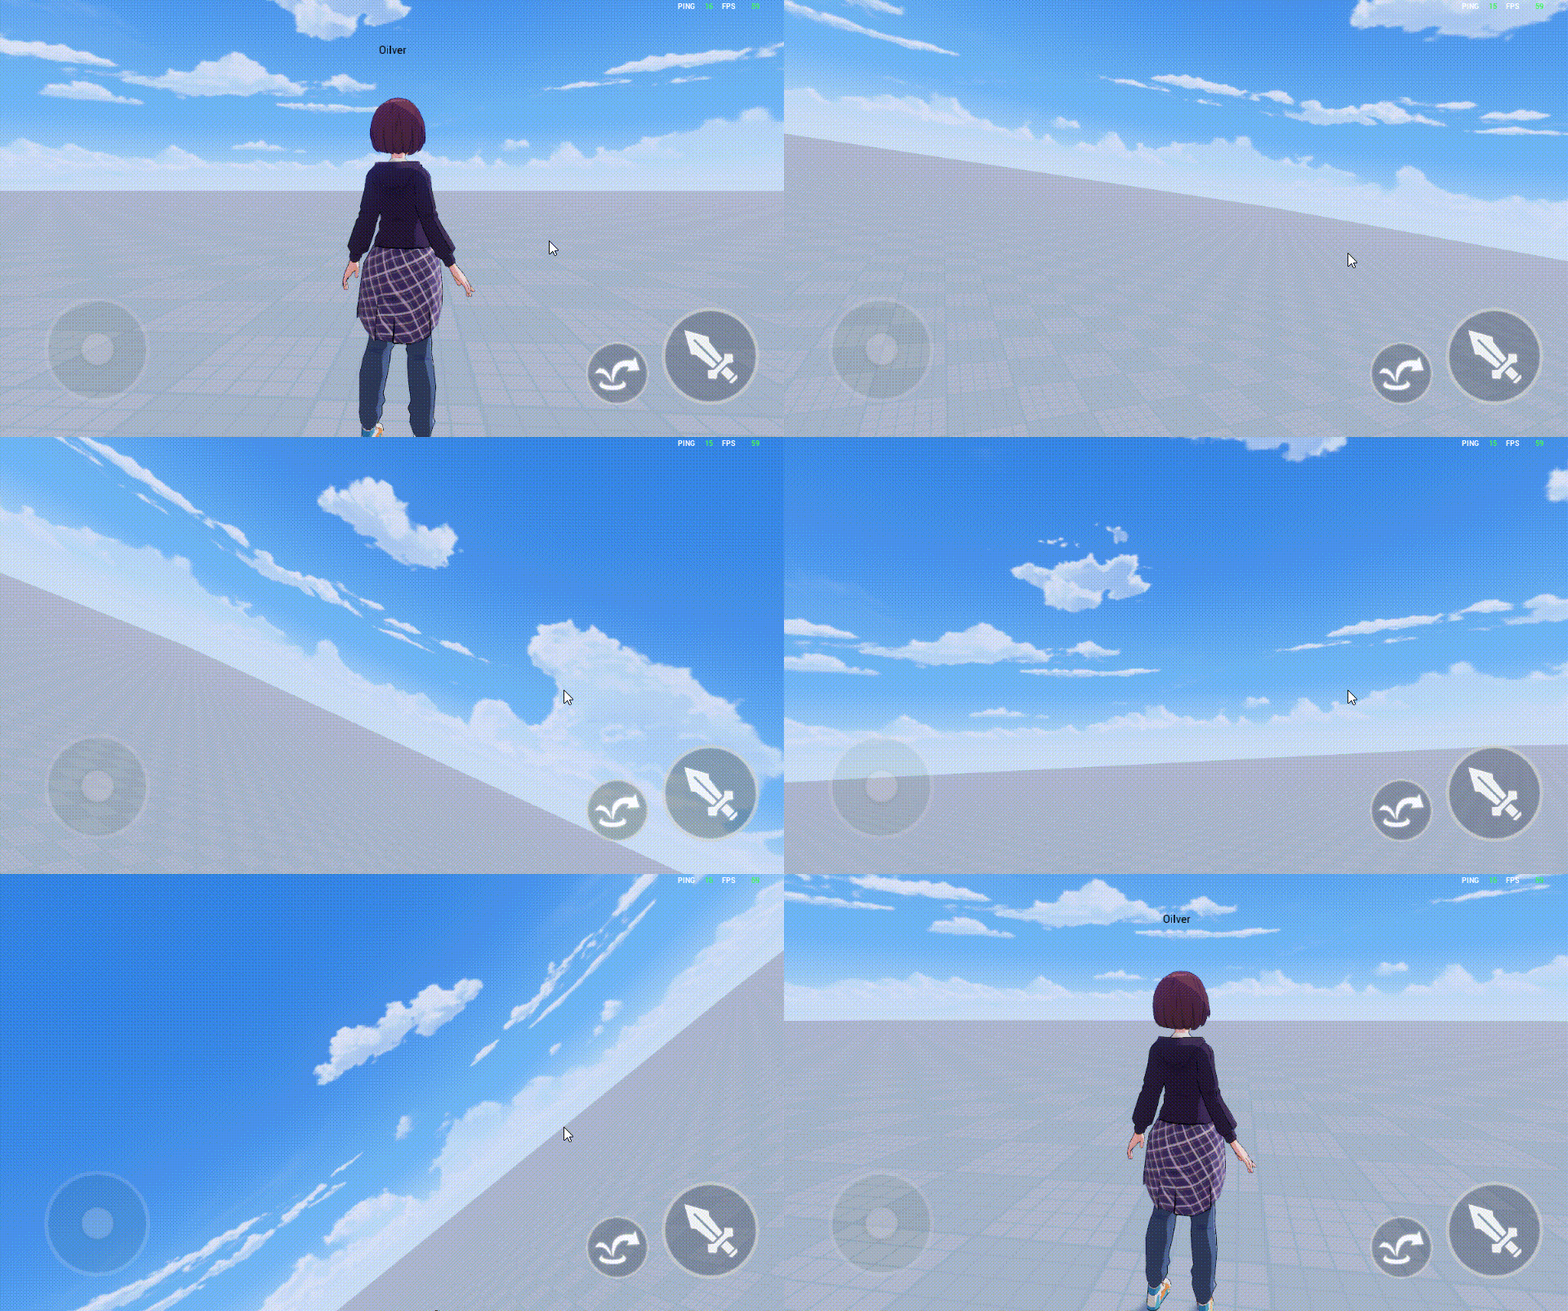
To create a new camera object and switch it over, you can refer to the following sample code:
@Component
 export default class Example_Camera_Switch extends Script {
     // This function is called before the first frame update when the script is instanced
     protected onStart(): void {
         // The following code executes only on the client side
         if(SystemUtil.isClient()) {
	        // Get the current camera
	        let myCamera = Camera.currentCamera;
		// Create and set up a second camera to mount on the character
		let camera = GameObject.spawn<Camera>("Camera") as Camera;
		camera.parent=Player.localPlayer.character
		camera.positionMode=1
		camera.rotationMode=2
		camera.springArm.useControllerRotation=true
		camera.springArm.length=500
		camera.fov=90

		// Add a button method: press keyboard "1" to switch cameras
		InputUtil.onKeyDown(Keys.One, () => {
		    console.log("Switch Camera");
		    Camera.switch(camera);
		});
		// Add a button method: press keyboard "2" to switch back to the default camera
		InputUtil.onKeyDown(Keys.Two, () => {
		    console.log("Switch Default Camera");
		    Camera.switch(myCamera);
		});
         }
     }
 }
@Component
export default class Example_Camera_Switch extends Script {
// This function is called before the first frame update when the script is instanced
protected onStart(): void {
// The following code executes only on the client side
if(SystemUtil.isClient()) {
// Get the current camera
let myCamera = Camera.currentCamera;
// Create and set up a second camera to mount on the character
let camera = GameObject.spawn<Camera>("Camera") as Camera;
camera.parent=Player.localPlayer.character
camera.positionMode=1
camera.rotationMode=2
camera.springArm.useControllerRotation=true
camera.springArm.length=500
camera.fov=90
// Add a button method: press keyboard "1" to switch cameras
InputUtil.onKeyDown(Keys.One, () => {
console.log("Switch Camera");
Camera.switch(camera);
});
// Add a button method: press keyboard "2" to switch back to the default camera
InputUtil.onKeyDown(Keys.Two, () => {
console.log("Switch Default Camera");
Camera.switch(myCamera);
});
}
}
} Editor Doc