UI widgets - List view/Tile view/Tree view
It takes about 5 minutes to read this article
This article outlines instructions for UI widgets—List view/Tile view/Tree view.
What is List view/Tile view/Tree view?
- List view is a virtual list that can display a large number of entries. Compared to simply using Scroll Box combined with Container layout to accommodate multiple rows of entries, only visible entries are created within list view to improve performance. For example, a list view with only 5 items visible holds 50 Items and does not really create a UI of 50 items, but only creates a UI of 5 items that are currently actually visible. It is recommended to use the List View widget instead of the Scroll Box and Container Layout features when displaying more items in a list.
- As well as automatic Container layout is more difficult to maintain the order information of each entry, if maintaining the logic of exchanging entry positions and inserting new entries into specified positions, it is recommended to use list view/tile view/tree view.
- The tile view is similar to the list view except that the entries are arranged in tile sets.
- Tree views are also similar to list views, except that tree views support hierarchical lists with expanded/collapse items containing nesting items that can be used in editor plug-ins to description folder structures or object parent-child relationships.
- For transform/align/generic/render properties see UI widget base properties
List View/Tile View/Tree View Properties - Style
- Most operations on items in list view/tile view/tree view need to be controlled in script, and only some base styles in list view/tile view/tree view can be modified on the property panel.
Item UI
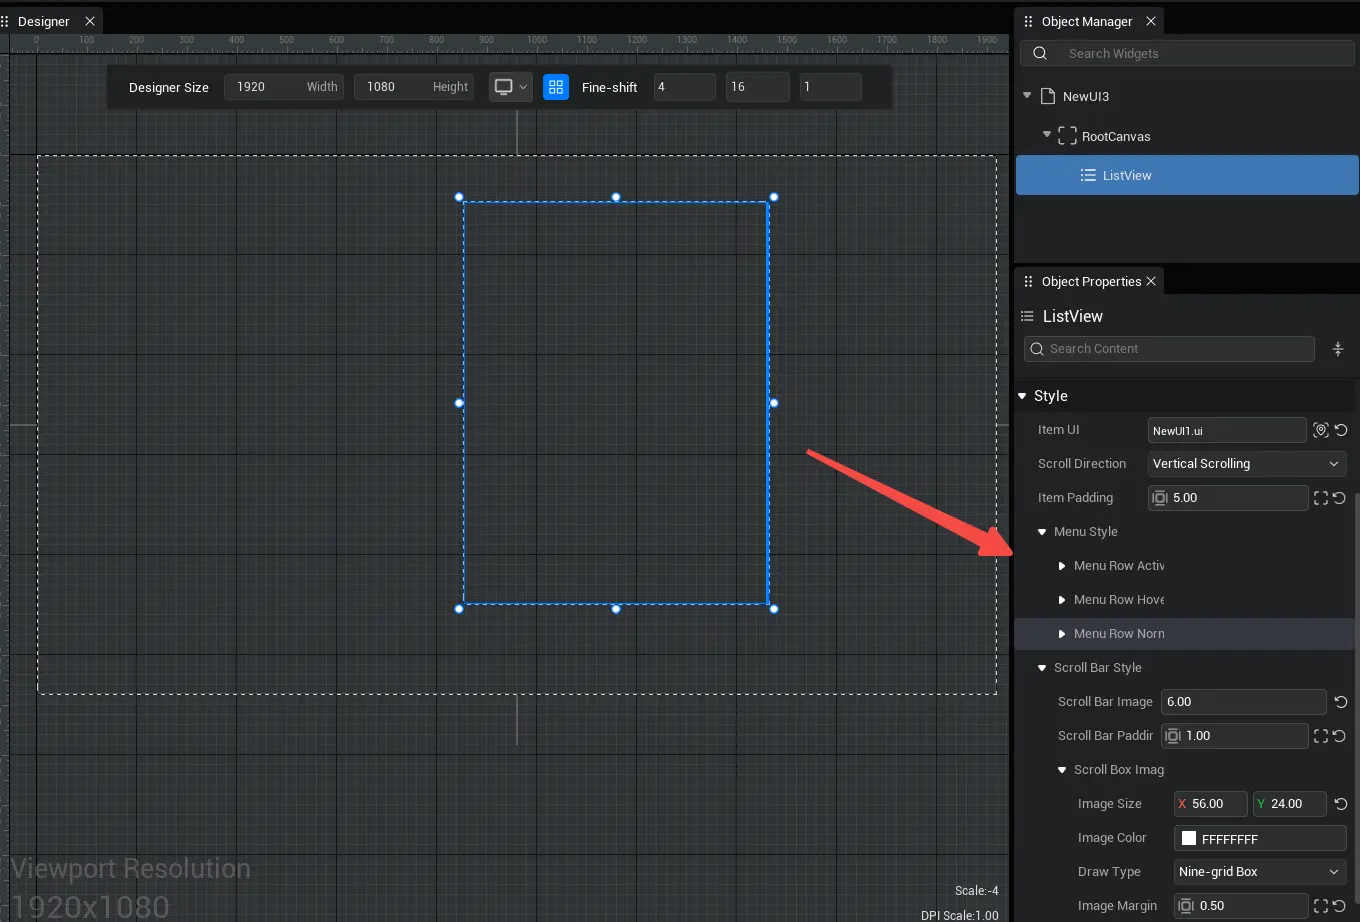
- Sets the default UI file bound for each item in this list view/tile view/tree view, which can be individually modified for each line item in the script by modifying the list view node data base class (i.e. ListViewItemDataBase).
- Note that the entry UI file can only be set on the property panel or when newObject is created dynamically. It cannot be set dynamically by script after creating a list view/tile view/tree view.
Scroll direction
- Sets the scroll orientation of scroll bars in list view/tile view/tree view, which determines whether each item UI is arranged horizontally or vertically.
Item Padding
- Used to modify the spacing between the UIs of items.
Menu Styles
Menu lines activate images / suspended images / normal images
- Sets the style of menu lines in the selected/suspended/normal states. These images appear below the project UI as the default project baseboard.
Scroll bar style
Scroll bar width / scroll bar image
- Sets the width of the scroll bar as well as the image, in the same way as the Scroll Box
Scroll Bar Padding
- The range of scroll bar widths to the right of the menu is the scroll bar initial position based on which scroll bar margins can have the scroll bar displayed in an offset position
How to use list view/tile view/tree view?
Using List View
- Below we achieve a basic list view with different numbers in order for each row.
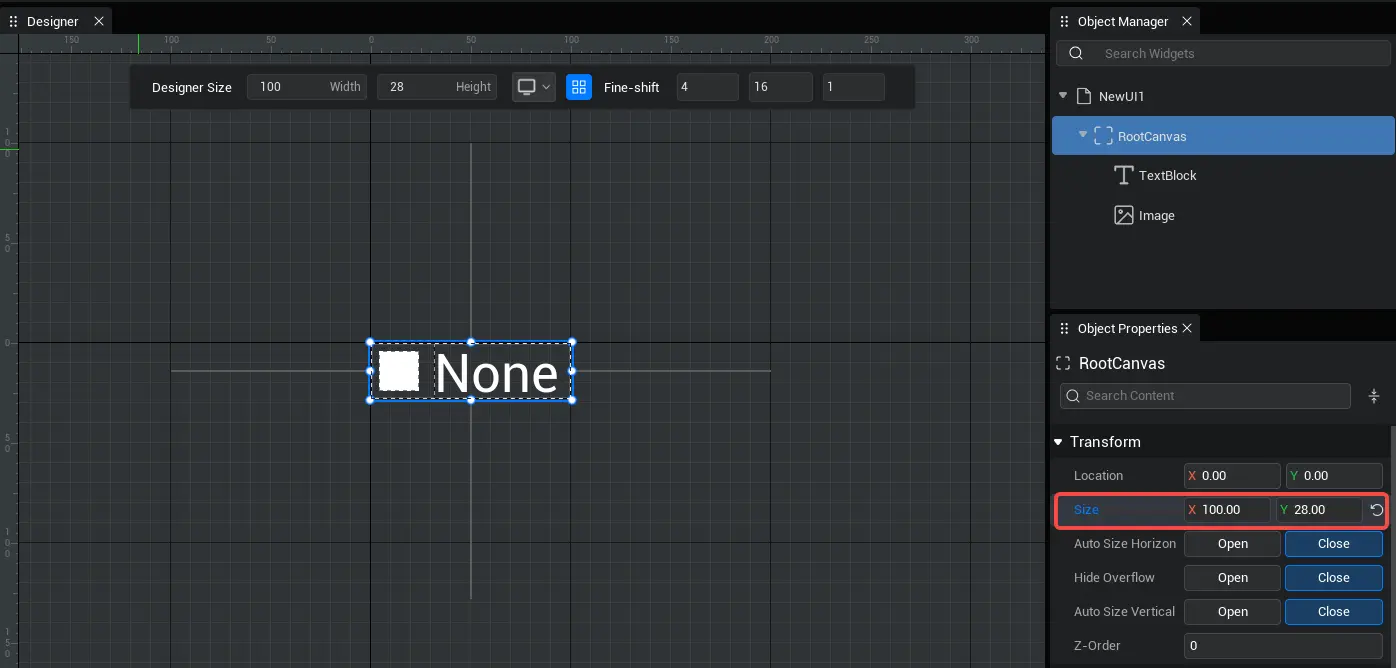
- Step 1: Create a new UI file that holds the default UI style for each project UI. Note that the size of the top RootCanvas layer determines the height of the project in the list view (in the vertical scrolling list view, the width of the list view determines the width of the project UI, while the horizontal scrolling list view is the opposite).

- Step 2: Create a list view, drag the entry UI file created in the previous step into the property panel, and modify the base style of the list view, including scroll orientation, entry margins, menu line style, scroll bar style.

- Step 3: Write the script corresponding to the entry UI file to get the text box in the UI file. Here we fill in the text box with the serial number of the list view achieving node data base class (ListViewItemDataBase). In the actual project, more logic can be written here so that each line item shows different content.
ts
// Inheritance achieves ListViewItemDataBase, since baseGuid is a unique value, not controllable, so just add a new customized data, which in this case is itemIndex
export default class ListViewItemData extends ListViewItemDataBase {
    itemIndex : number = 0

    constructor(index: number) {
        super()
        this.itemIndex = index
    }
}
// Inheritance achieves ListViewItemDataBase, since baseGuid is a unique value, not controllable, so just add a new customized data, which in this case is itemIndex
export default class ListViewItemData extends ListViewItemDataBase {
itemIndex : number = 0
constructor(index: number) {
super()
this.itemIndex = index
}
}ts
export default class NewUIScript1 extends UIScript {
  TextBlock : mw.TextBlock;

    protected onStart() {
        this.TextBlock = this.uiWidgetBase.findChildByPath('RootCanvas/TextBlock') as TextBlock;
    }

    set data(inRowData : ListViewItemData) {
        // Use itemIndex of inherited class as fixed index value
        this.TextBlock.text = inRowData.itemIndex.toString();
    }
}
export default class NewUIScript1 extends UIScript {
TextBlock : mw.TextBlock;
protected onStart() {
this.TextBlock = this.uiWidgetBase.findChildByPath('RootCanvas/TextBlock') as TextBlock;
}
set data(inRowData : ListViewItemData) {
// Use itemIndex of inherited class as fixed index value
this.TextBlock.text = inRowData.itemIndex.toString();
}
}- Step 4: Write the script corresponding to the UI file where the list view is located. Here we write a logic that presses the number key 1 to add a new item for easy testing:
- When a list view refresh onItemRefreshed is triggered, the performance of each UI item is refreshed by achieving a ListViewItemDataBase; actions such as adding/deleting/modifying/Player scrolling the list view/requesting a refresh all trigger a refresh, while emptying does not.
ts
export default class NewUIScript extends UIScript {

    /**
     * Initialize the UI file first at the right time after it has been successfully constructed
     */
    protected onStart() {
        this.ListView = this.uiWidgetBase.findChildByPath('RootCanvas/ListView') as mw.ListView;
        let index = 0
        // Press number key 1 to add new item
        InputUtil.onKeyDown(Keys.One, () => {
            // Code dynamically adds a copy of ListViewItemData data into ListView
            this.ListView.addItems([new ListViewItemData(index)]);
            index++
        });

        this.ListView.onItemRefreshed.add((newWorkList : ListViewItemData[])=>{
          console.log("_____onItemRefreshed");
          newWorkList.forEach((workItem : ListViewItemData)=>{
            const typeSc = mw.findUIScript(workItem.widgetCanvas) as any;
            typeSc.data = workItem;
          });
        });
    }
}
export default class NewUIScript extends UIScript {
/**
* Initialize the UI file first at the right time after it has been successfully constructed
*/
protected onStart() {
this.ListView = this.uiWidgetBase.findChildByPath('RootCanvas/ListView') as mw.ListView;
let index = 0
// Press number key 1 to add new item
InputUtil.onKeyDown(Keys.One, () => {
// Code dynamically adds a copy of ListViewItemData data into ListView
this.ListView.addItems([new ListViewItemData(index)]);
index++
});
this.ListView.onItemRefreshed.add((newWorkList : ListViewItemData[])=>{
console.log("_____onItemRefreshed");
newWorkList.forEach((workItem : ListViewItemData)=>{
const typeSc = mw.findUIScript(workItem.widgetCanvas) as any;
typeSc.data = workItem;
});
});
}
}- After starting the experience, we press number 1 to dynamically generate new items in the list view, and the number in each item is the serial number of the node data base class.

Using Tile View
- When using a tile view, you need to manually set the arrangement rules as follows after the above code gets the TileView widget:
ts
this.TileView = this.uiWidgetBase.findChildByPath('RootCanvas/TileView') as mw.TileView
// Determine the ordering rules for the child objects by setting their width and height
// TileView width in this example is 400+, here set itemWidth200, a row can hold two items
this.TileView.itemWidth = 200
this.TileView.itemHeight = 50

// TileView inherits from ListView and related data is consistent
let arrTileV:ListViewItemData[] = []
for(let index = 0; index < 10; index++){
    arrTileV.push(new ListViewItemData(index))
}
tileV.addItems(arrTileV)this.TileView = this.uiWidgetBase.findChildByPath('RootCanvas/TileView') as mw.TileView
// Determine the ordering rules for the child objects by setting their width and height
// TileView width in this example is 400+, here set itemWidth200, a row can hold two items
this.TileView.itemWidth = 200
this.TileView.itemHeight = 50
// TileView inherits from ListView and related data is consistent
let arrTileV:ListViewItemData[] = []
for(let index = 0; index < 10; index++){
arrTileV.push(new ListViewItemData(index))
}
tileV.addItems(arrTileV)Using the tree view
- Parent-child information can be recorded in TreeViewItemDataBase compared to ListViewItemDataBase used in ListView and TileView
- Note that the logic of whether clicking items containing nested items will expand/collapse needs to be written yourself
ts
this.TreeView.onItemRefreshed.add((newWorkList : mw.TreeViewItemDataBase[])=>{
        console.log("_____onItemRefreshed");
      newWorkList.forEach((workItem : mw.TreeViewItemDataBase)=>{
        const typeSc = mw.findUIScript(workItem.widgetCanvas) as any;
        typeSc.data = workItem;
      });
    });

    // expand/collapse after controlling project
    this.TreeView.onItemClicked.add((clickedItem: TreeViewItemDataBase, doubleClick: boolean)=>{
        let expansion = this.TreeView.getItemExpansion(clickedItem);
        this.TreeView.toggleItemExpansion(clickedItem);

    })
    // Set the child indent distance and refresh
    InputUtil.onKeyDown(Keys.One, () => {
        this.TreeView.itemIndentAmount=100
        this.TreeView.resetListItems(this.TreeView.listItems);

    });
    // Modify the expansion status of Article 0
    InputUtil.onKeyDown(Keys.Two, () => {
        this.TreeView.toggleItemExpansion(this.TreeView.listItems[0])
        console.log(this.TreeView.getItemExpansion(this.TreeView.listItems[0]));
    });
    // Expand Article 0
    InputUtil.onKeyDown(Keys.Three, () => {
        this.TreeView.setItemExpansion(this.TreeView.listItems[0],true)
        console.log(this.TreeView.getItemExpansion(this.TreeView.listItems[0]));
    });
    // Check all currently expanded entries
    InputUtil.onKeyDown(Keys.Four, () => {
        this.TreeView.setSelectionItem(this.TreeView.getExpandedItems(),true)
    });
    // can first click button to add 4 rows and then assign parent-child relationship
    InputUtil.onKeyDown(Keys.Five, () => {
        console.log(this.TreeView.listItems[3].parent);
        this.TreeView.listItems[1].parent=this.TreeView.listItems[0]
        this.TreeView.listItems[1].parent=this.TreeView.listItems[0]
        this.TreeView.listItems[1].parent=this.TreeView.listItems[0]
        this.TreeView.resetListItems(this.TreeView.listItems);
        console.log(this.TreeView.listItems[3].parent);

    });
    // You can also create and assign parent-child relationships before adding
    InputUtil.onKeyDown(Keys.Six, () => {
        let newparent= new TreeViewItemDataBase
        let child1=new TreeViewItemDataBase
        let child2=new TreeViewItemDataBase
        let child3=new TreeViewItemDataBase
        newparent.children.push(child1);
        newparent.children.push(child2);
        newparent.children.push(child3);
        this.TreeView.addItems([newparent]);
    });

    this.TreeView.onItemExpansionChanged.add((targetItem: TreeViewItemDataBase, bExpanded: boolean)=>{
        console.log("_____onItemExpansionChanged"+targetItem+bExpanded);
    });

    this.Button.onClicked.add(()=>{
      this.TreeView.addItems([new mw.TreeViewItemDataBase]);
});this.TreeView.onItemRefreshed.add((newWorkList : mw.TreeViewItemDataBase[])=>{
console.log("_____onItemRefreshed");
newWorkList.forEach((workItem : mw.TreeViewItemDataBase)=>{
const typeSc = mw.findUIScript(workItem.widgetCanvas) as any;
typeSc.data = workItem;
});
});
// expand/collapse after controlling project
this.TreeView.onItemClicked.add((clickedItem: TreeViewItemDataBase, doubleClick: boolean)=>{
let expansion = this.TreeView.getItemExpansion(clickedItem);
this.TreeView.toggleItemExpansion(clickedItem);
})
// Set the child indent distance and refresh
InputUtil.onKeyDown(Keys.One, () => {
this.TreeView.itemIndentAmount=100
this.TreeView.resetListItems(this.TreeView.listItems);
});
// Modify the expansion status of Article 0
InputUtil.onKeyDown(Keys.Two, () => {
this.TreeView.toggleItemExpansion(this.TreeView.listItems[0])
console.log(this.TreeView.getItemExpansion(this.TreeView.listItems[0]));
});
// Expand Article 0
InputUtil.onKeyDown(Keys.Three, () => {
this.TreeView.setItemExpansion(this.TreeView.listItems[0],true)
console.log(this.TreeView.getItemExpansion(this.TreeView.listItems[0]));
});
// Check all currently expanded entries
InputUtil.onKeyDown(Keys.Four, () => {
this.TreeView.setSelectionItem(this.TreeView.getExpandedItems(),true)
});
// can first click button to add 4 rows and then assign parent-child relationship
InputUtil.onKeyDown(Keys.Five, () => {
console.log(this.TreeView.listItems[3].parent);
this.TreeView.listItems[1].parent=this.TreeView.listItems[0]
this.TreeView.listItems[1].parent=this.TreeView.listItems[0]
this.TreeView.listItems[1].parent=this.TreeView.listItems[0]
this.TreeView.resetListItems(this.TreeView.listItems);
console.log(this.TreeView.listItems[3].parent);
});
// You can also create and assign parent-child relationships before adding
InputUtil.onKeyDown(Keys.Six, () => {
let newparent= new TreeViewItemDataBase
let child1=new TreeViewItemDataBase
let child2=new TreeViewItemDataBase
let child3=new TreeViewItemDataBase
newparent.children.push(child1);
newparent.children.push(child2);
newparent.children.push(child3);
this.TreeView.addItems([newparent]);
});
this.TreeView.onItemExpansionChanged.add((targetItem: TreeViewItemDataBase, bExpanded: boolean)=>{
console.log("_____onItemExpansionChanged"+targetItem+bExpanded);
});
this.Button.onClicked.add(()=>{
this.TreeView.addItems([new mw.TreeViewItemDataBase]);
});- The tree view behaves in the experience run as follows:

 Editor Doc