Effects
It takes about 15 minutes to read this article
This page outlines the working mechanism of effects, shows the process of creating and using effects in the editor and their application in the game. The tutorial includes the property panel and interface for the Effect Function object.
1. What are effects?
- Effects are special effects in the game, such as character skill effect, scene waterfalls, leaf drop, UI effects, and so on.
- In games, the most common is Particle Effect, a process model that combines modeling and animation as a whole, using a single particle that changes with time as the basic element of the scene. Essentially, particle effects consist of one or more particle emitters, each with its own lifecycle and various effect properties.
2. How to use effects?
2.1 How do I find Effect assets?
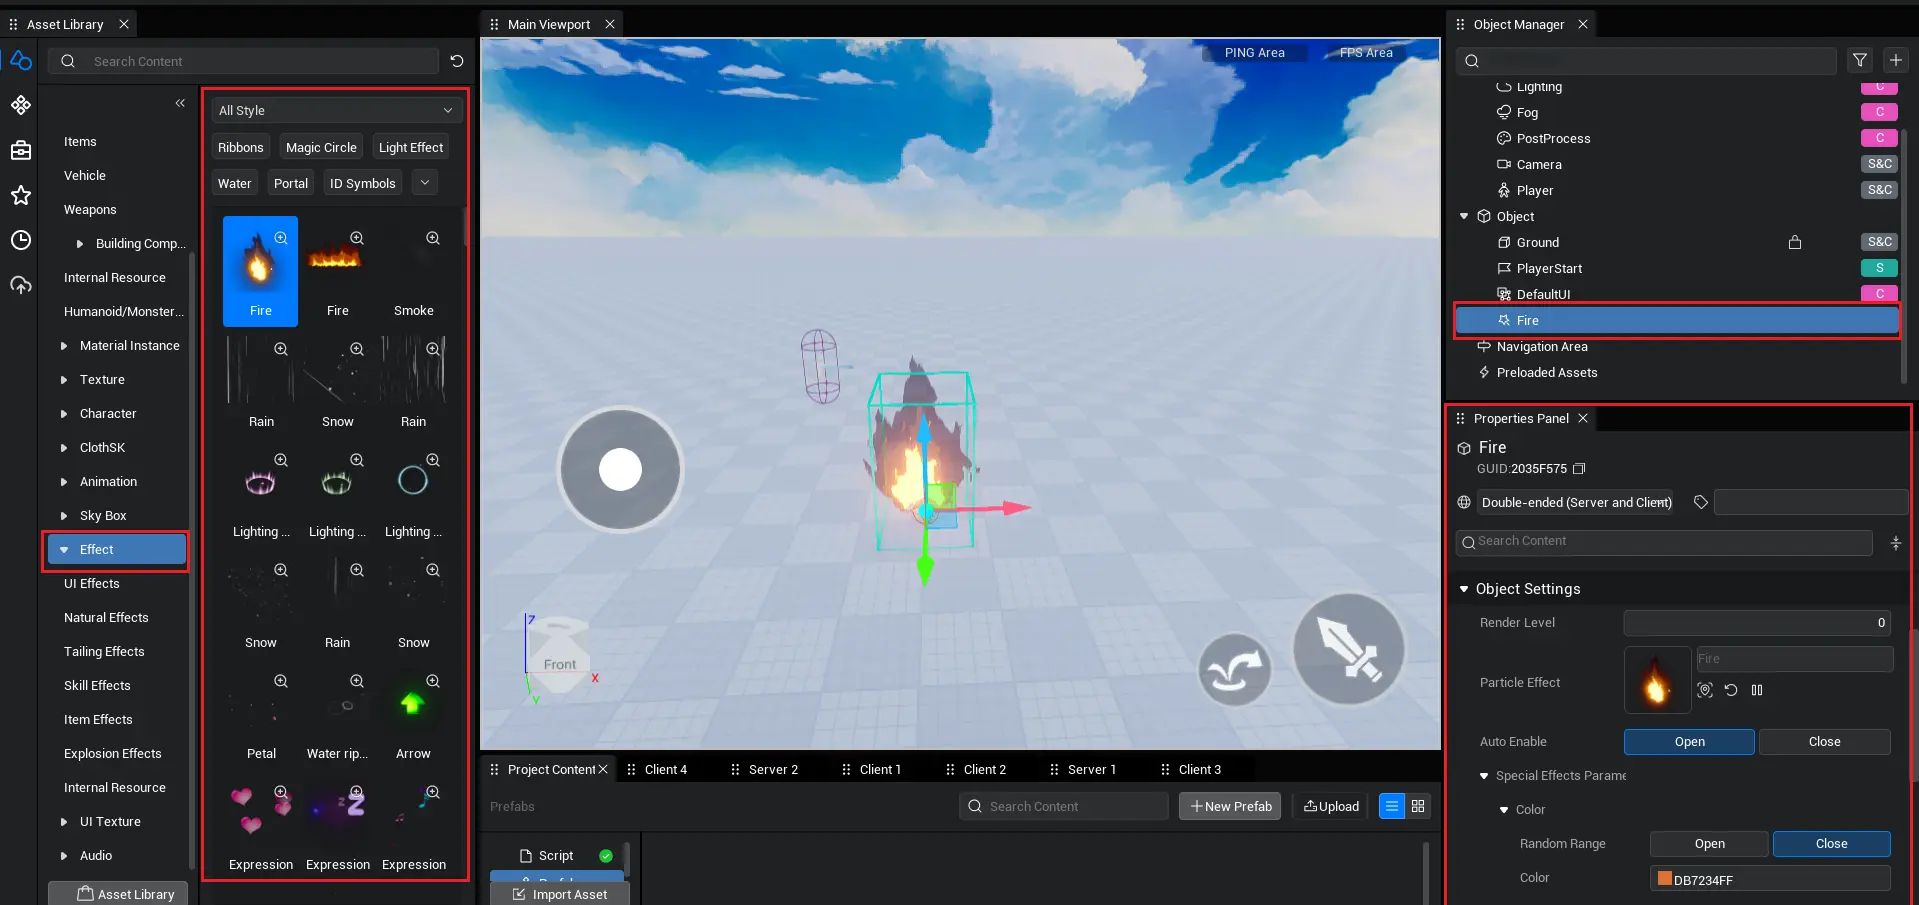
- A large number of special effects objects were found in the asset library - Particle System list.

2.2 How to use Effect assets?
- After we find the effects assets, we can find the effects we want according to our needs, drag them into the scene, and modify their properties.

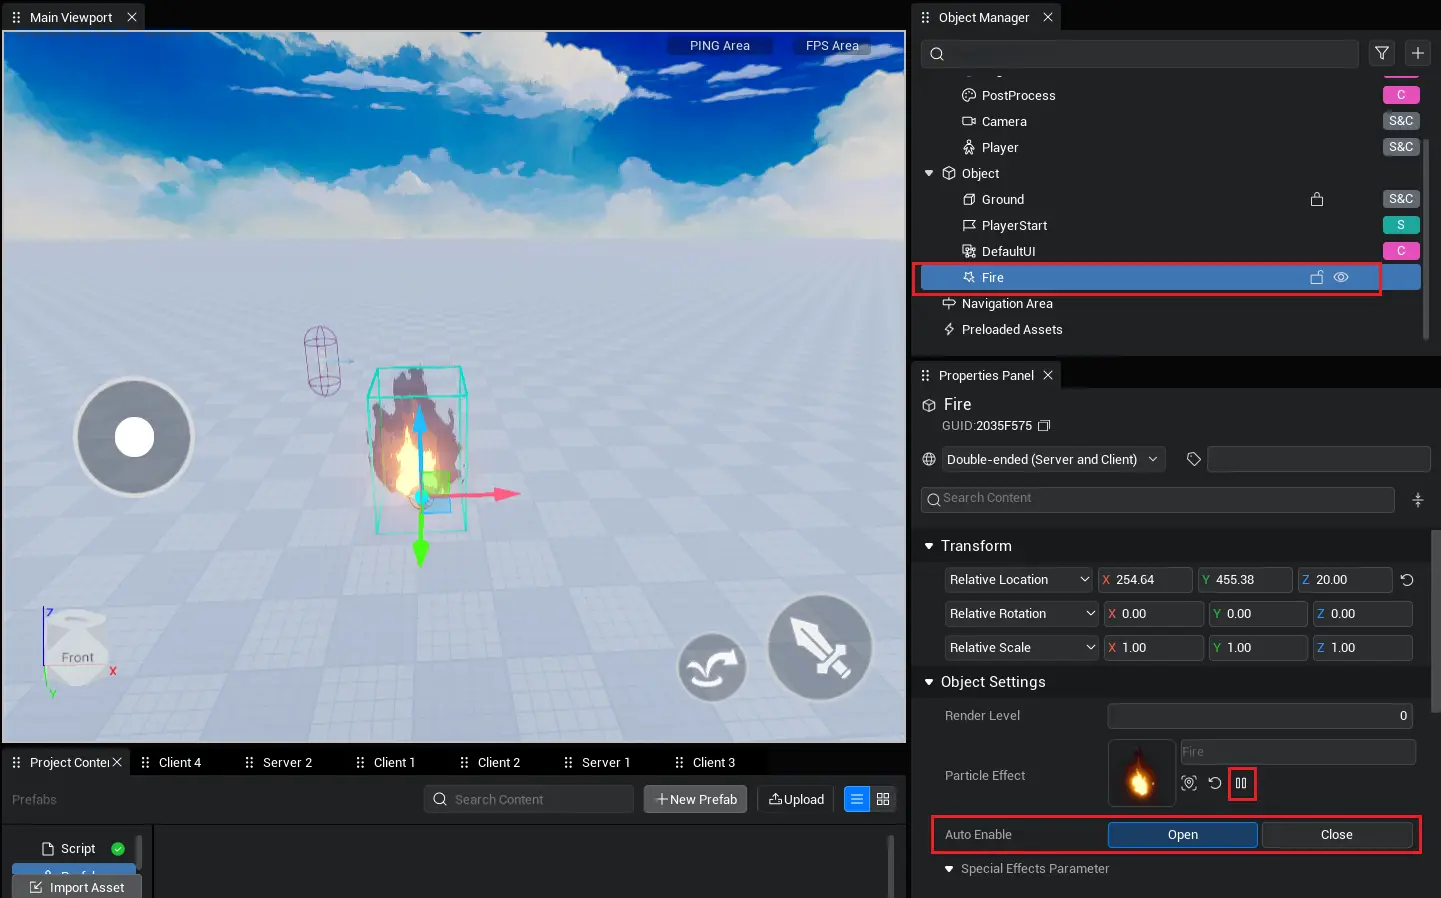
- In the basic property, there is a play/stop button to adjust the playback state of the effect while editing.
- If you want to see effects during operation, you need to activate [Auto Enable] function. This allows the effect to play automatically when running. Otherwise, effects may not be visible while running.
2.3 Dynamic Create Effect asset


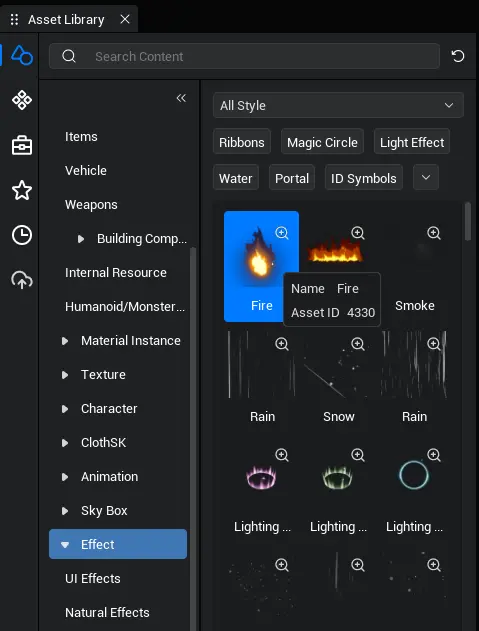
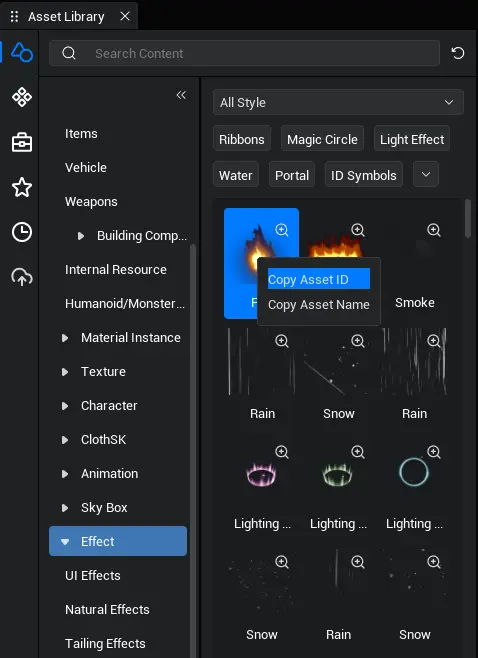
- You can also hover over the asset to view the asset ID of the resource, or you can right-click to copy the asset ID of the asset. Then dynamically create corresponding asset through asset ID.
- Sample script for dynamically generating effects:
@Component
export default class NewScript extends Script {

    /** When the script is instanced, this function is called before the first frame is updated */
    protected async onStart(): Promise<void> {
        // Delay by 3s
        await TimeUtil.delaySecond(3)
        // Generate Effect
        let eff = await GameObject.asyncSpawn(
            // Effect asset ID
            "4330",
            {// Effect synchronization set to false
            replicates: false,
            // Effect generation location
            transform: new Transform(new Vector(100, 0, 100), new Rotation(0, 0, 0),
                new Vector(2, 2, 1))
        }) as Effect
        // Play effect
        eff.play();
        // Stop Effect
        //eff.stop();
    }

}
@Component
export default class NewScript extends Script {
/** When the script is instanced, this function is called before the first frame is updated */
protected async onStart(): Promise<void> {
// Delay by 3s
await TimeUtil.delaySecond(3)
// Generate Effect
let eff = await GameObject.asyncSpawn(
// Effect asset ID
"4330",
{// Effect synchronization set to false
replicates: false,
// Effect generation location
transform: new Transform(new Vector(100, 0, 100), new Rotation(0, 0, 0),
new Vector(2, 2, 1))
}) as Effect
// Play effect
eff.play();
// Stop Effect
//eff.stop();
}
}3. Introduction to Effect properties
- Clicking on the Effect Object allows you to edit the Effect's Property in the Property Panel (default lower right corner). Check Auto Enable, the effect will be displayed. The following expansion describes specific special effects properties:
3.1. Particle Effect
- Property Notes: Effect asset refer to the asset ID of the effect. We can replace asset by dragging the Effect asset in the Asset Library directly into the properties panel.
3.2 Auto Enable
- Description: Set whether the effect will be activated automatically at the beginning of the game. If yes, it will play automatically, otherwise, you need a script to trigger playback.
3.3 Number of particles generated (Rate)
Description: Number of particles generated
Of course, we also provide the property "random range", meaning that each particle effect is randomly generated within a set range. Displays a more varied effect.
Related interfaces:
// Set the number of particles generated by the effect to 3
eff.setFloat("Rate",3)
// Set the number of particles generated by the effect to a random value between 3 and 10
eff.setFloatRandom("Rate",10,3)
// Set the number of particles generated by the effect to 3
eff.setFloat("Rate",3)
// Set the number of particles generated by the effect to a random value between 3 and 10
eff.setFloatRandom("Rate",10,3)3.4 Lifecycle (LifeTime)
Description: Survival time of special effect particle
Of course, we also provide the property "random range", meaning that each particle effect is randomly generated within a set range. Displays a more varied effect.
Related interfaces:
// Set the effect generation period to 10
eff.setFloat("LifeTime",10)
// Set a random value between 10 and 100 for the effect generation period
eff.setFloatRandom("LifeTime",100,10)
// Set the effect generation period to 10
eff.setFloat("LifeTime",10)
// Set a random value between 10 and 100 for the effect generation period
eff.setFloatRandom("LifeTime",100,10)3.5 Size
Description: Size of special effect particle
Of course, we also provide the property "random range", meaning that each particle effect is randomly generated within a set range. Displays a more varied effect.
Related interfaces:
// Set the effect size to 10
eff.setVector("Size",new Vector(10,10,10))
// Set a random value between 10 and 20 effect sizes
eff.setVectorRandom("Size",new Vector(20,20,20), new Vector(10,10,10))
// Set the effect size to 10
eff.setVector("Size",new Vector(10,10,10))
// Set a random value between 10 and 20 effect sizes
eff.setVectorRandom("Size",new Vector(20,20,20), new Vector(10,10,10))3.6 Speed (Speed)
Description: The direction and speed of the effect particle
Of course, we also provide the property "random range", meaning that each particle effect is randomly generated within a set range. Displays a more varied effect.
Related interfaces:
// Set the speed of the effect in the Z-axis direction to 50
eff.setVector("Speed",new Vector(0,0,50))
// Set the speed of the effect in the Z-axis direction to a random value between 0 and 50
eff.setVectorRandom("Speed",new Vector(0,0,50), new Vector(0,0,0))
// Set the speed of the effect in the Z-axis direction to 50
eff.setVector("Speed",new Vector(0,0,50))
// Set the speed of the effect in the Z-axis direction to a random value between 0 and 50
eff.setVectorRandom("Speed",new Vector(0,0,50), new Vector(0,0,0))3.7 EmitterLocation
Description: Position of particle generation
Demo Effect: Due to the poor resolution of fixed positions, we use random positions to make demo effects.
Random effects are still generated randomly according to the property "Random Range", i.e. each particle effect is within a set range.
Related interfaces:
// Set the playback position of the effect to (0,0,0)
eff.setVector("EmitterLocation",new Vector(0,0,0))
// Set the playback position of the effect to a random value between (0,0,0) and (50,50,50).
eff.setVectorRandom("EmitterLocation",new Vector(50,50,50), new Vector(0,0,0))
// Set the playback position of the effect to (0,0,0)
eff.setVector("EmitterLocation",new Vector(0,0,0))
// Set the playback position of the effect to a random value between (0,0,0) and (50,50,50).
eff.setVectorRandom("EmitterLocation",new Vector(50,50,50), new Vector(0,0,0))3.8 Color (InitialColor)
Description: Effect particle color
Demo Effect: Colors are simple; we show random colors together with normal colors.
Random color is still a property of "Random Range", i.e. each particle effect is randomly generated within a set range.
Related interfaces:
// Set the color of the effect, where the Type.LinearColor parameters represent red, green, blue, and transparency.
eff.setColor("Color", new Type.LinearColor(1,0,0,1))
// Set the color of the effect and randomly generate it between red and green
eff.setColorRandom("Color",new Type.LinearColor(1,0,0,1), new Type.LinearColor(0,1,0,1))
// Set the color of the effect, where the Type.LinearColor parameters represent red, green, blue, and transparency.
eff.setColor("Color", new Type.LinearColor(1,0,0,1))
// Set the color of the effect and randomly generate it between red and green
eff.setColorRandom("Color",new Type.LinearColor(1,0,0,1), new Type.LinearColor(0,1,0,1))3.9 Initial Rotation Angle (Rotation)
Description: Initial rotation angle of the effect particle
Demo Effect: The rotation angle is relatively simple. We will show the random angle together with the normal angle.
The random angle is still a property of [Random Range], i.e. each particle effect is randomly generated within a set range.
Related interfaces:
// Set the initial rotation angle of the effect to 0.5
eff.setFloat("Rotion",0.5)
// Set the initial rotation angle of the effect to a random value between 0 and 1.
eff.setFloatRandom("Rotion",1,0)
// Set the initial rotation angle of the effect to 0.5
eff.setFloat("Rotion",0.5)
// Set the initial rotation angle of the effect to a random value between 0 and 1.
eff.setFloatRandom("Rotion",1,0)3.10 Rotation Speed (RotationRate)
Description: The rotational speed of the effect particle
Demo Effect: The rotation speed is relatively simple. We will show the random rotation speed together with the normal rotation.
Random rotation speed is still a property of [Random Range]. That is, each particle effect is randomly generated within a set range.
Related interfaces:
// Set the effect rotation speed to 0.5
eff.setFloat("RotationRate",0.5)
// Set the effect rotation speed to a random value between 0 and 1
eff.setFloatRandom("RotationRate",1,0)
// Set the effect rotation speed to 0.5
eff.setFloat("RotationRate",0.5)
// Set the effect rotation speed to a random value between 0 and 1
eff.setFloatRandom("RotationRate",1,0)3.11 Drag
property Description: Effect of resistance to particles
Demonstration Effect: The resistance is relatively simple. We present random resistance together with normal resistance.
Random resistance is still a property of "Random Range", i.e. each particle effect is randomly generated within a set range.
Related interfaces:
// Set the effect resistance to 1
eff.setFloat("Drag",10)
// Set the effect resistance to a random value between 0 and 1
eff.setFloatRandom("Drag",1,0)
// Set the effect resistance to 1
eff.setFloat("Drag",10)
// Set the effect resistance to a random value between 0 and 1
eff.setFloatRandom("Drag",1,0)3.12 Gravity (Acceleration)
Property Description: Gravity Effect on Effect Particles
Of course, we also provide the property "random range", meaning that each particle effect is randomly generated within a set range.
Related interfaces:
// Set the gravity of the effect to -50 in the Z-axis direction.
eff.setVector("Acceleration",new Vector(0,0,-50))
// Set the gravity of the effect in the Z-axis direction to a random value between 0 and -50
eff.setVectorRandom("Acceleration",new Vector(0,0,-50), new Vector(0,0,0))
// Set the gravity of the effect to -50 in the Z-axis direction.
eff.setVector("Acceleration",new Vector(0,0,-50))
// Set the gravity of the effect in the Z-axis direction to a random value between 0 and -50
eff.setVectorRandom("Acceleration",new Vector(0,0,-50), new Vector(0,0,0))3.13 Number of loops/cycles (to be abandoned)
[Loop] Property: Whether the effect loops or not. When activated, the effect will not stop and loop.
[Number of loops] Property: When starting a loop, the number of loops will not take effect. When the loop is cancelled, the effect will play based on the number of loops. After the number of loops reached, the effect will stop playing.
Note: This property interface is about to be deprecated. The effect loop is implemented by the developer using a script that calls the play function.
4. Property Display Problem
- In order to allow the user to experience a more free effect function, the above effect properties are exposed. The effect will expose the relevant properties based on the characteristics of the effect. That is, the above effect properties are displayed differently in different effects. Some will display 1, others multiple. And we won't renovate resources for older effects, only newly created effects will show these properties.
 Editor Doc