It takes about 15 minutes to read this article.
In projects we often need to move objects in various trajectories (parabolas or straight lines) and sometimes to obtain collision results. In application scenes such as cannonballs, golf spheres and tracking missiles, realistic trajectory and impact effects enhance the expressiveness of the game.
Object Launcher
Object Launcher is a functional object that can launch a GameObject to move it in a parabolic trajectory and return collision results en route. It builds projectiles according to its own properties and mounts launch objects on them, similar to cannons. By setting Object Launcher properties, you can achieve:
- Modify initial speed, acceleration, maximum speed, and gravity to achieve different trajectory such as: flat throw, oblique throw, uniform speed, and acceleration.
- Set capsule radius, capsule half length to construct collision volume, modify collision response to switch between bounce/penetration effects.
- Set life cycle control projectile destruction timing and modify velocity retention to simulate velocity loss due to real collision deformation.
- Incoming tracking targets and tracking acceleration at launch to create interesting tracking effects such as: tracking missiles.
Create an Object Launcher
Create in Editing State
Object Launcher is a feature object and the Asset ID in the asset library is: “ObjectLauncher”. To create an Object Launcher:
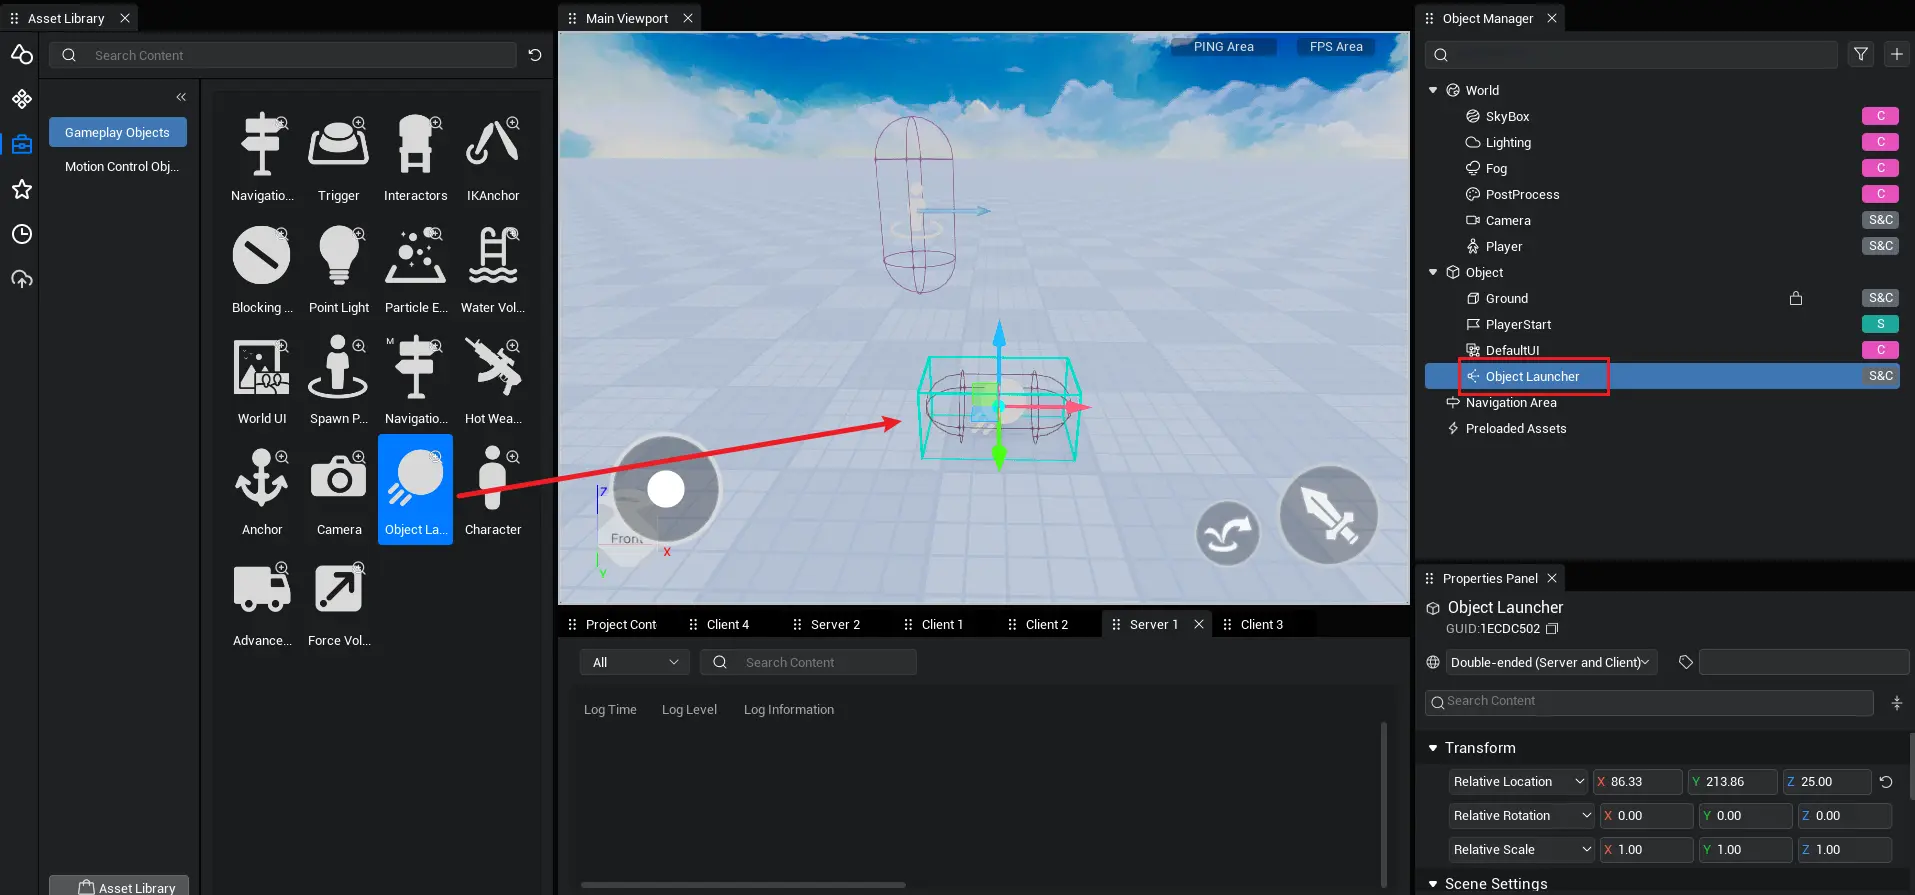
- Click the toolkit icon to access the game object asset library.
- Click Game Feature Objects to view all feature objects provided by the editor.
- Asset found: Object Launcher. It consists of a flying projectile as an icon. Hover over objects to view object information.
- Left mouse click to select Object Launcher, hold and drag to main viewport, scene appears with a corresponding object. If dragged directly into the object manager, the emitter is generated at scene origin (0, 0, 0).
- Locate the Object Manager window on the right side of the editor. The emitter object appears under the object bar. The selected object modifies the emitter's properties in the properties panel. If the Object Manager window or Property Panel window does not exist, click View Options in the menu bar and check Show.
Dynamically created
With Object Launcher's Asset ID in script, you can call interface to dynamically create an Object Launcher. Please do the following:
Locate the project catalog window below the editor. If the window does not exist, click View Options in the menu bar and check Show.
Click the New Script button and a new script file will appear in the script directory: NewScript.
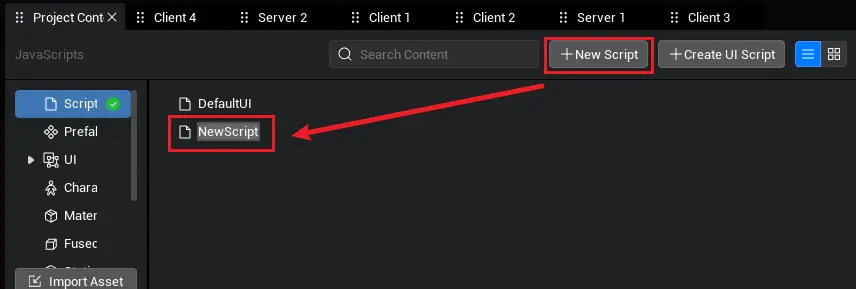
- Double-click to open the script file and paste the following sample code into the
onStartmethod in the script: Create an Object Launcher and print its GameObject ID in the log window.
let objectLauncher = GameObject.spawn("ObjectLauncher") as ObjectLauncher;
console.log("ID " + objectLauncher.gameObjectId);
let objectLauncher = GameObject.spawn("ObjectLauncher") as ObjectLauncher;
console.log("ID " + objectLauncher.gameObjectId);- Left mouse click to select script file, hold and drag into scene or object manager.
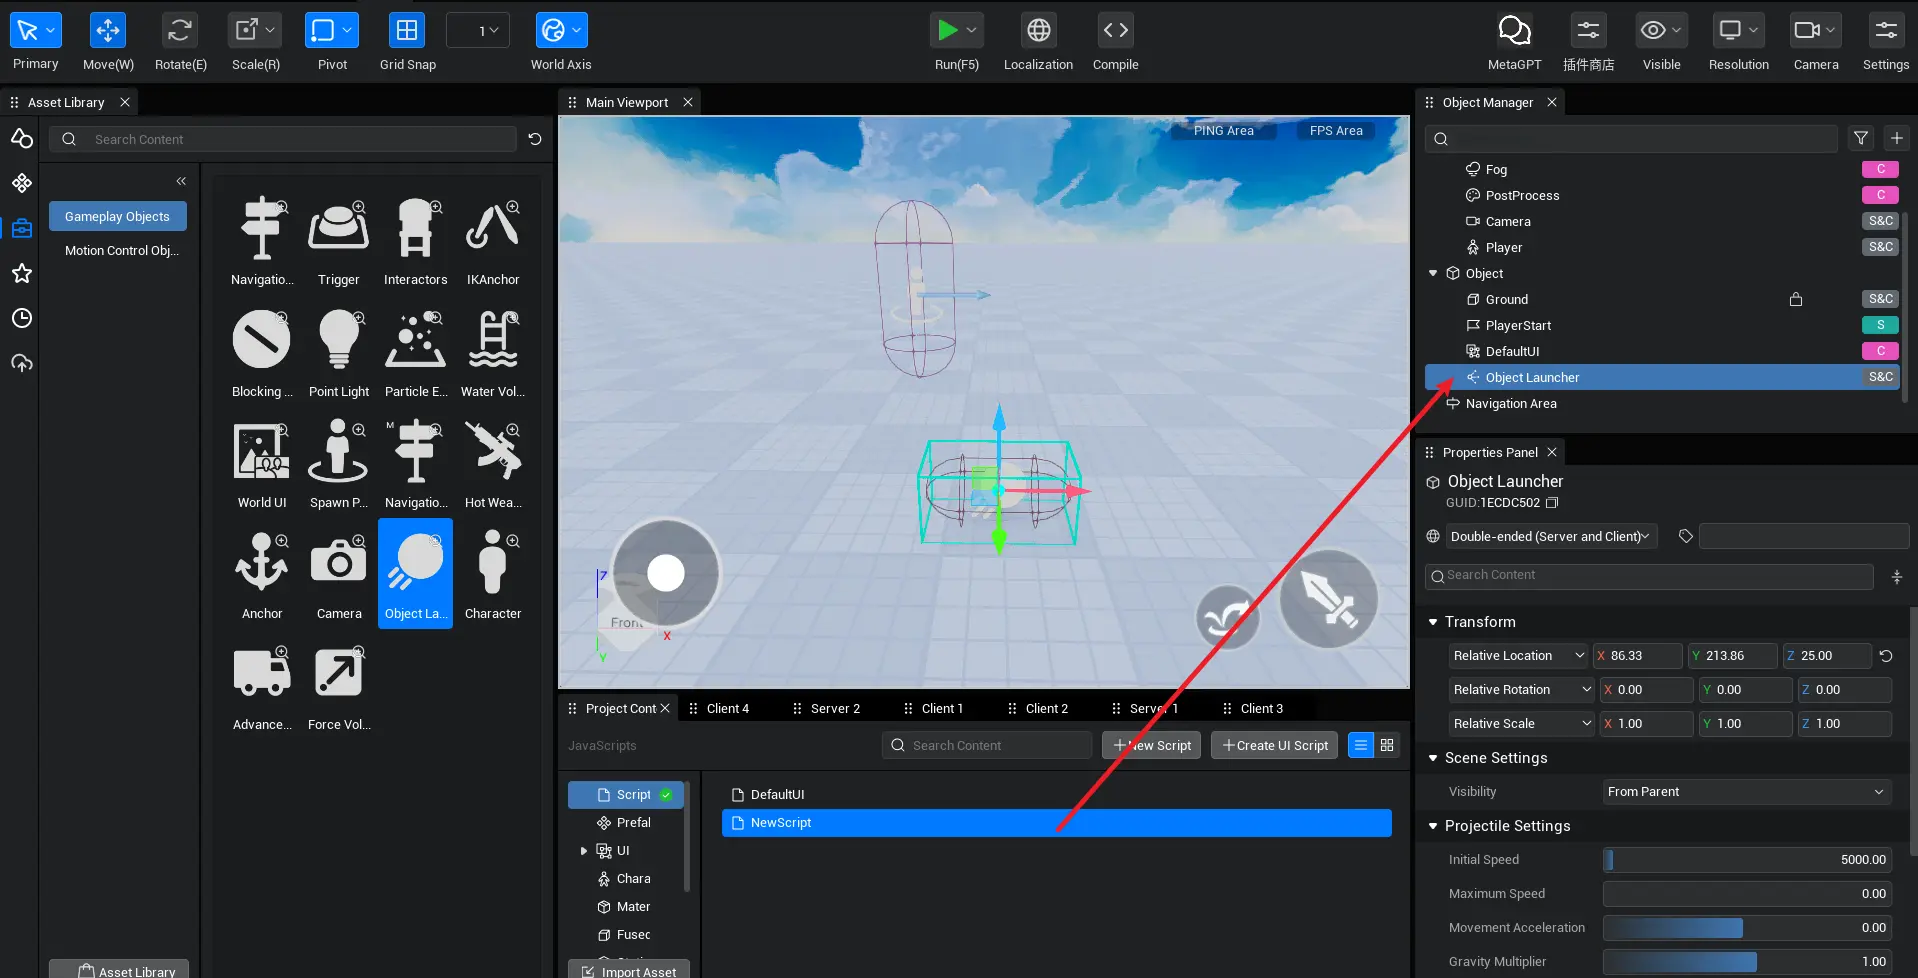
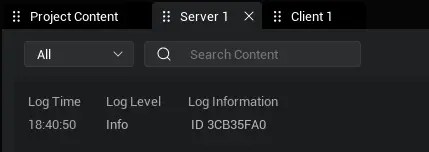
- Click Run button (F5) to view log window printout results. If the window does not exist, click View Options in the menu bar and check Show.
Workflow for Object Launcher
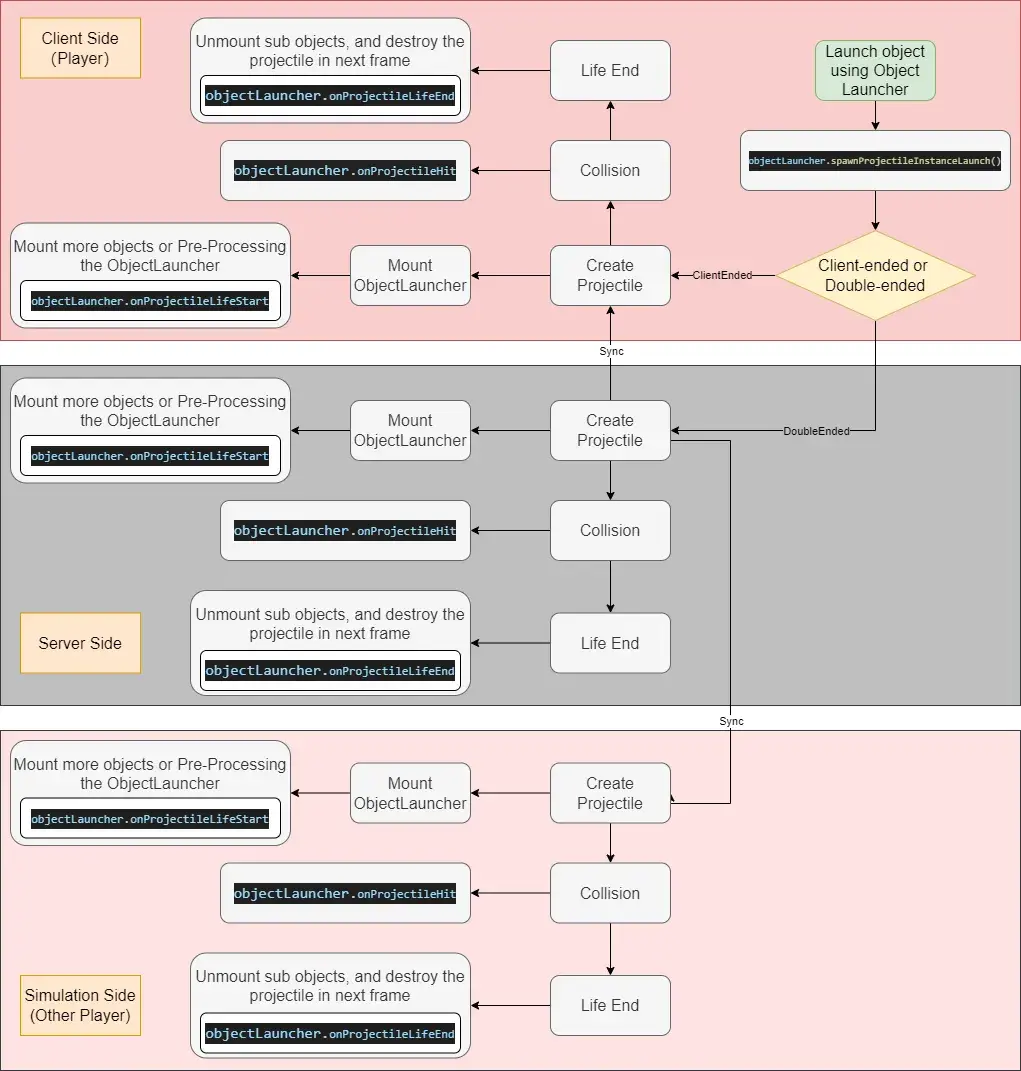
Through the process of sending and passing the transmit command, the transmitter creates projectiles with its own properties. Projectiles carry emitter properties to trigger corresponding events and execute delegated methods in three aspects of the client-server model:
- The sending client, the local device of the user who sent the transmitting message.
- Receiving client, the local device of another user.
- The server, which is a staging station that receives transmitted messages from the sending client and processes messages delivered to the receiving client, may also act as a sender of messages.
Examples of projectiles
The launcher is a projectile manufacturing facility where each launch mounts the launch object under a newly created projectile instance and launches it. A projectile instance is a GameObject, so it has all the abilities to game objects such as modifying its own Transform or destroy. It is important to note that the initial property of the projectile is provided with a property value by the launcher when it is created. Modifying the launcher's property will not affect the projectile that has been created.
Projectile instances also get Players who create their own. When Player calls launch method on client, projectile created by this launch assigns owner property with that client Player. The owner property is empty when the transmitter calls transmit on the service side.
The velocity property records the current velocity of the projectile during motion, representing the current direction and velocity vector (cm/s) of the projectile. You can set different effects or rotation speeds to launch objects depending on the speed of movement. Or you can set the projectile's current speed to modify its trajectory, for example by setting the velocity property to 0, where a frame of projectile stops moving without gravity and acceleration.
Set launch speed.
The initialSpeed property sets the initial speed of motion for the projectile. Objects apply this speed to begin a uniform linear motion (gravity-free) within the scene. Initial velocity is a scalar that is not negative indicating the distance per second (cm/s) the projectile moves within the scene. The default value for this property is 5000 and the range is [1, 100,000]. Modifying the initial speed does not change the direction of motion, only the speed at which it moves in the firing direction. The higher the initial speed, the higher the projectile flies.
During flight, projectiles are continuously affected by acceleration properties for uniform acceleration (positive) or uniform deceleration motion (negative). The default value for acceleration is 0 and the range is [-10000, 10000]. Modifying this property can achieve a simulated effect of thruster acceleration or air drag deceleration.
Projectile flight is limited by the maximum speed maxSpeed property, which always moves at a speed less than or equal to a given maximum speed value. The default value for this property is 0, which means there is no maximum speed limit and the range of values is [0, 100,000]. This is useful when projectiles track targets or are subject to gravity - you can make sure the speed never exceeds a specific speed, no matter how long it drops/accelerates.
Turn on gravity
The gravityScale property represents the magnification of the projectile affected by world gravity and can be used to change the trajectory of the projectile in flight. When the property value is 0, it means the projectile is not affected by gravity and will only follow a straight line until it hits the object or ends its life. The property defaults to 1 with a range of [-10, 10], setting it to greater than zero means the projectile will throw like a normal object. Setting it to less than zero means the projectile trajectory will curve upwards like a balloon floating.
Setting the isRotationFollowsVelocity property to true (default) when a projectile is affected by gravity causes the world positive direction of the projectile (and its mounted object) to always follow the direction of motion: the arrow of the arrow points in the direction of speed and rotates itself in flight. When this property is false, the projectile updates its coordinate position only according to the trajectory calculation, while its rotation remains constant.
Collision detection
Collision Size
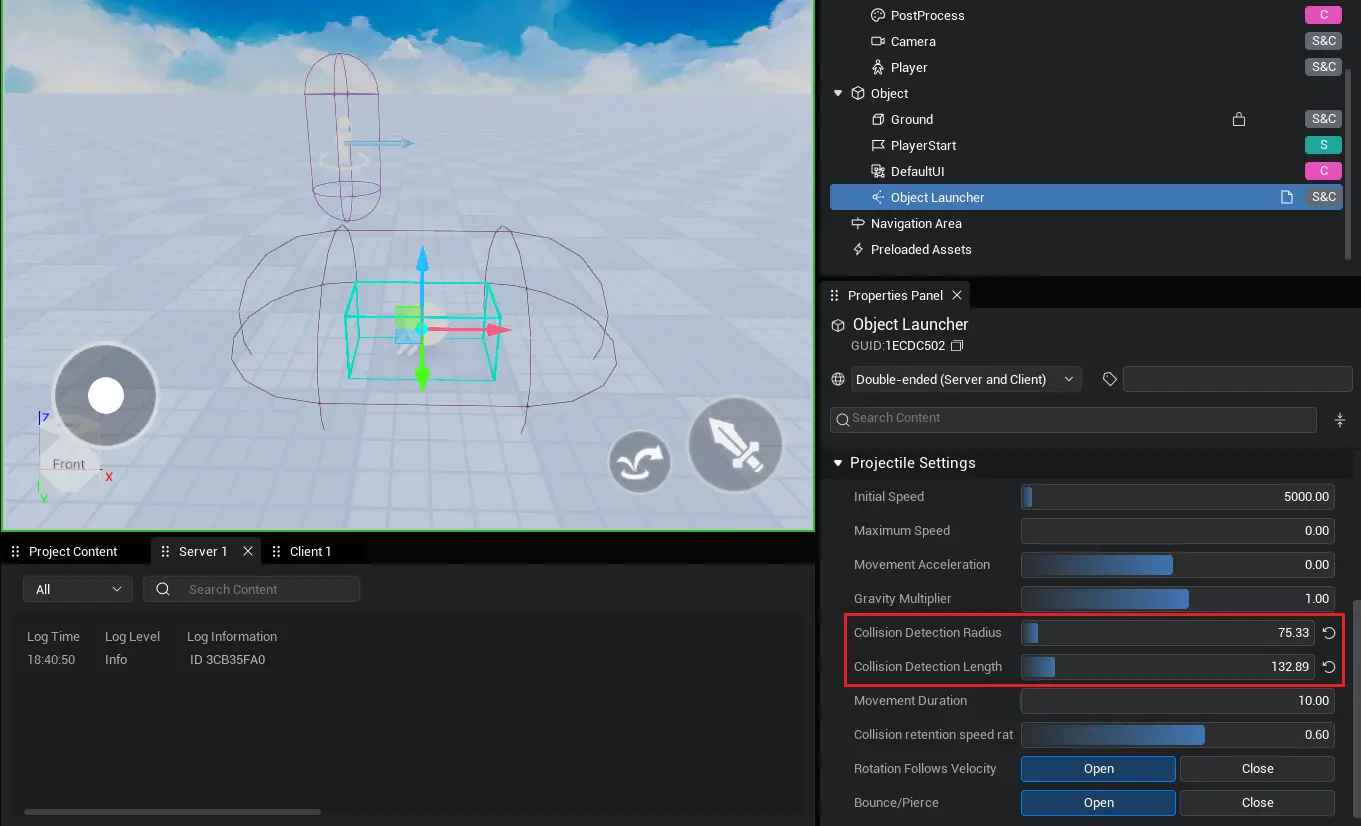
The user can customize the collision volume of the projectile (usually by wrapping the launch object) and dynamically frame the wire at the main viewport by the launcher for visual configuration. During projectile motion, collision bodies are used to detect and return the corresponding hits. The base shape of the collision body is a horizontal capsule with a half-length of 50 and a radius of 100 controlled by the properties capsuleHalfLength and capsuleRadius, respectively. Due to the limitations of the capsule, the radius must be less than or equal to the half length, and when the radius equals the half length the collision becomes a sphere.
Bounce
The isShouldBounce property determines the collision response result after the projectile hits the surface: bounce/penetration. When isShouldBounce = true, the projectile bounces in a new direction after hitting the surface and can be used to simulate things like grenades, bounce spheres, bounce effects, etc. When isShouldBounce = false the projectile maintains its previous direction of motion after hitting the surface and can be used to simulate penetrating something like a bullet.
Collision Rentention Speed Rate
The energy (velocity) lost after projectile collision due to deformation and friction can be controlled by the collisionVelocityRetention property. This property maintains the ratio of pre-impact velocity of the projectile after impact. The property defaults to 0.6 and the range is [0, 1]. When the property value is 1, it can be considered a fully elastic collision with no loss of speed. When the property value is 0, the projectile stops moving immediately after impact and aborts life. It is important to note that the property depends on isShouldBounce = true for validity.
onProjectileHit
When a projectile hits a surface, it triggers a hit delegate onProjectileHit and executes a binding function. The delegate provides various relevant hit information: hit object, launch Player and hit location distance normal, etc. More specifically, it accepts three object references: projectile ProjectileInst, hit object GameObject, and hit result HitResult. where the launcher and velocity of the projectile object can be accessed in ProjectileInst. And HitResult allows users to determine information such as collision location and angle. The usual development mode determines whether the projectile hits the Player within this delegate and executes the corresponding game business logic such as blood loss, word jumping, and bonus points.
Movement cycle
The launcher's own lifeSpan property is used to control the maximum number of seconds the projectile it produces can move. Once time is up, the projectile disarms the mounted object and destroys itself. When lifeSpan= 0 means projectile motion time will be unlimited and it will always be present in the scene. Property default is 10 and the range is [0, 1000].
When a projectile reaches its end of life, it triggers an end-of-life delegate onProjectileLifeEnd and executes a binding function. The delegate is triggered before the projectile is destroyed, so the ProjectileInst reference passed in the binding function remains valid. Projectile speed of 0 (affected by acceleration < 0 or collisionVelocityRetention = 0) also terminates life, triggering the delegate. The usual development mode destroys or recycles projectile mounted objects within this delegate.
myLauncher.onProjectileLifeEnd.add((projectile) => {
    this.ammoPool.recycle(projectile.getChildByName("Ammo"));
});myLauncher.onProjectileLifeEnd.add((projectile) => {
this.ammoPool.recycle(projectile.getChildByName("Ammo"));
});Launch & Track Launch
When the emitter's properties are set, call spawnProjectileInstanceLaunch method to generate projectile instance with current parameters and fire. API requires 1 required parameter to be passed in: the gameObjectId of the launch object, which is automatically mounted on the generated projectile. Next, three optional parameters are required to be passed in: transmit position, transmit direction, and client broadcast identification. If no position or direction is passed in, the launch object will launch directly in front of the original ground. The method returns the generated projectile instance object for user convenience elsewhere.
this.launcher.spawnProjectileInstanceLaunch(this.ball.gameObjectId, this.ball.worldTransform.position, new Vector(1, 0, 1));this.launcher.spawnProjectileInstanceLaunch(this.ball.gameObjectId, this.ball.worldTransform.position, new Vector(1, 0, 1));Calling the spawnProjectileInstanceLaunchToTarget method not only fires projectiles, but projectiles also come with a target tracking effect. In addition to the above four parameters, the method requires two additional tracking parameters to be passed in: tracking target and tracking acceleration. During flight, the projectile is continuously affected by tracking acceleration applied in the target direction (limited by the maxSpeed property) towards the target. Tracking launches can be applied to things like missiles or baseball spheres that follow a curved trajectory.
myLauncher.spawnProjectileInstanceLaunchToTarget(ball.gameObjectId, target, 2000, ball.worldTransform.position, new Vector(1, 0, 1));myLauncher.spawnProjectileInstanceLaunchToTarget(ball.gameObjectId, target, 2000, ball.worldTransform.position, new Vector(1, 0, 1));When the launch/trace launch method is called, a life is triggered to start delegating onProjectileLifeStart and executing the binding function. The delegate is triggered after the projectile is created and passes a reference to the newly created projectile in the binding function. In delegated binding functions, launch objects can be preprocessed such as modifying relative positions to accommodate different anchor positions, or mounting more launch objects to projectiles.
myLauncher.onProjectileLifeStart.add((projectile) => {

    // modify mount position of launch object so collision body wraps the entire object
    let grenade =  projectile.getChildByName("Grenade");
    grenade.localTransform.position = new Vector(0, 0, 30);

    // Generate an effect object and mount it
    let eff = GameObject.spawn("14318") as Effect;
    eff.parent = projectile;
    eff.localTransform.position = Vector.zero;
    eff.loop = true;
    eff.play();

});myLauncher.onProjectileLifeStart.add((projectile) => {
// modify mount position of launch object so collision body wraps the entire object
let grenade = projectile.getChildByName("Grenade");
grenade.localTransform.position = new Vector(0, 0, 30);
// Generate an effect object and mount it
let eff = GameObject.spawn("14318") as Effect;
eff.parent = projectile;
eff.localTransform.position = Vector.zero;
eff.loop = true;
eff.play();
});If the projectile has a tracking target set, but the target disappears for some reason during the tracking process (usually due to object deletion or Player exit), a tracking failure delegate onProjectileHomingFail is triggered and the binding function is executed. A reference to a projectile is passed out of a binding function, and the user can recycle or delete the projectile (and its mounted objects). If the projectile is not handled after the target is lost, the projectile will continue to move at the speed and direction it was before the target was lost.
Predicting the trajectory of motion
Calling the emitter's predictedTrajectory method returns the trajectory point of the projectile. The method also needs to set path point density and predicted time after incoming launch position and direction. Path point density represents the number of path points returned per second. The greater the value, the denser the path points, and the greater the performance drain. The predicted duration determines the total length of the predicted trajectory, and the longer the predicted trajectory (no collisions in the middle). It is important to note that predicted trajectories stop predicting after a collision is first detected and do not predict post-collision trajectories. So if the array returned is of length 1, it is possible that the projectile caused a collision in the starting position. By traversing the returned array of path points, you can create special effects or models on each point coordinate to draw the desired trajectory line style.
Projectile moving class
In most game scenarios, similar flying props perform the same, have the same business logic (collision handling), and do not need to control launched projectiles. You do this by setting the Object Launcher properties and then mass-manufacturing the same performance projectile launches in the scene such as bullets, missiles, etc. But in special scenes such as shooting, each time an object is fired may have different dynamics depending on the force, and hitting the basket/floor also requires different game logic. Features such as game pause also need to be achieved by controlling the projectile to pause/continue its motion during flight, when the Object Launcher appears inflexible. ProjectileMovement is therefore provided for the need for flexible projectile control, which can provide throwing power to each individual GameObject.
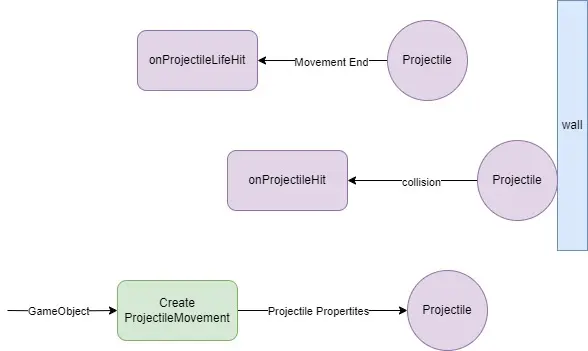
Creating a projectile moving object requires passing in a GameObject. Once constructed, objects can be fired in different manifestations through the class member API. Calling getRelatedGameObject method can get the projectile moving object's associated object, while calling setRelatedGameObject method can toggle its associated object.
Another optional projectile parameter can be passed into the projectile property's data object ProjectileMovementConfig to initialize the projectile moving object's property. The properties in ProjectileMovementConfig are essentially the same as Object Launcher, including object speed, motion period, gravity, target tracking and acceleration tracking, among others. Together, these properties determine the trajectory of the moving object thrown. Throwing moving objects also supports predicting trajectory.
Throwing a moving object also gets/sets the velocity property, which functions in line with the emitter. Since no new GameObject is created, the owner property of the throwing moving object cannot be assigned automatically, only by the user manually setting its holder and using it as a judgment for subsequent collision callbacks hitting the Player. Projectiles have corresponding hit delegates, end-of-life delegates, and tracing failed delegates, and you can bind corresponding event methods. Calling destroy methods can determine whether to destroy projectiles and their associated objects, or only projectiles, depending on the incoming parameters.
protected async onStart(): Promise<void> {

    // The following logic is executed on the server side
    if(SystemUtil.isServer()) {

        // Create a model array of balls and identify curBall.
        let balls = new Array<Model>();
        let curBall = 0;

        // Generate 5 spheres asynchronously in front and put them in array balls.
        for (let i = 0; i < 5; i++) {
            let ball = await GameObject.asyncSpawn("84121") as Model;
            ball.worldTransform.position = new Vector(200, i * 100, 25);
            ball.name = "ball" + i;
            ball.setCollision(CollisionStatus.QueryCollisionOnly);
            balls.push(ball);
        }

        // Create the throw.
        let projectile = new ProjectileMovement(balls[curBall], {initialSpeed: 1000});

        // Bind a function to the hit delegate, play a hit effect when the hit object is a target, and delete the target after 0.5s.
        projectile.onProjectileHit.add((hitGameObject, HitResult) => {
            EffectService.playAtPosition("99599", HitResult.impactPoint, {scale: new Vector(5, 5, 5)});
        });

        // Add a "LAUNCH" event listener sent by the client to fire the sphere right ahead.
        Event.addClientListener("LAUNCH", async (player: Player) => {
            projectile.launch(new Vector(1, 1, 1));
        });

        // Add the "DESTROY" event listener sent by the client, delete the ball object from the array, and toggle the projectile associated object.
        Event.addClientListener("DESTROY", async (player: Player) => {
            console.error("DESTROY");
            let deleteBall = projectile.getRelatedGameObject() as Model;
            let deleteIndex = balls.indexOf(deleteBall);
            balls.splice(deleteIndex, 1);
            if(balls.length > 0) {
                curBall = (deleteIndex) % balls.length;
                projectile.setRelatedGameObject(balls[curBall]);
                deleteBall.destroy();
            } else {
                projectile.destroy(true);
            }
        });
    }

    // The following logic is executed on the client
    if(SystemUtil.isClient()) {
        // Add a key method: press key "1" to send a "LAUNCH" event to the server and fire spheres.
        InputUtil.onKeyDown(Keys.One, () => {
            Event.dispatchToServer("LAUNCH");
        });

        // Add a key method: press key "2", send a "DESTROY" event to the server, switch to the next sphere and delete the previous one.
        InputUtil.onKeyDown(Keys.Two, () => {
            Event.dispatchToServer("DESTROY");
        });
    }
}
protected async onStart(): Promise<void> {
// The following logic is executed on the server side
if(SystemUtil.isServer()) {
// Create a model array of balls and identify curBall.
let balls = new Array<Model>();
let curBall = 0;
// Generate 5 spheres asynchronously in front and put them in array balls.
for (let i = 0; i < 5; i++) {
let ball = await GameObject.asyncSpawn("84121") as Model;
ball.worldTransform.position = new Vector(200, i * 100, 25);
ball.name = "ball" + i;
ball.setCollision(CollisionStatus.QueryCollisionOnly);
balls.push(ball);
}
// Create the throw.
let projectile = new ProjectileMovement(balls[curBall], {initialSpeed: 1000});
// Bind a function to the hit delegate, play a hit effect when the hit object is a target, and delete the target after 0.5s.
projectile.onProjectileHit.add((hitGameObject, HitResult) => {
EffectService.playAtPosition("99599", HitResult.impactPoint, {scale: new Vector(5, 5, 5)});
});
// Add a "LAUNCH" event listener sent by the client to fire the sphere right ahead.
Event.addClientListener("LAUNCH", async (player: Player) => {
projectile.launch(new Vector(1, 1, 1));
});
// Add the "DESTROY" event listener sent by the client, delete the ball object from the array, and toggle the projectile associated object.
Event.addClientListener("DESTROY", async (player: Player) => {
console.error("DESTROY");
let deleteBall = projectile.getRelatedGameObject() as Model;
let deleteIndex = balls.indexOf(deleteBall);
balls.splice(deleteIndex, 1);
if(balls.length > 0) {
curBall = (deleteIndex) % balls.length;
projectile.setRelatedGameObject(balls[curBall]);
deleteBall.destroy();
} else {
projectile.destroy(true);
}
});
}
// The following logic is executed on the client
if(SystemUtil.isClient()) {
// Add a key method: press key "1" to send a "LAUNCH" event to the server and fire spheres.
InputUtil.onKeyDown(Keys.One, () => {
Event.dispatchToServer("LAUNCH");
});
// Add a key method: press key "2", send a "DESTROY" event to the server, switch to the next sphere and delete the previous one.
InputUtil.onKeyDown(Keys.Two, () => {
Event.dispatchToServer("DESTROY");
});
}
}Projectile moving objects can control their state of motion during launch. It is "Launched" during motion and is available through the status property. By calling the pause method to pause the motion of a projectile moving object, you can achieve pause games, or space-time stops. At this point the state of the projectile switches to "Ready" and calling the launch/trace launch method in the "Ready" state refreshes the internal properties to relaunch, and the resume method can be called if you wish to continue the previous trajectory.
 Editor Doc