Language localization
It takes about 15 minutes to read this.
What is language localization
- Language localization refers to allowing editors to produce experiences in different languages to help adapt the experience to different language environments
- Experience localization features include the following three parts:
- I. Collecting original text
- II. Automatic or self-translated import
- III. Replace with translated text at runtime
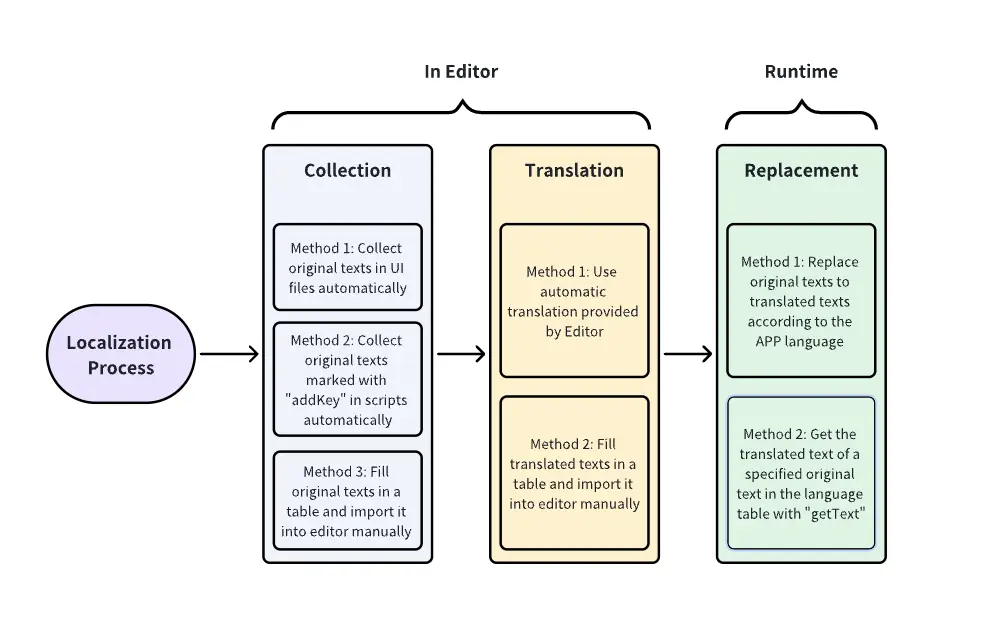
Experience Localization Usage Process
Phase 1 - Collect original text
Method One: Collect original text in UI file with one click
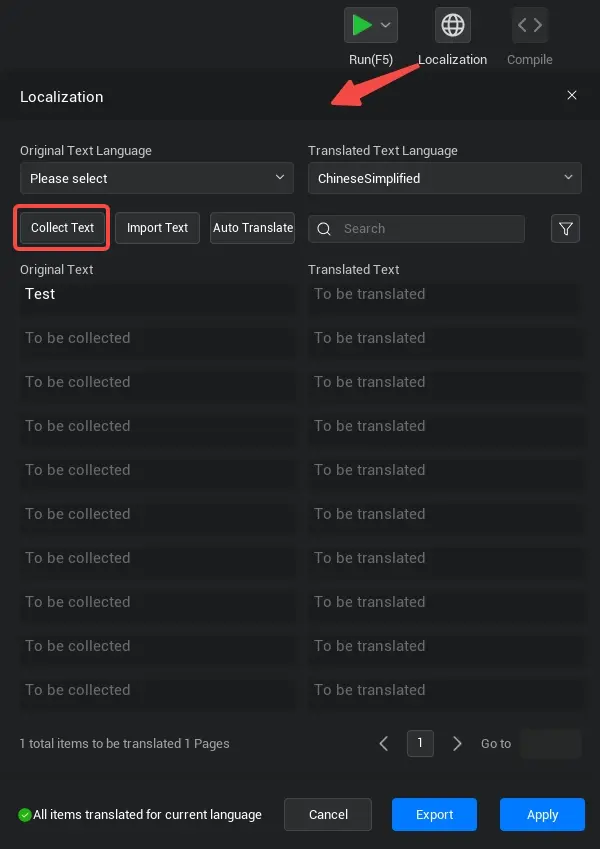
- Open the localization window from the top entry of the main editor and click [Collect Text] to collect the text of UI widget configuration within all UI files of the current project;
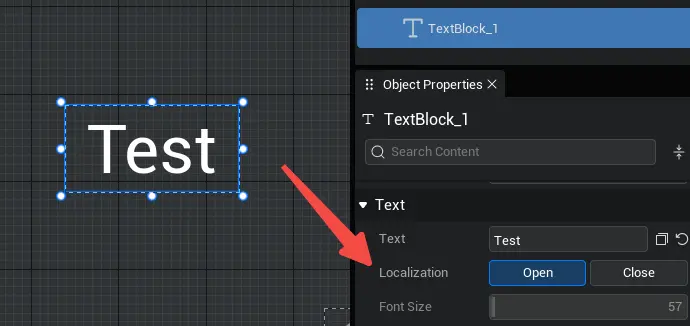
- UI widgets such as Text Boxes/Input Boxes that allow configuration of text have a [Localization] switch on the property panel that collects the configured text of the widget when turned on, which is turned on by default;
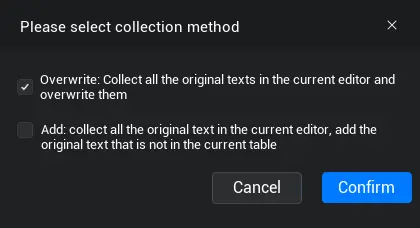
- After clicking collect text, a window will pop up to select the collecting method. You can select [Override] or [New]: Select [Override] to delete the text records in the multilingual table and collect them again. Select [New] to add only the original text not currently in the multilingual table;
- The exact same original text will only be collected once, and multiple duplicate original text entries will be automatically de-duplicated to keep only one when collected or imported.
Method Two: Collect original text marked with addKey in script with one click
- For dynamically set text in the script, cannot be filled in the UI file in advance, you can mark the original text with LanguageUtil.addKey (“Test”) method, then the same as method one, click the [Collect Text] button in the localization window, you can collect the script marked original text;
- The addKey method itself does nothing at runtime, only to mark whether it can be automatically collected by the localization feature; so if the original text has been collected in a multilingual table by another method, the runtime can be replaced with translated text even without the addKey tag.
//There is no difference between the following two writing methods at runtime, the difference is just whether it can be collected by the localization collect text function, you need to manually click the [Collect Text] button in the localization window to collect
this.tiptxt.text = LanguageUtil.addKey("Test")
this.tiptxt.text = "Test"
//There is no difference between the following two writing methods at runtime, the difference is just whether it can be collected by the localization collect text function, you need to manually click the [Collect Text] button in the localization window to collect
this.tiptxt.text = LanguageUtil.addKey("Test")
this.tiptxt.text = "Test"Method Three: Organize the original text table yourself and import it (recommended)
- First, click the [Export] button at the bottom of the localization window to export the multilingual table of the current project as a csv file. Fill in the original text used in the project in column A within the csv file;
- Then, click the [Import] button of the localization window, select the import mode as [Overwrite] or [Add] and confirm, you can import the finished csv file into the multilingual table of the current project;
- Note that the imported table must have the same structure and header name as the exported table, otherwise it will not be recognized correctly;
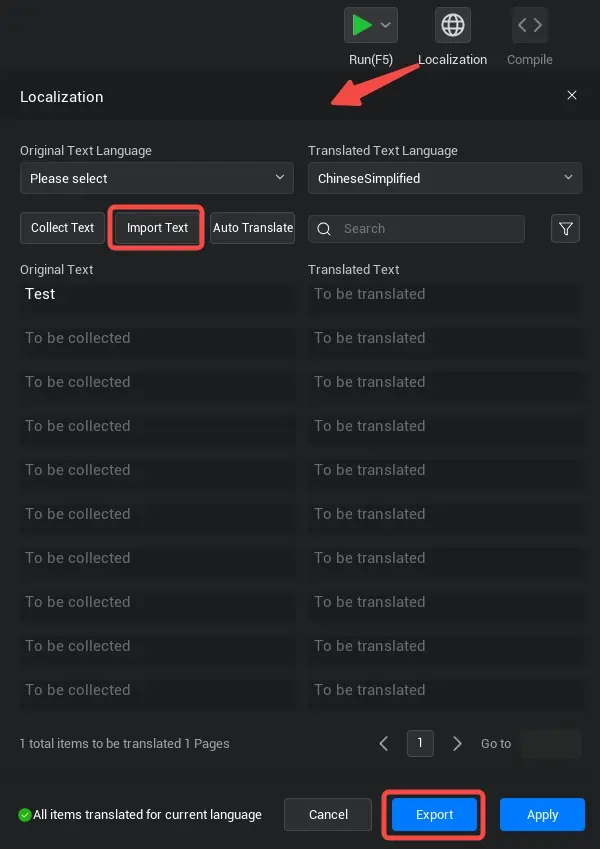

- Can be Unioned with the first two methods, such as automatically collecting UI files and scripts marked text, in addition to self-organizing an original language table and import, note the selection of import mode for [new];
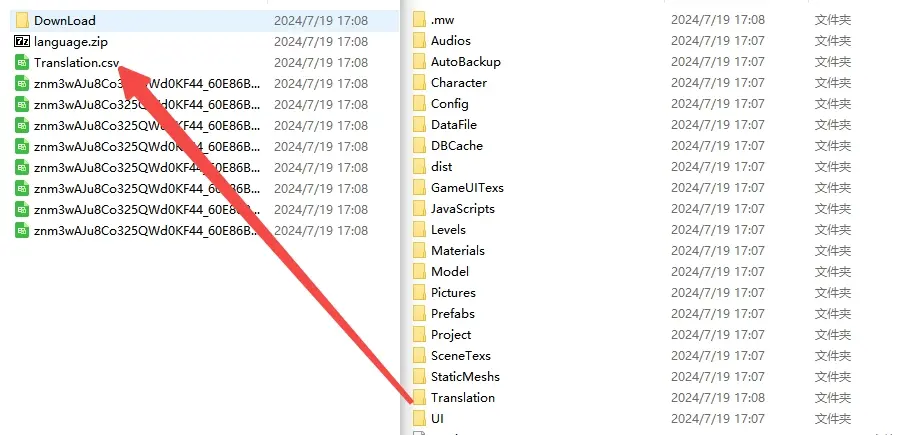
- The applied multilingual tables are stored in the project at the path - project name \Translation\Translation.csv. If the results of an auto collect/auto translate feature are not satisfactory, the previous version of the multilingual tables can be found in the previous version of the project file and re-imported.
Stage 2 - Automatic or self-translation
Method One: Use the editor's automatic translation function
- After completing the original text collection, you can use the editor's machine translation feature to select the language type of the original text, then click the Auto Translate button and wait for the automatic translation to complete. The editor currently supports machine translation between nine languages: English, Chinese (Simplified), Chinese (Traditional), Spanish, French, Russian, Portuguese, Japanese, and Korean.
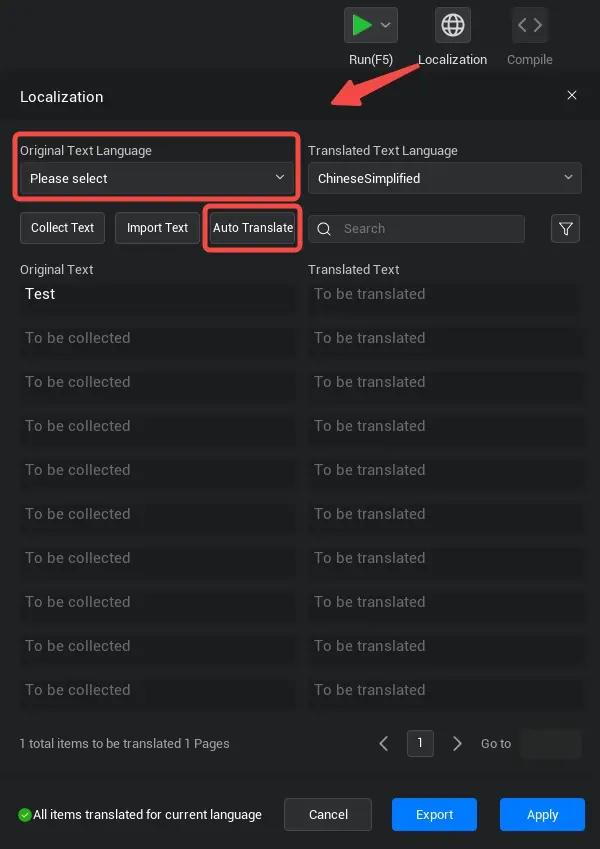
- The number of entries currently remaining that have not been translated will be displayed at the bottom of the localization window. If individual original text cannot be translated by machine, please translate it yourself and fill in the form;
- Please select the correct type of original text language, otherwise automatic translation may not result in a reasonable translation;
- To prevent self-translated entries (i.e., method two below) or calibrated entries from being overwritten by auto-translation, auto-translation only translates empty cells in the current multilingual table.
Method Two: Translate and import the form yourself
- Similar to method three of collecting original text, if you want to pursue higher translation quality, you can export an original text csv table, translate it yourself manually, translate columns B to J within the translated text csv file, and then import the translated table;

- Manual translation can be Unioned with automatic translation, such as manually translating a key language, filling in the exported multilingual table, then importing it, and using automatic translation to translate the remaining non-key languages.
Phase 3 - Replace with translated text at runtime
Method one: Runtime automatically replaces the translated text in the target language according to the APP language
- When the experience pulls up, the engine reads the kind of language Player sets in the APP and automatically calls LanguageUtil.setLanguage API to set the experience language to this language; that is, the target language can be automatically selected as long as the complete translated text of the target language is recorded in the multilingual table without calling any API;
- After setting the language category at runtime, it retrieves whether the text used everywhere exists in the original text column of the multilingual table. Note that it must be identical to the original text to be recognized. After recognition, the text is automatically replaced with translated text in the target language;
- In order to ensure that projects that have been localized and adapted to only one or several languages can also play properly, the priority of target language selection is: APP Language → English → Original Language; that is, the translated text of English is displayed if there is no translated text of any App language in the language table, and the original language is displayed if there is no translated text of English in the language table.
Method Two: Use getText at runtime to get translated text of the original text specified in the multilingual table
- This method is mainly used to deal with situations such as dynamically stitched text or image/sound localization that require dynamically fetching translated text from translation tables (simple stitched text can also be handled with placeholders).
// Get the translated text for the current target language for an original text in the multilingual table
this.tiptxt.text = LanguageUtil.getText("Test")
this.tiptxt.text = LanguageUtil.getText("Test1")+"number"+LanguageUtil.getText("Test2")
// Get the translated text for the current target language for an original text in the multilingual table
this.tiptxt.text = LanguageUtil.getText("Test")
this.tiptxt.text = LanguageUtil.getText("Test1")+"number"+LanguageUtil.getText("Test2")## How to handle image/sound localization - It is not necessary to have pre- and post-translation text in multilingual tables, but also strings that switch according to the language environment, such as Asset ID. If you want to set up specialized images/sounds based on the Player's language type, you can use language tables and localization APIs - getText to achieve localization in the experience; - First, create images/sounds in two or more languages and upload them to the asset library; 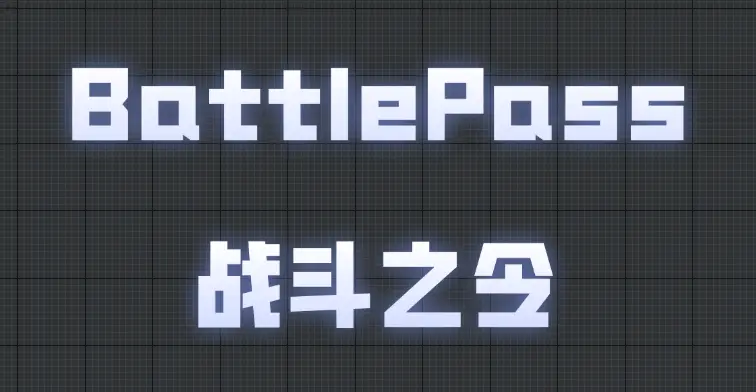 - Then, fill in the Asset ID in the multilingual table and open the localization window to import the table;
  - Finally, take images as an example. Set the GUID of the image control in the script using the getText API; set the image control to the Asset ID of the target language when the experience runs, i.e. readable language table. Note that if the experience runs with a language switch, the completed asset set in this way will not follow the replacement and the Asset ID of the target language will need to be reset once.
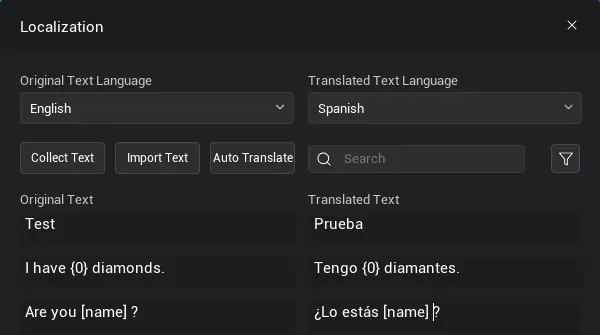
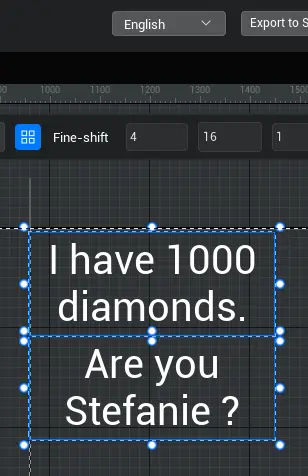
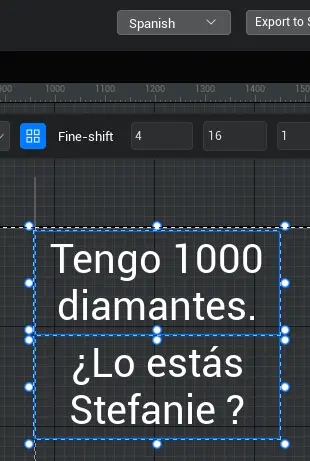
image.imageGuid = LanguageUtil.getText("165429")image.imageGuid = LanguageUtil.getText("165429")## How to handle dynamically stitched text using placeholders - Sometimes dynamically stitched text appears in the experience, such as "I have 100 diamonds.," "Are you Stefanie?", and the "100" and "Stefanie" in these two sentences are not set in advance, but are dynamically fetched and restitched without translation. In this case, instead of exhausting all potentially dynamically stitched original text in a multilingual table, the original text with placeholders should be used. - These two sentences can be replaced with placeholders for text that needs to be dynamically spliced, with the following table:
| Original text | Translated text | Dynamically spliced original text | Dynamically spliced translated text |
|---|---|---|---|
| I have {0} diamonds. | Tengo {0} diamantes. | I have 100 diamonds. | Tengo 1000 diamantes. |
| Are you [name] ? | ¿Lo estás [name] ? | Are you Stefanie ? | ¿Lo estás Stefanie ? |
 |  |
|---|---|
| Original text | After translation |
- There are three placeholder formats that localization currently supports recognition. Markup text within these three placeholders is not automatically translated, and run-time detect substitution skips placeholders for matchmaking:
| Placeholder format | Examples |
|---|---|
{**} | {0},{number} |
| <**> | <color=#ff0000ff> |
| [**] | [name] |
| 中文 |
- If you use the automatic translation function to translate the original text with placeholders, there may be problems such as incorrect word order and lack of spaces. You need to focus on checking the translation effect of the placeholder text;
- In addition to placeholders, this dynamic stitching text can be handled using the getText API already described above.
- Given the problem of noun singular plurals, interfaces should be designed to bypass dynamic stitching text whenever possible, such as "You get 100 gold coins." The best practice is to display the text boxes "You get the following items" and "100" separately, and replace the coins with icons.
## How to preview the effect after switching languages - In addition to real-time testing on mobile, starting the experience after switching the APP language to check the localization of the various languages separately, the following methods are available for previewing in the editor: - Select the preview language at the top of the UI editor to preview the effect of text switching languages set in the UI file; 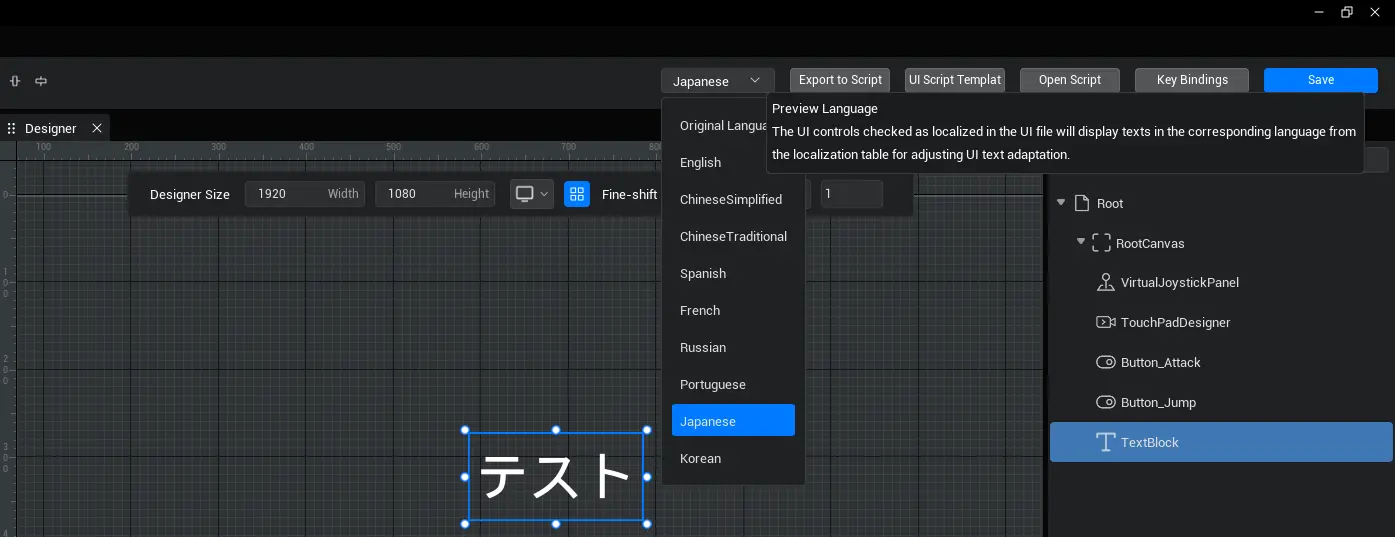 - Open the settings menu, select the localization preview tab, select the preview language, and then launch the experience in the editor. That is, you can preview the experience in PIE.
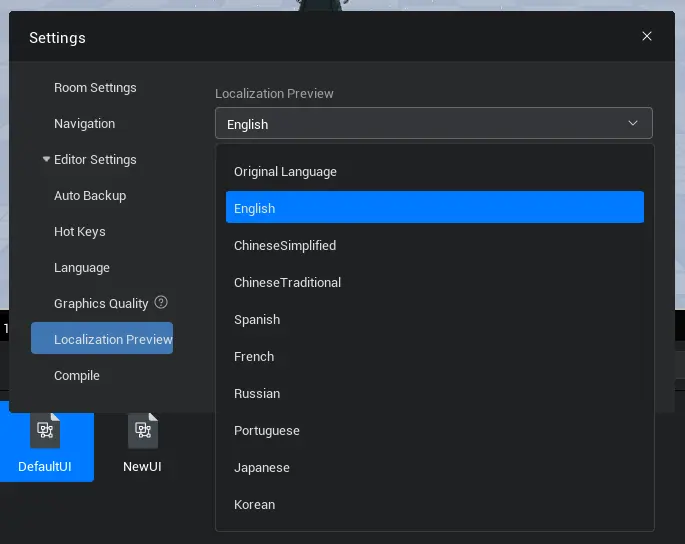
## How to make the interface more beautiful after switching languages
TIP
Because the length of the same text after translation into different languages differs greatly, attention needs to be paid to the effect of text everywhere after conversion into different languages, such as whether there are text hyperframes, font size gaps and so on: - If the effect is demanding and text size is desired, choose a suitable fixed size and check each language for excessively long translated text leading to hyperboxing; - If you don't want to put too much effort into multilingual text display, you can accept font size, you can turn on text box [Adaptive Text Box] property (default on), and set [Maximum font size] to prevent font size when there is less text;
### Use adaptive text box and maximum minimum font size feature - [Adaptive Text Box]: When turned on, the appropriate font size to fill as much text as possible is calculated based on text content and text box size. Therefore, if the text has a fixed size display area and you do not want the hyperbox to appear after switching languages, you should turn on the [Adaptive Text Box] function. - [Maximum font size]: If the font size calculated by [Adaptive Text Box] is greater than [Maximum font size], [Maximum font size] is applied to this text box - In order to prevent the occurrence of text boxes of the same size where some of the text is shorter and the font size calculated by Adaptive Text Box is too large, you can set a Maximum Font Size to make the text look more coordinated.
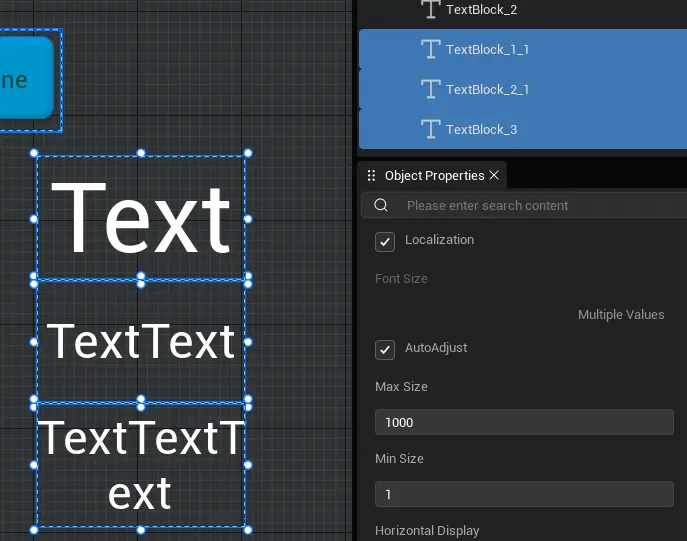 | 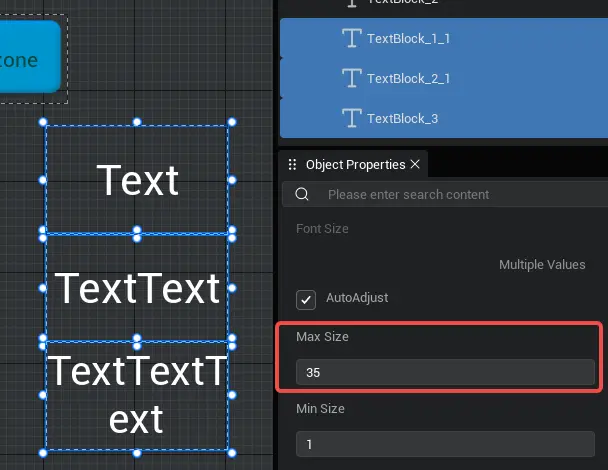 |
|---|---|
| Before setting maximum font size | After setting maximum font size |
- [Minimum font size]: If the font size calculated by [Adaptive Text Box] is less than [Minimum font size], [Minimum font size] will be applied to this text box
- Please note that [Adaptive Text Box] automatically calculates the font size is the maximum font size to fill the text box. If experience dynamically setting text results in the application of [Minimum Font Size], it means that [Minimum Font Size] is greater than the adaptive font size, text will have a greater probability of overboxing, and then the editor will give an error prompt; that is, [Minimum Font Size] can be set itself, but its role is mainly to check whether the text in the project is too small after translation into different languages. If this happens, it is recommended to streamline the translated copy or modify the text box size.

- Please note that [Adaptive Text Box] automatically calculates the font size is the maximum font size to fill the text box. If experience dynamically setting text results in the application of [Minimum Font Size], it means that [Minimum Font Size] is greater than the adaptive font size, text will have a greater probability of overboxing, and then the editor will give an error prompt; that is, [Minimum Font Size] can be set itself, but its role is mainly to check whether the text in the project is too small after translation into different languages. If this happens, it is recommended to streamline the translated copy or modify the text box size.
Plan when making UI and reserve translation space
- It is highly recommended to consider localization adaptation at the outset of UI production, leaving text display areas.
- Note that translated text in various languages should not be too long, long translated text should be as concise as possible, and text in the same batch of text boxes should not differ too much in length.
- If the Adaptive Text Box is turned on, it is recommended that text boxes containing short single-line text be shorter height and width whenever possible. This ensures that most single-line text has a consistent font size and is more aesthetically pleasing, and does not overframe even when translating extra-long text (although try to avoid extra-long text).
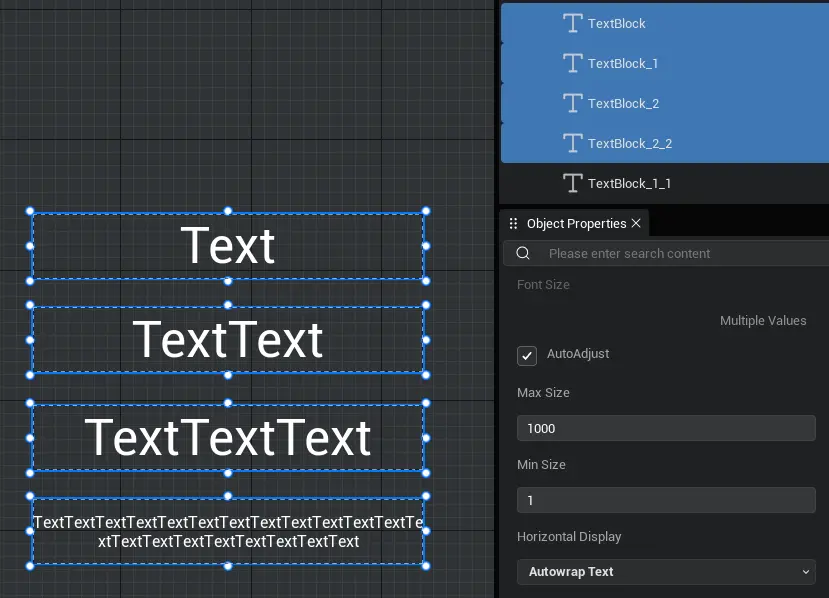
- For text boxes with Adaptive Text Boxes not turned on, the editor provides a warning prompt for hyperbox detection:
- When the Adaptive Text Box is not turned on, each time a new text box is created, or modified to a different text content than before (including translated text replaced with localization), the text content is detected as out of text box range, and a warning prompt is given if the text box is out of range.
- This will not be detected in actual experience, it will only be detected in PIE with a warning; and it will only detect text boxes available in TS scripts.
- For the description, the presence of a warning doesn't mean that the actual performance is necessarily out-of-box. If the text content happens to fill the text box, there is a risk of out-of-boxing at some resolutions, so this situation still gives a warning for easy inspection. It is recommended to try to avoid this situation where it happens to be filled, leaving some space in the text box.
- If there is a hyperbox but it does not affect the display, such as text box range < text content range < baseboard image range, the warning prompt can be ignored without modification, although the text is "superboxed" but does not exceed the baseboard range.

 Editor Doc