Create the User Interface(UI)
It takes about 10 minutes to read this article
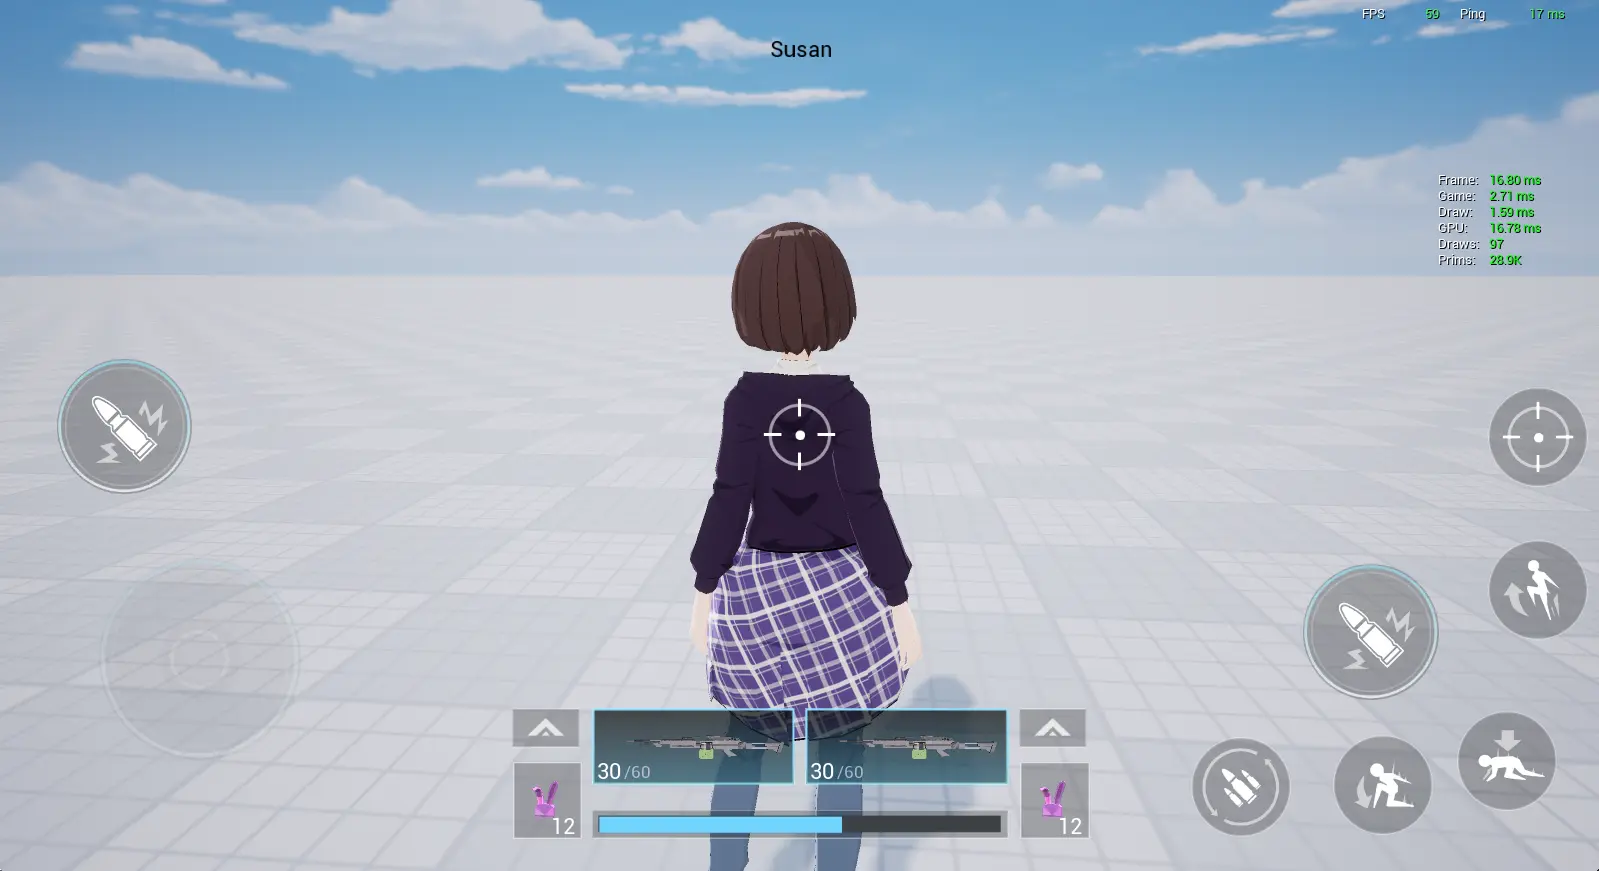
What is the User Interface?
User Interface refers to the experience software, including button, animation , text, windows and other experience design elements that directly or indirectly come into contact with experience users in the experience graphics .
How to create a UI?
- First, create a new UI file in the project content library: click the UI tab of the project content, click the New UI button
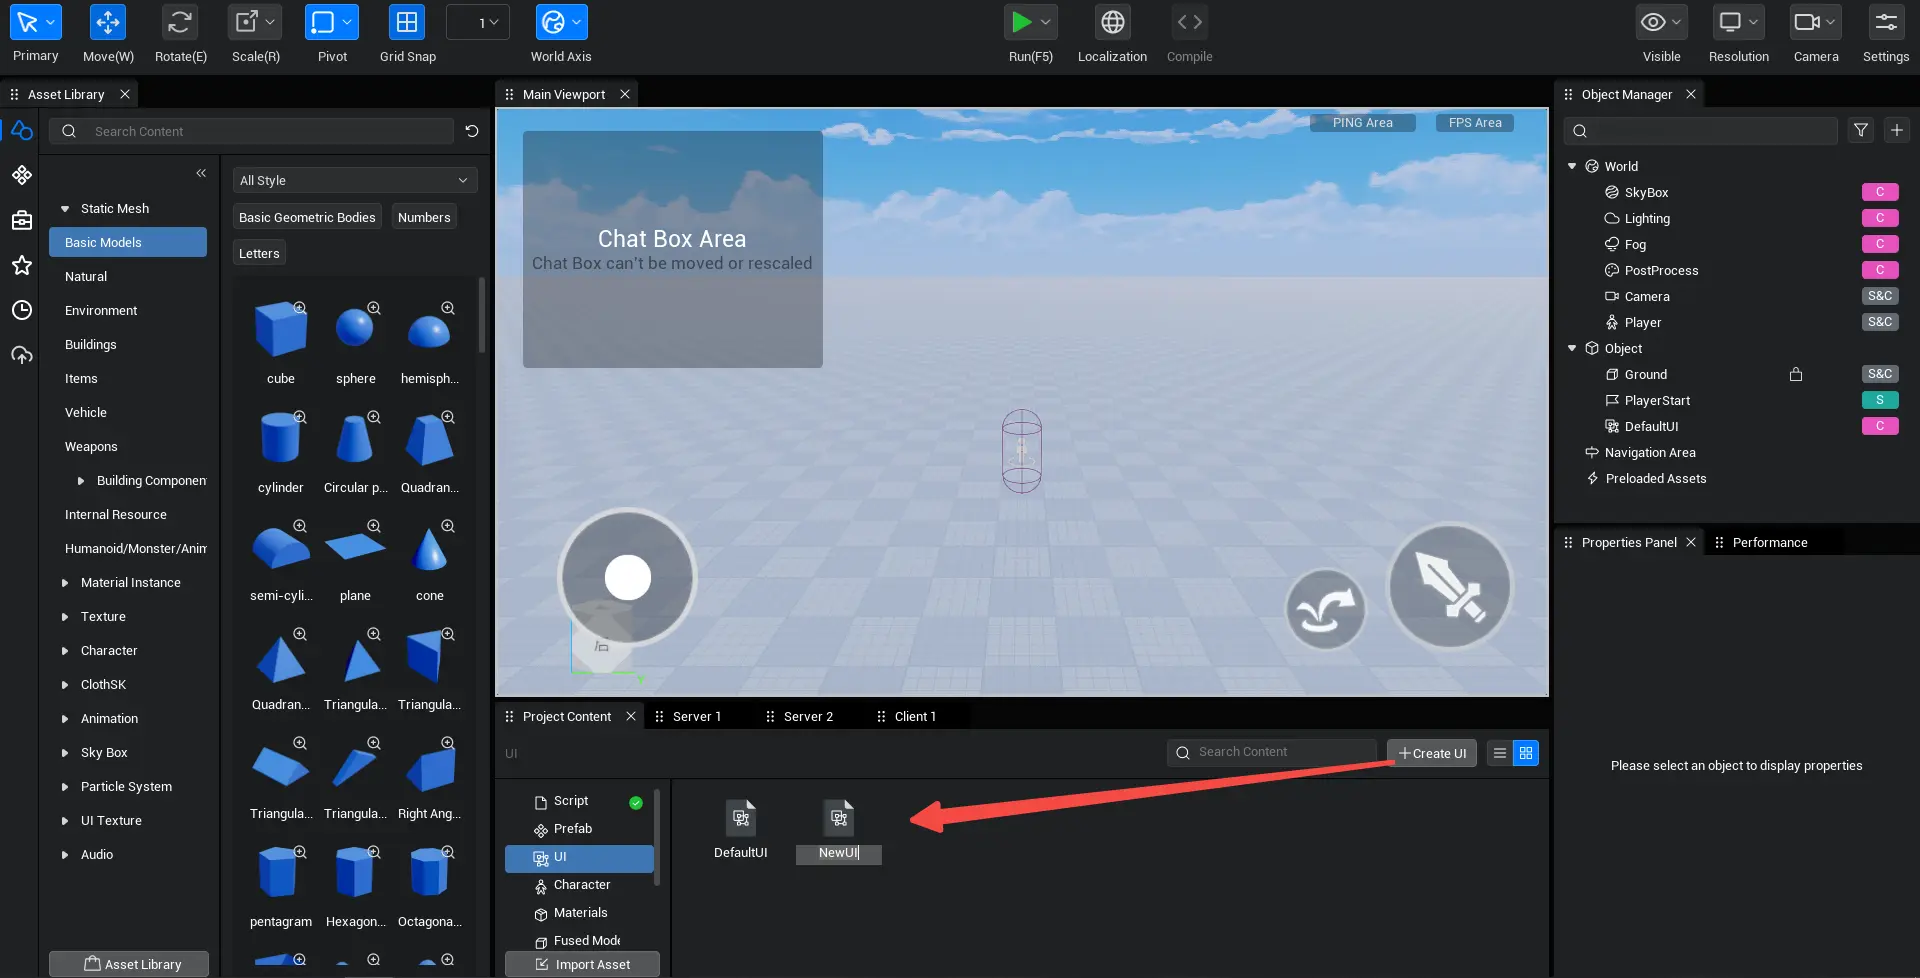
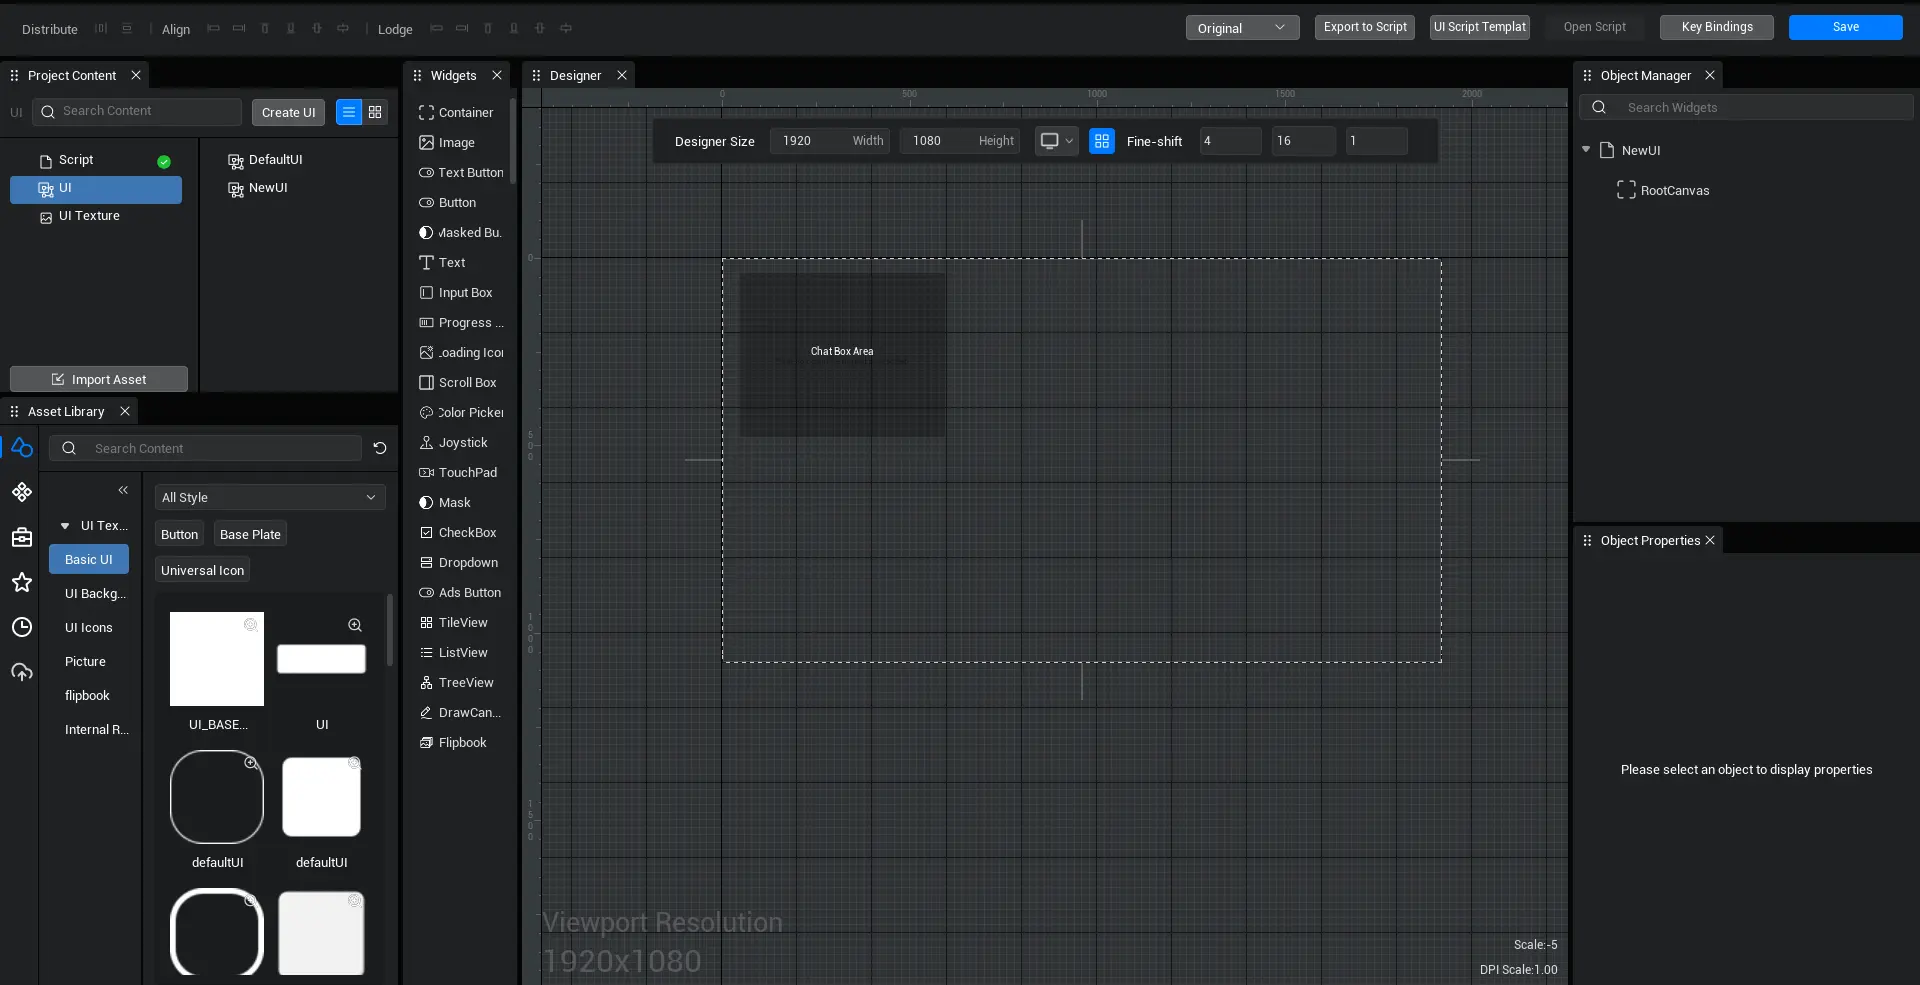
- Then double-click to open the newly create UI file and the UI editor will pop up.
- We can create an ideal User interface in the UI editor and click Save to save this UI file .
UI editor Module description:
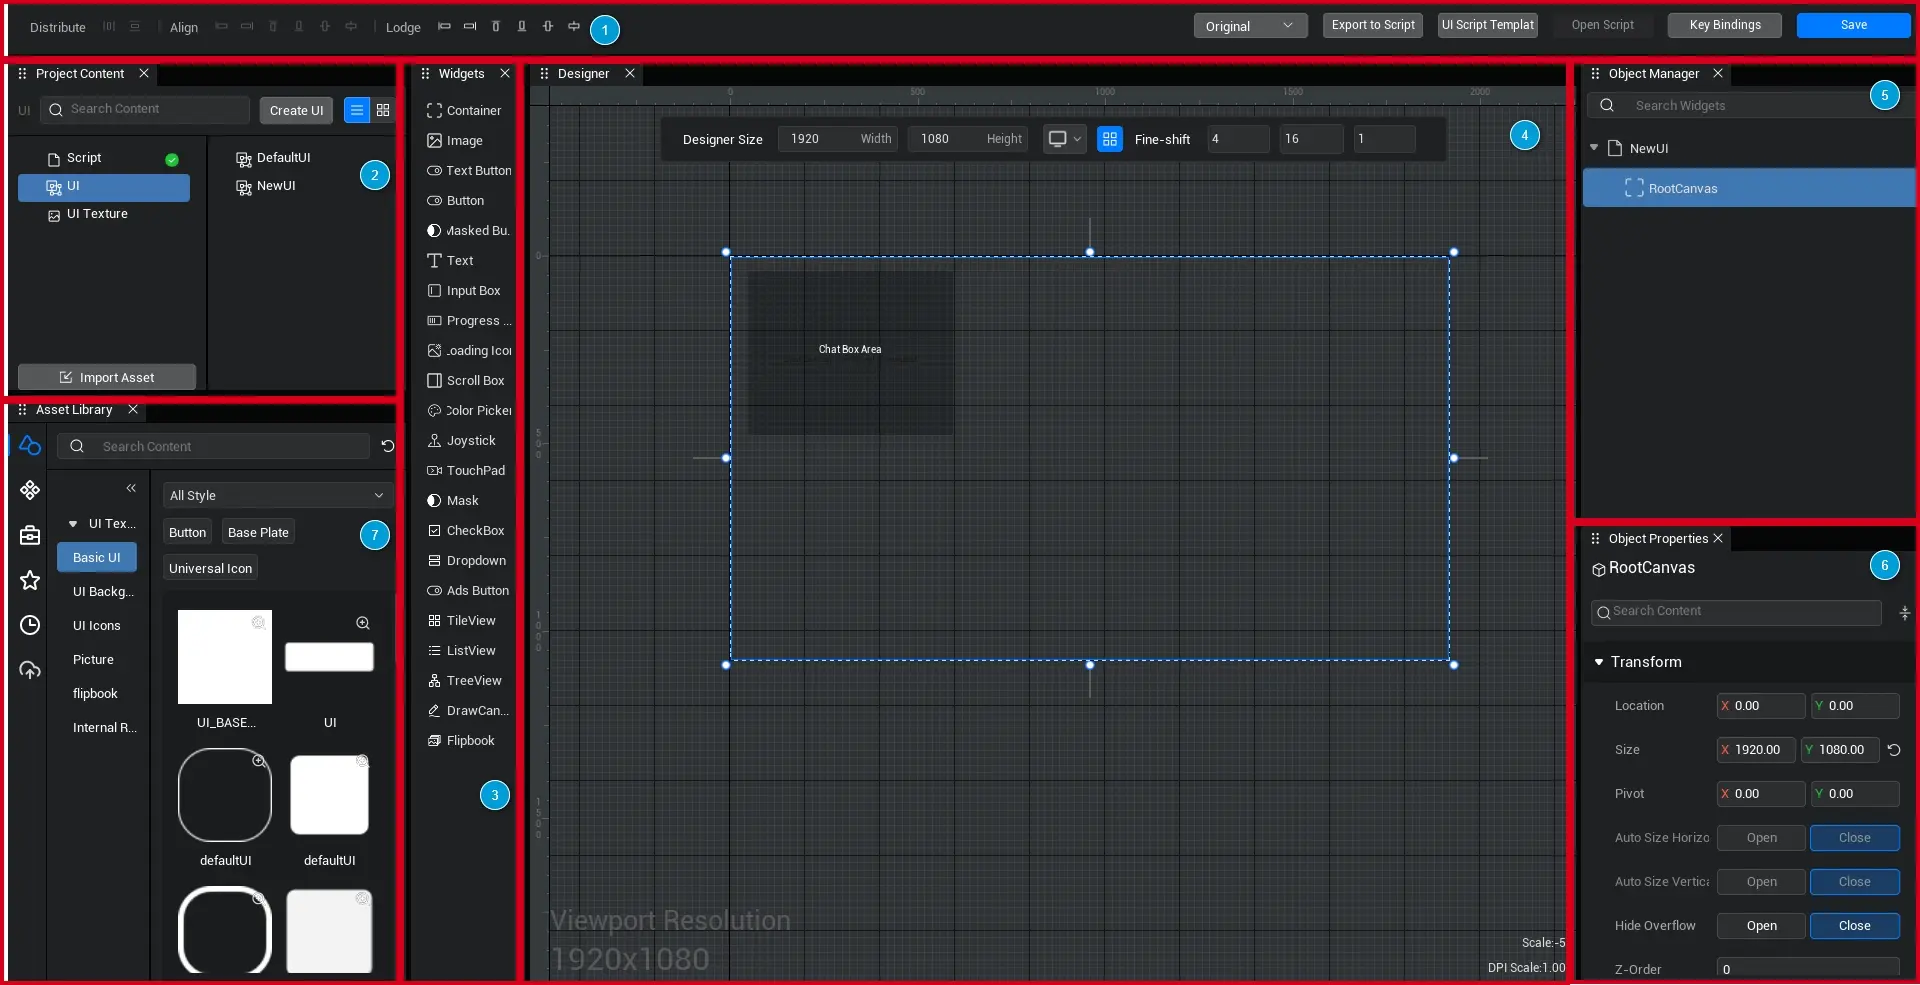
The UI editor includes the toolbar, system UI widget and customize UI list, designer, object list, property panel, local asset library, and script list:
- 1. Toolbar: Place and save, key binding, view and other common setting functions.
- 2. Project content: Use customize /UI script/UI texture.
- 3. System UI widget list: place common UI widget
- 4. Designer: displays the interface effects and can operate and modify the visual UI widget.
- 5. object list: Place all UI widget to facilitate user operation and management.
- 6. property panel : displays all property of the selected UI widget , allowing users to modify parameter to achieve the desired effect.
- 7. asset library : Displays all UI texture asset in the asset library , allowing you to easily drag and drop them to widget to change asset.
How to use UI editor to stitch UI?
- First of all, we need to understand what are the basic widget of UI?
- Including: Container, image, button, text, Input Box, Progress Bar, Scroll Box, etc. For specific UI widget related function tutorials, please refer to other parts of the manual
- After analyzing all the basic widget of a UI, we can drag the corresponding widget into the main viewport to splice the UI.
- For example, we want to stitch together a gender selection interface.
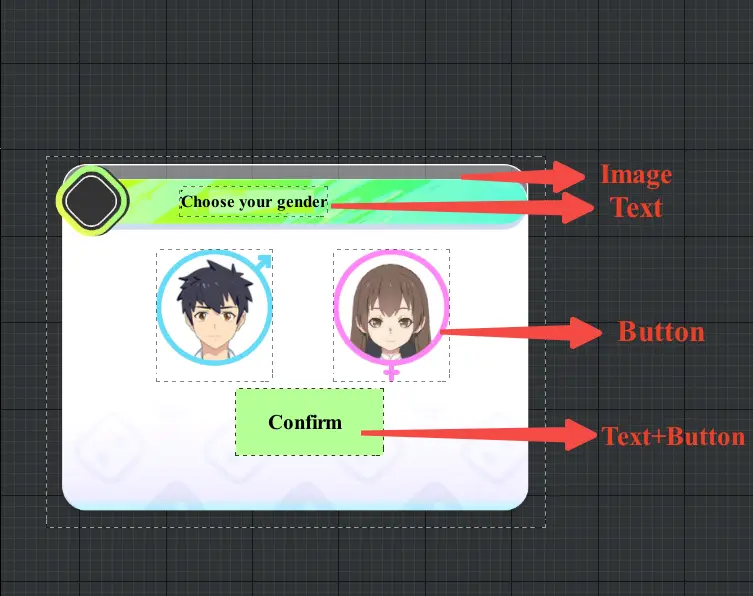
First, we drag in a image widget as the background of the interface.
- You can modify the position and size of the image and place it in a more reasonable position;
- Change the align to center align in horizontal direction and top align in vertical direction to facilitate interface adaptation;
- Set the style of the image . Drag the UI asset in the asset library into the image and modify the image presentation style.
Secondly, we drag in a text widget as a text introduction to the interface.
- You can set the position and size of the text to place it in a more reasonable position;
- Change the align to center align in horizontal direction and top align in vertical direction to facilitate interface adaptation;
- Set the text content, change the text to "Please select your gender", and set the size to 24;
- Set the text style, change the text color to black, and change the align to center.
Then we drag in three button widget as the UI for gender options and confirm functions, thus completing the preliminary UI splicing.
- Set the position and size of the button respectively, and place the button in a more reasonable position;
- Change the align of the three button to center align in horizontal direction and top align in vertical direction to facilitate interface adaptation;
- Drag another text widget under the confirm button, change the text to "confirm", and set the size to 24;
- Set the image style of the button , drag the UI asset from the asset library into the image, and modify the image.
How to add UI to the scene?
- After completing the UI stitching, we will learn how to add the UI to the experience scene and execute the logic we wrote in the script.
Method 1: Drag the UI file into the scene in the editor
- In the main editor, you can directly drag the UI file into the experience scene or object list to instantiate the UI file as a UI object;
- Using this method, you don't need to write how to add UI in the script. After entering the experience , the UI object in the object list will be automatically added to the experience scene.
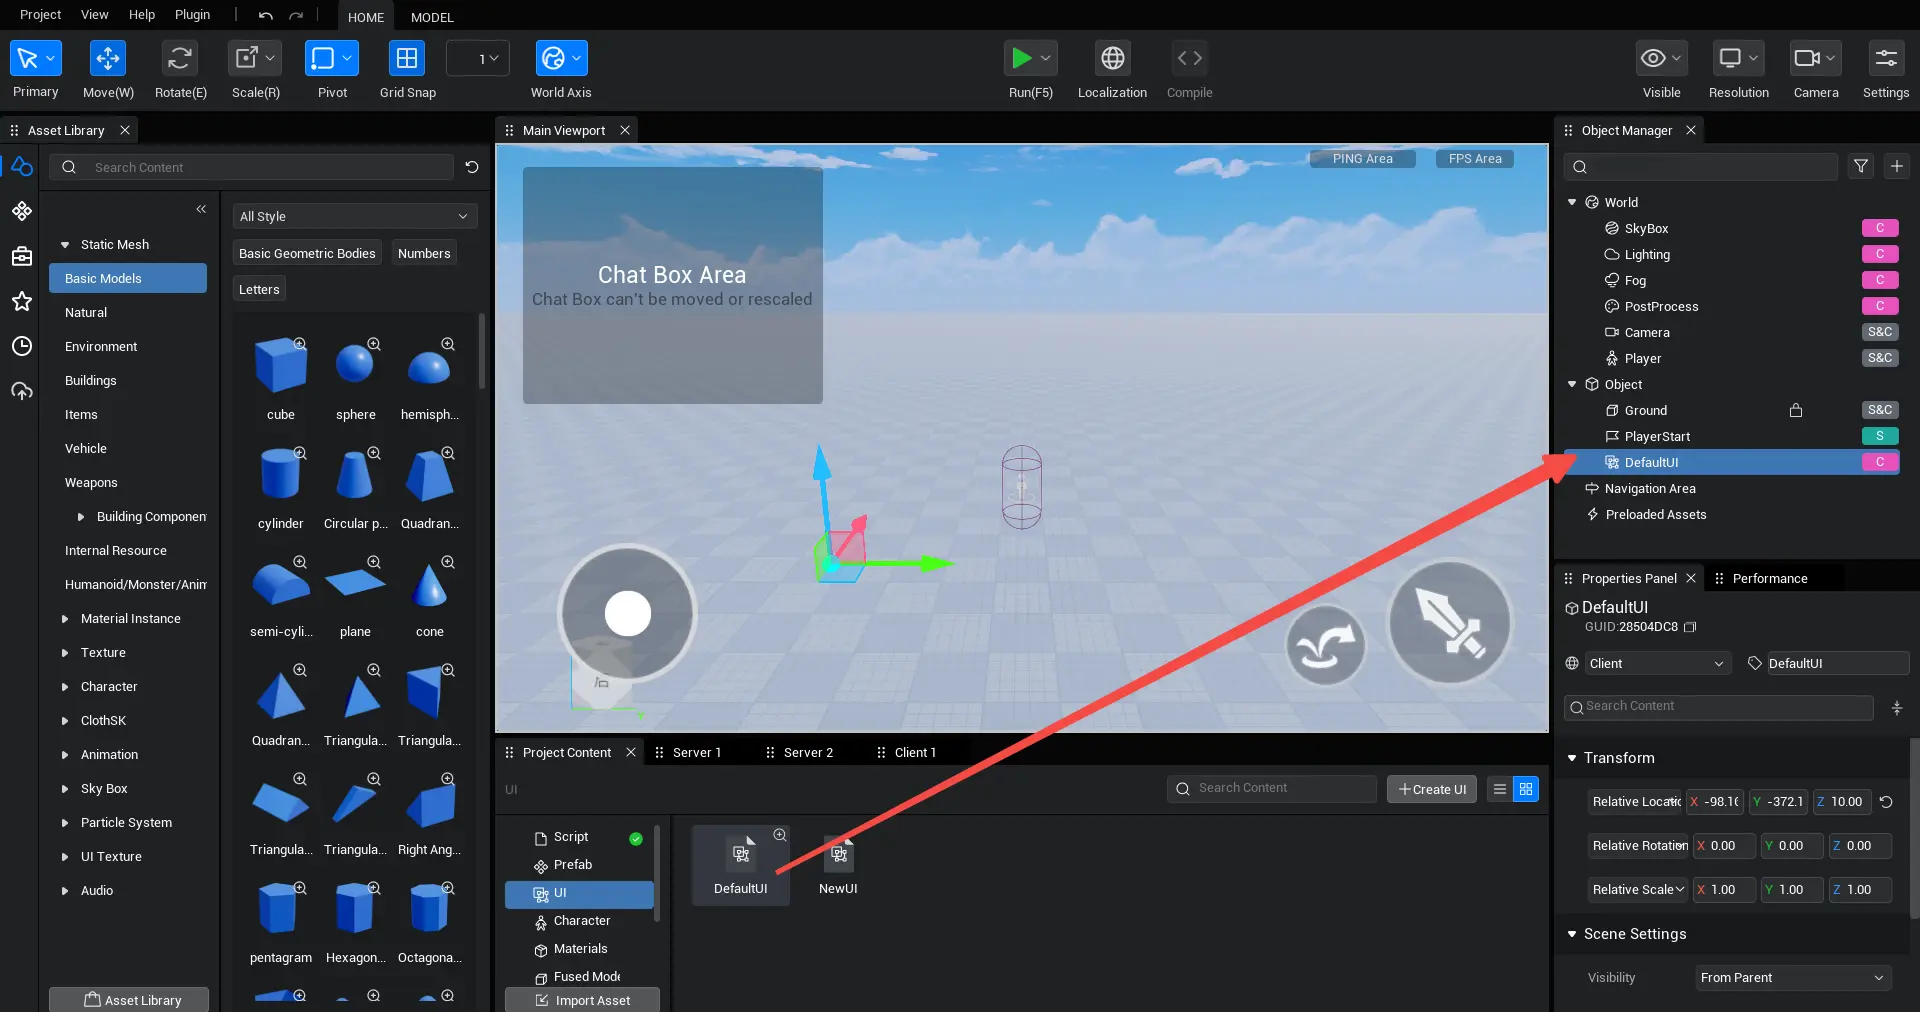
- If you want to write logic for the UI file(such as using a button to jump/select gender), first we need to create a new UI script.
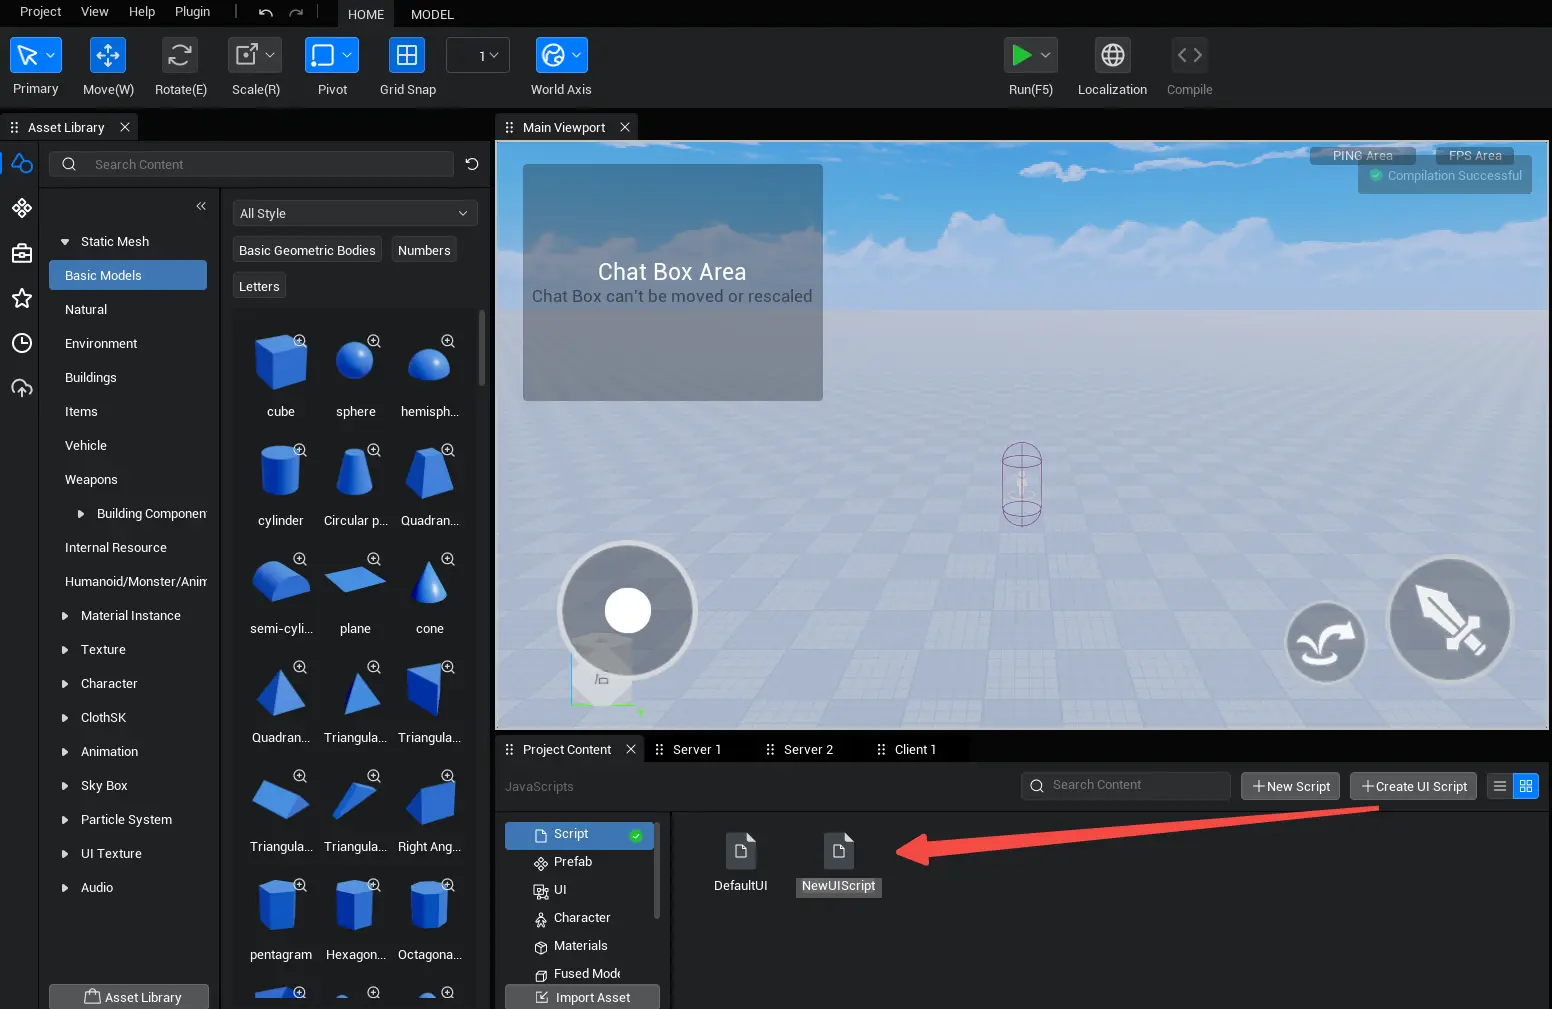
- Open the UI file you just assembled, and under the property of its root directory Root, drag the UI script into the property bar to complete the binding of the UI script and the UI file.
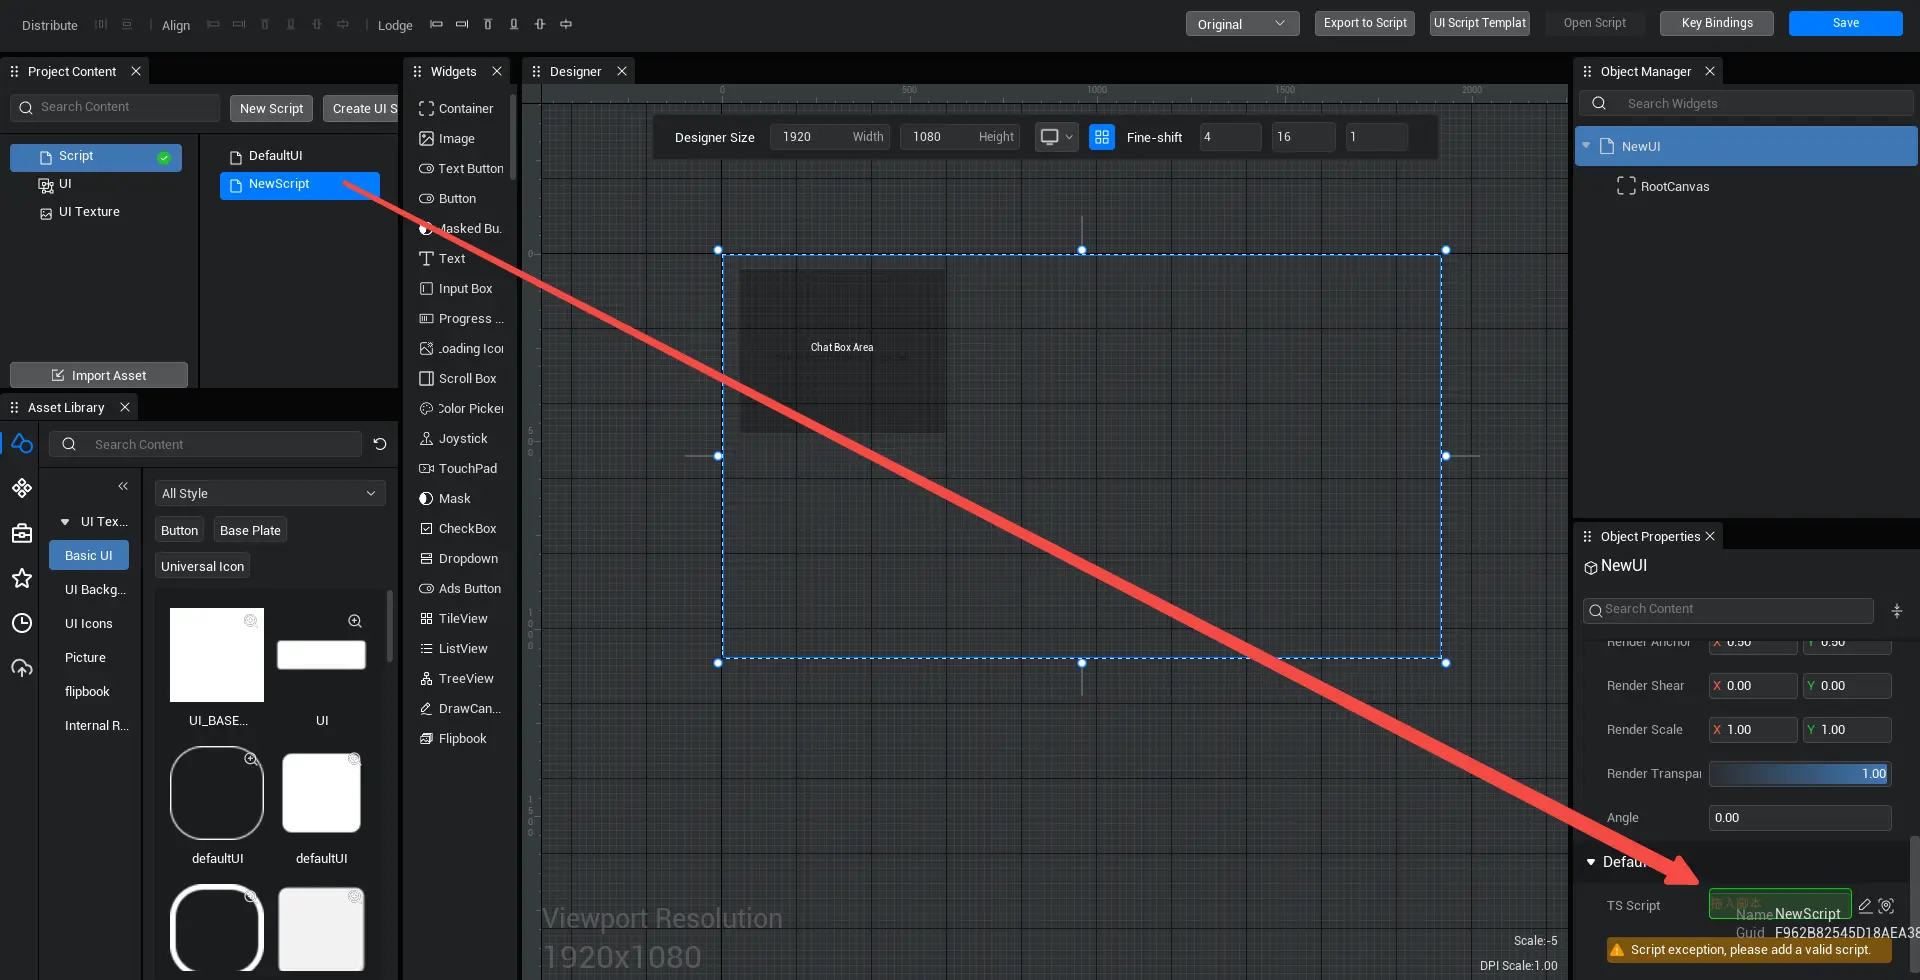
- Finally, click the [Open script] button in the UI editor menu bar, or double-click the newly created UI script in [Project Content] - [ script ] to open the UI script bound to this UI file , and then you can write the relevant UI logic.
- For example, to achieve a simple logic of a jump button:
@UIBind('')
export default class DefaultUI extends UIScript {
	private character: Character;

	/** Only call once during experience time for non- TEMPLATE instances */
  protected  onStart() {
		//Set whether onUpdate can be triggered every frame
		this.canUpdate = false;

		// Find the corresponding jump button
    const jumpBtn = this.uiWidgetBase.findChildByPath('RootCanvas/Button_Jump') as Button
		const attackBtn = this.uiWidgetBase.findChildByPath('RootCanvas/Button_Attack') as Button

		// click the jump button to get the character asynchronous and then jump
        jumpBtn.onPressed.add(()=>{
			if (this.character) {
				this.character.jump();
			} else {
				Player.asyncGetLocalPlayer().then((player) => {
					this.character = player.character;
					// The character performs the jump function
					this.character.jump();
				});
			}
		})
}@UIBind('')
export default class DefaultUI extends UIScript {
private character: Character;
/** Only call once during experience time for non- TEMPLATE instances */
protected onStart() {
//Set whether onUpdate can be triggered every frame
this.canUpdate = false;
// Find the corresponding jump button
const jumpBtn = this.uiWidgetBase.findChildByPath('RootCanvas/Button_Jump') as Button
const attackBtn = this.uiWidgetBase.findChildByPath('RootCanvas/Button_Attack') as Button
// click the jump button to get the character asynchronous and then jump
jumpBtn.onPressed.add(()=>{
if (this.character) {
this.character.jump();
} else {
Player.asyncGetLocalPlayer().then((player) => {
this.character = player.character;
// The character performs the jump function
this.character.jump();
});
}
})
}- Since the UI file dragged into the object list in the editor has been instantiated as a UI object , the logic written in the bound UI script will be executed in the experience after the experience starts. As long as the Player click the jump button, the character can jump.
Method 2: create a customize UI component in the script and attach it to the existing UI object
- Use the createUIByName function to create the UI file you want to add as a customize UI widget, and then use the addChild function to hang the customize UI widget in a Container under the current UI object , so as to dynamically load the UI into the experience scene.
//For example, create a customize UI widget in the UI script and hang it under a Container of the UI object
@UIBind('')
export default class DefaultUI extends UIScript {
	  private character: Character;

    /** Only call once during experience time for non- TEMPLATE instances */
    protected onStart() {
        //Find button and Container by path
        const canvas_1=this.uiWidgetBase.findChildByPath('RootCanvas') as Canvas
        const btn = this.uiWidgetBase.findChildByPath("RootCanvas/Button") as Button;
        // click this button to open a customize UI
        btn.onPressed.add(() => {
            let uiprefab1= createUIByName('/NewUI_1.ui') as UserWidget
            canvas_1.addChild(uiprefab1)
        })
    }
}
//For example, create a customize UI widget in the UI script and hang it under a Container of the UI object
@UIBind('')
export default class DefaultUI extends UIScript {
private character: Character;
/** Only call once during experience time for non- TEMPLATE instances */
protected onStart() {
//Find button and Container by path
const canvas_1=this.uiWidgetBase.findChildByPath('RootCanvas') as Canvas
const btn = this.uiWidgetBase.findChildByPath("RootCanvas/Button") as Button;
// click this button to open a customize UI
btn.onPressed.add(() => {
let uiprefab1= createUIByName('/NewUI_1.ui') as UserWidget
canvas_1.addChild(uiprefab1)
})
}
}- The above only introduces two common UI adding methods. The editor also provides many other methods.
- For example, the UI file in the project can be dynamically create into new UI object and added directly to the graphics without being hung under a Container in an existing UI object . When using this create method, you need to write the UI experience logic in the UI file bound to the create UI script, similar to method one.
//For example, instantiate a UI file as a new UI object in a normal script
@Component
export default class NewScript extends Script {
    /** When the script is instantiated, this function will be call before the first frame is update */
    protected onStart(): void {
        createUIByName('/NewUI_1.ui').addToViewport(0)
    }
}
//For example, instantiate a UI file as a new UI object in a normal script
@Component
export default class NewScript extends Script {
/** When the script is instantiated, this function will be call before the first frame is update */
protected onStart(): void {
createUIByName('/NewUI_1.ui').addToViewport(0)
}
}(Advanced) How to use the UI script export function instead of manually obtaining UI component?
- Only after obtaining the UI widget can you continue to write the experience logic of the UI widget :
- In the previous article, we used the findChildByPath function to find each UI widget in the UI object using the path ;
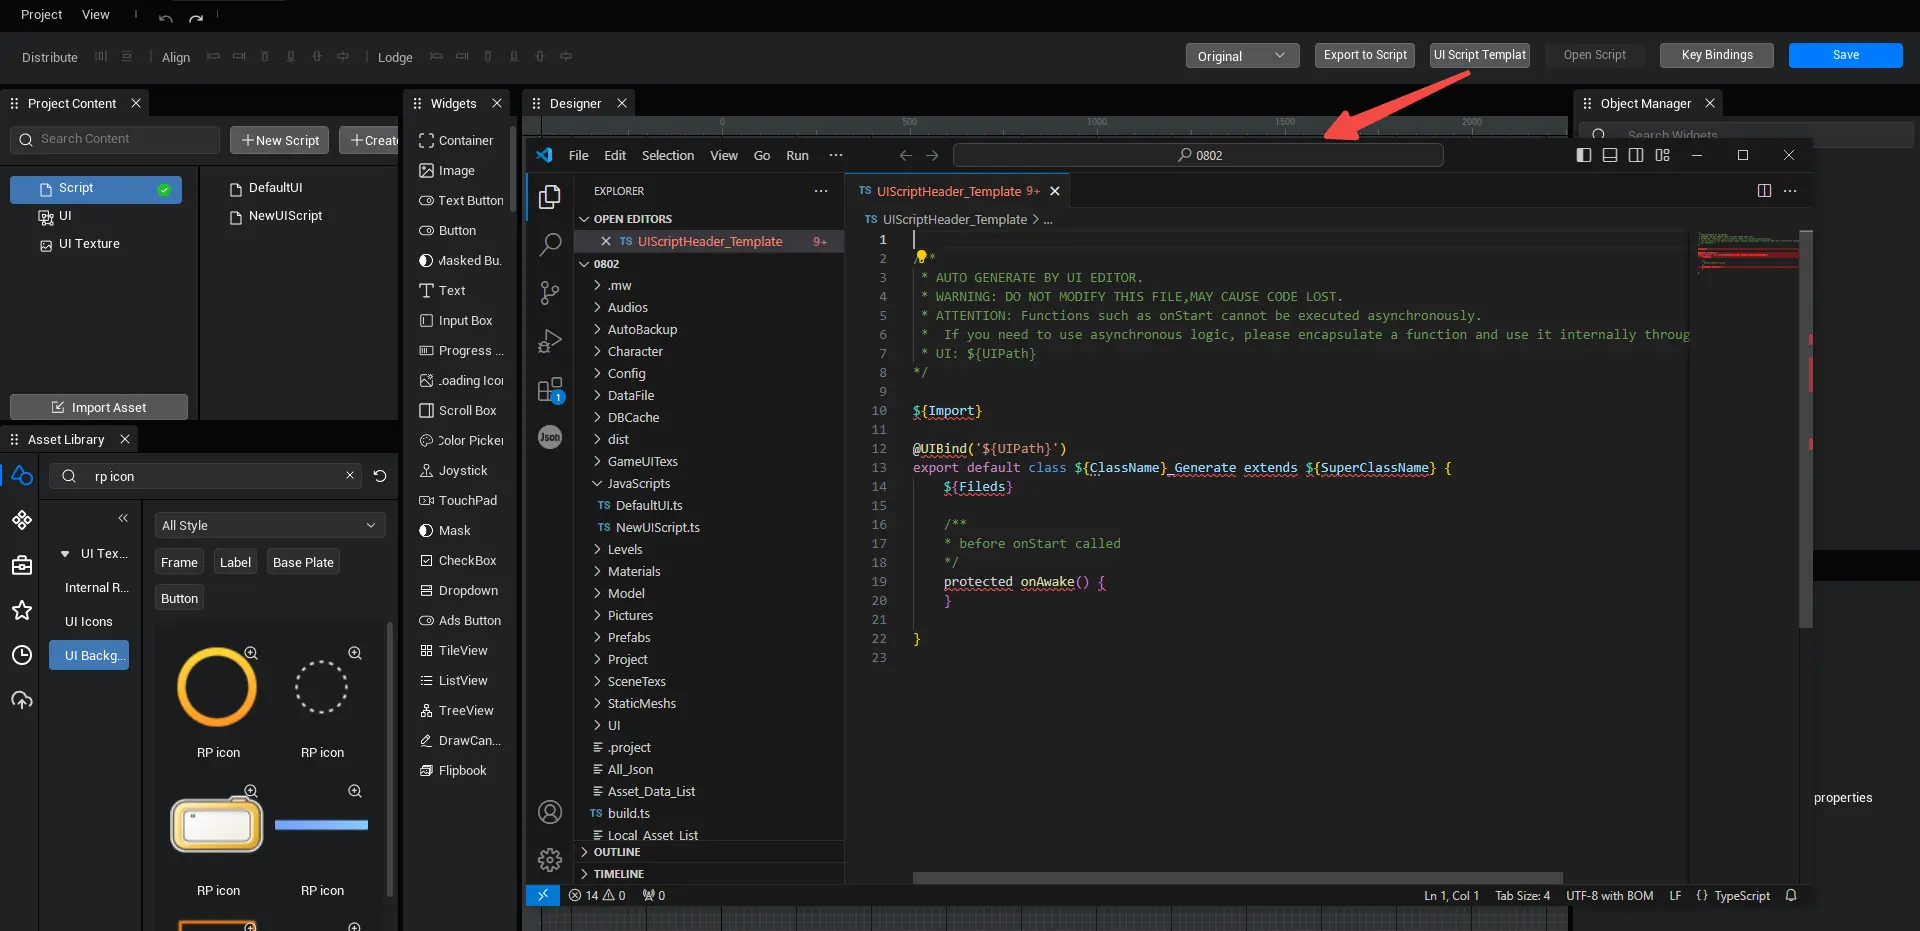
- In addition to using the findChildByPath function to obtain UI widget one by one, you can also use the [Export All script] and [UI script TEMPLATE ] functions in the UI editor toolbar to efficiently and automatically export script for obtaining UI widget.
- Export all script:
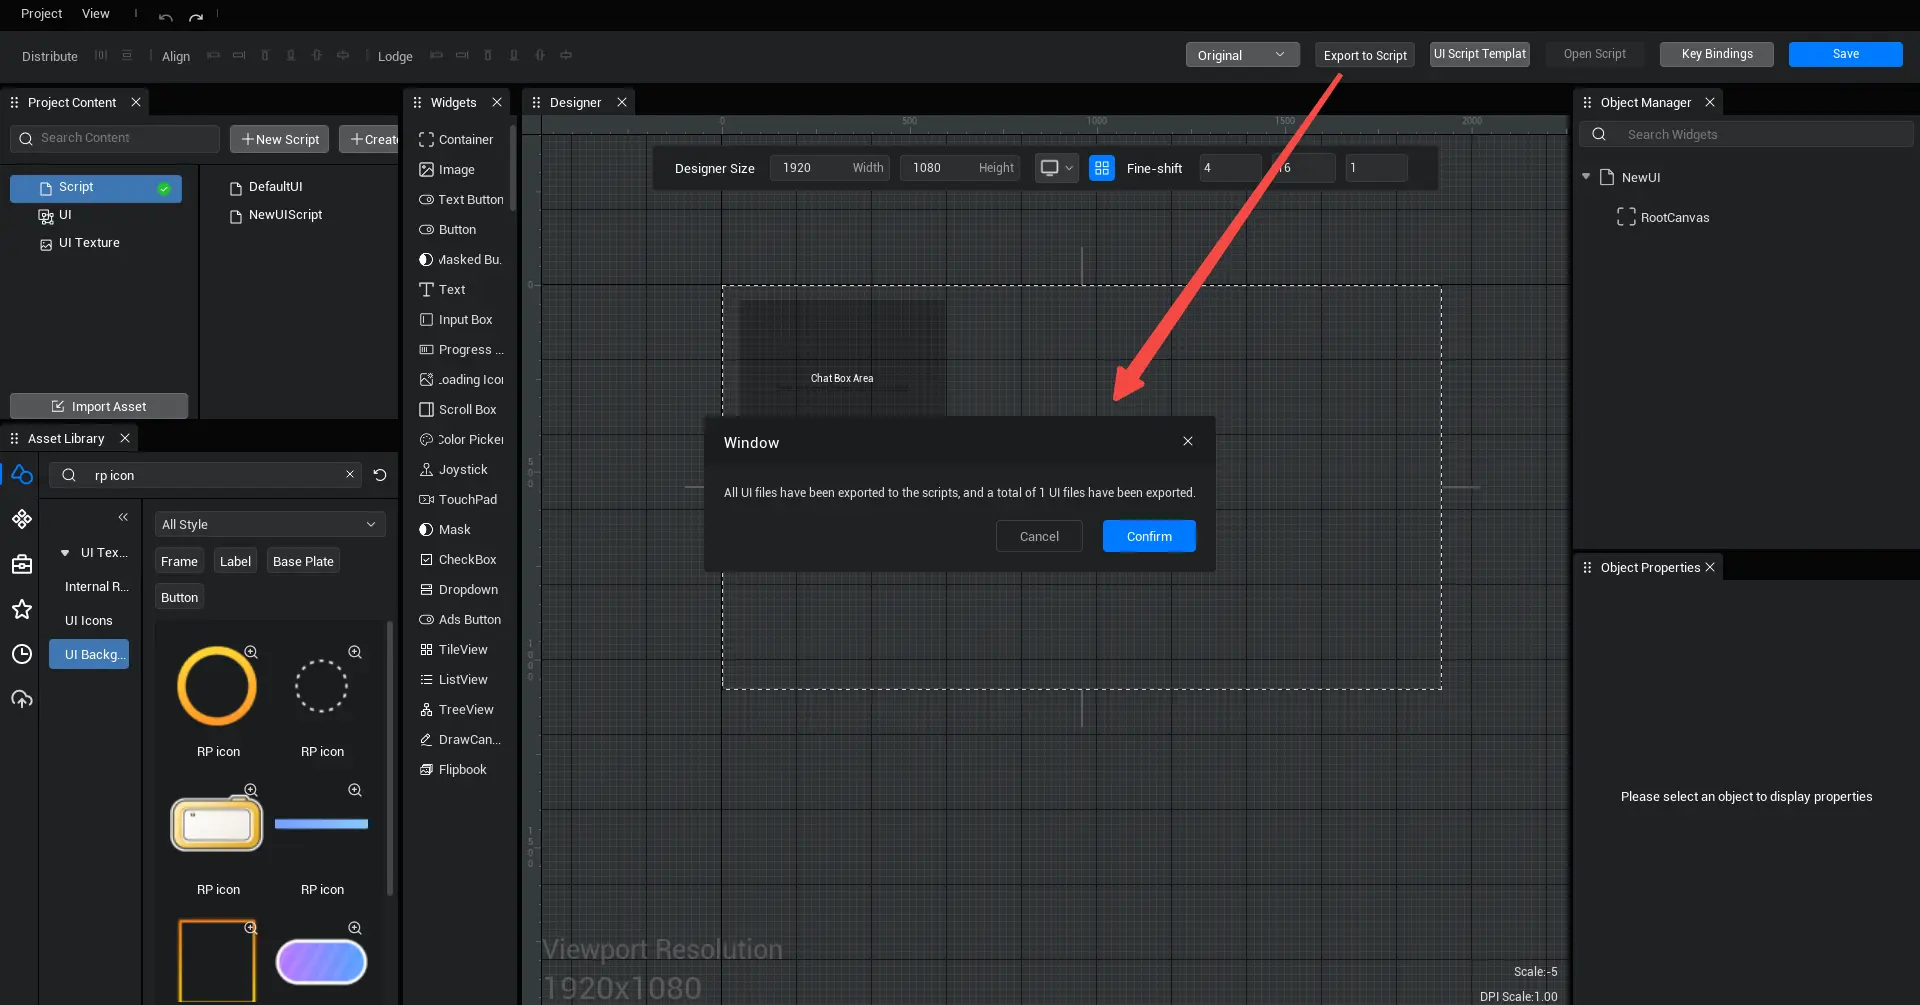
- After click the [Export All script] button, a pop-up window will pop up to prompt that the export has been successful. At the same time, all UI widget information starting with lowercase letters in the project's UI file will be automatically imported into the script named "UI file name-generate" to complete the declaration. These script will be stored in the ui-generate folder
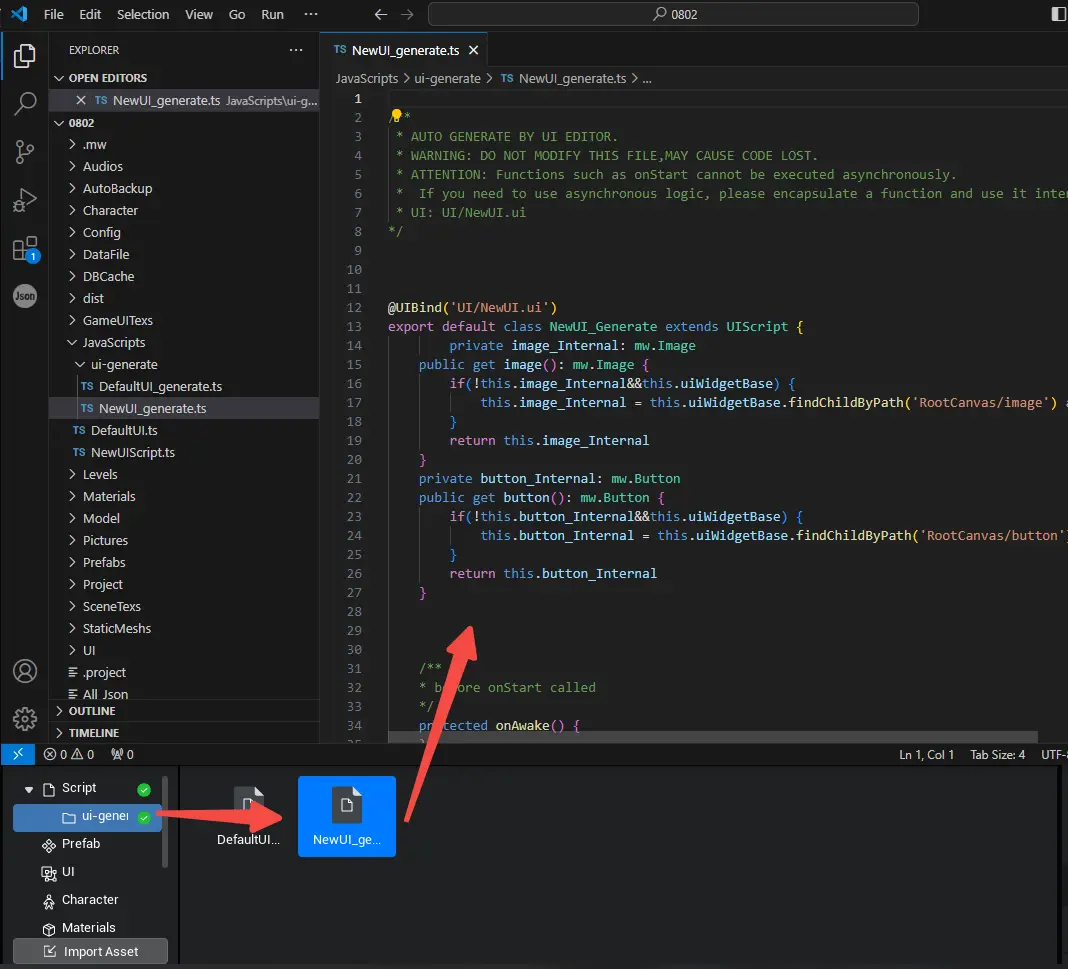
- After the export is completed, please modify the UI script bound to the UI file to inherit the "UI file name_generate"script . Then you can directly use the UI widget in the script file to the UI file, without having to use the findChildByPath function to obtain the UI widget one by one.
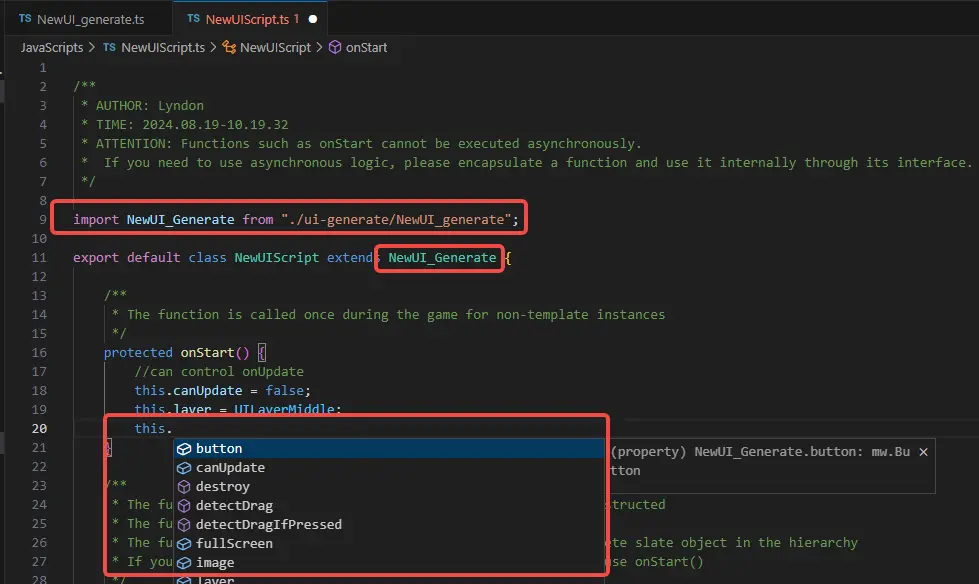
Please note that you should not write logic in the "UI file name-generate"script. Each execution of [Export all script] will re-export all UI widget information and overwrite all script in the current ui-generate folder.
UI script TEMPLATE:
- After click the [UI script TEMPLATE] button, the script TEMPLATE file will be opened. When [Export All script ] is executed, the code in the "UI file Name-Generate"script will be filled in according to the rules in this script TEMPLATE file , which is convenient for batch generate of repeated code.
${Import}

@UIBind('${UIPath}')
export default class ${ClassName}_Generate extends ${SuperClassName} {
	${Fileds}

	/**
	* Triggered once before onStart
	*/
	protected onAwake() {
		${Button_Start}this.${Button}.onClicked.add(()=>{

        })${Button_End}
	}

}
${Import}
@UIBind('${UIPath}')
export default class ${ClassName}_Generate extends ${SuperClassName} {
${Fileds}
/**
* Triggered once before onStart
*/
protected onAwake() {
${Button_Start}this.${Button}.onClicked.add(()=>{
})${Button_End}
}
}- ${Import}: used to automate framework import script references
- ${Fileds} : used to automate framework import variable
- ${UIPath} : Replaced with the UI path appended by the script
- ${ClassName} : replaced with the script's class name
- ${SuperClassName} : The script's parent class name
- ${Author} : replaced by the user name
- ${Time} : save time
- ${UIName} : UI file name
- ${FileName}: script file name
- ${Button_Start}this.${Button}...Any Code;${Button_End}: All exported Buttons will be filled into this rule. For example, if the script exports two Button variable b1 and b2, the following code will be generate(the same applies to other component)
- ${Button_Path}: can be replaced with the path of the current component , ${Button_Start}${Button_Path}${Button_End}, which will replace the path of the component currently written when it is repeatedly generate . (The same goes for other component)
- ${Button_HideStart}this.${Button}...Any Code;${Button_HideEnd}: All unexported Buttons will be filled into this rule. For example, if the script does not export two Button variable b1 and b2, the following code will be generate(the same applies to other component)
//For example, according to the TEMPLATE:
${Button_Start}this.${Button}.onClicked.add(()=>{})${Button_End}
//Automatically generate script:
this.b1.onClicked.add(()=>{});
this.b2.onClicked.add(()=>{});
//For example, according to the TEMPLATE:
${Button_Start}this.${Button}.onClicked.add(()=>{})${Button_End}
//Automatically generate script:
this.b1.onClicked.add(()=>{});
this.b2.onClicked.add(()=>{}); Editor Doc