Player Character and Camera
Estimated reading time: 10 minutes.
In the process of developing a game using the editor, the concepts of Player and Character are central. This chapter will help you understand the relationship between these two elements.
1. Player
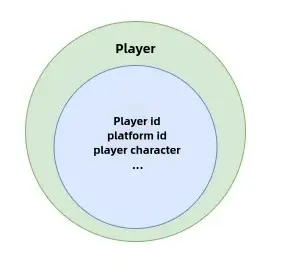
First, it’s important to understand what a player is. When a user enters the game, the server automatically generates a player object for that user. Each user has a corresponding player object, which serves as the controlling entity in the game, while the character is the player's representation in the game world. The player object that belongs to the user is referred to as the Local Player.
It’s important to note that the concept of a local player does not exist on the server. Since a game room can have multiple players simultaneously, operations targeting a specific player on the server are typically done by retrieving the player object using the Platform ID (userId).
The player is not directly visible in the game—it is a purely logical entity. The model you see in the game is the Character controlled by the player, and more details about the character will be covered in the following sections.

The following code demonstrates how to retrieve the player's Platform ID:
@Component
export default class GameStart extends Script {
    protected onStart(): void {
        // Retrieve the Platform ID of the local player
        if (SystemUtil.isClient()) {
            const userId = Player.localPlayer.userId;
        }
    }
}
@Component
export default class GameStart extends Script {
protected onStart(): void {
// Retrieve the Platform ID of the local player
if (SystemUtil.isClient()) {
const userId = Player.localPlayer.userId;
}
}
}::: Important: Retrieving the Local Player
Please note that the Player.localPlayer property is only accessible in scripts that inherit from Script. If you need to retrieve the local player in a UI script, use the Player.asyncGetLocalPlayer() function.
:::
2. Character
A character is a model with special functions that appears in the game and serves as the player's representation. The character is a property of the player object, and every player is assigned a default character upon entering the game. We can customize different characters by adjusting attributes such as appearance, body type, and movement speed.
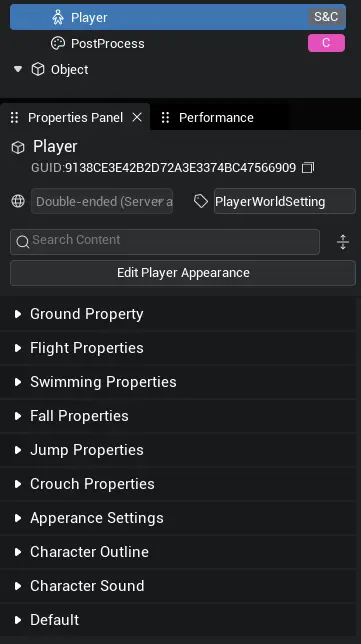
In the Object Manager on the editor's main interface, you’ll find a game object named Player. When you select it, the Properties Panel will display the default attribute parameters for the game character, as shown in the image below. Any changes made here will update the default values for all users.

You can modify the character's attribute parameters in the image above. In addition to this, it's common to use script code for dynamic character control, such as adjusting movement speed, making the character jump, crouch, and more. Below is an example of how to retrieve the player character and modify its maximum jump height using code:
@Component
export default class GameStart extends Script {
    protected onStart(): void {
        // Set the maximum jump height of the local player's character to 100
        if (SystemUtil.isClient()) {
            Player.localPlayer.character.maxJumpHeight = 100; //[!code focus]
        }
    }
}
@Component
export default class GameStart extends Script {
protected onStart(): void {
// Set the maximum jump height of the local player's character to 100
if (SystemUtil.isClient()) {
Player.localPlayer.character.maxJumpHeight = 100; //[!code focus]
}
}
}This document provides examples of various character abilities, including basic movements, flying, swimming, crouching, falling, jumping, postures, outfit changes, slots, and more.
3. Camera
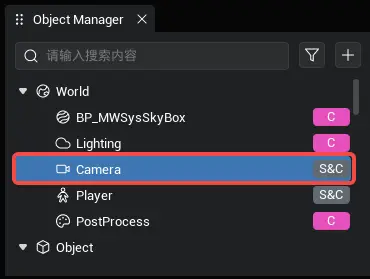
When a player character is created, a corresponding camera object is automatically generated. This camera object is, by default, a child of the character and continuously follows the player's position. You can find the Camera in the Object Manager to configure the default camera settings.

4. User Joining and Leaving Rooms
As mentioned earlier, the concepts of Character and Player are central to gameplay. Due to various real-world factors, players may frequently enter and exit game rooms, leading to dynamic changes in the character's presence in the game world. The editor provides four different callback events to notify developers when players join or leave a game.
4.1 Player Joining and Leaving
The onPlayerAdd event allows you to listen for when a player joins the game. This function can be used on both the client and server sides. However, it's important to note that when used on the client side, it cannot detect the joining of the local player, as the script may not be running yet when the local player enters the game.
Player.onPlayerAdd.add((player: Player) => {
    console.info("A player has joined the game!");
});Player.onPlayerAdd.add((player: Player) => {
console.info("A player has joined the game!");
});Player.onPlayerRemove.add((player: Player) => {
console.info("A player has left the game!");
});Player.onPlayerRemove.add((player: Player) => {
console.info("A player has left the game!");
});4.2 Character Creation and Destruction
After a player is created, their character is subsequently created. When the event is triggered, the character's skeleton and collision body are fully initialized and ready for movement. However, the character's appearance and attachments may take some additional time to load. To wait for the character to be fully completed, you can use the Character.asyncReady function.
You can also listen to the Character.onDescriptionComplete event to ensure that the character's appearance and attachments are fully loaded.
It's important to note that accessing the player's character object within the onPlayerAdd event callback may lead to errors, as the character might not be entirely created at that point. To ensure the process is handled correctly, use the onCharacterAdd event to listen for the character's creation.
Player.onPlayerAdd.add((player: Player) => {
    console.info("A player has joined the game!");
	// Listen for the character creation event
    player.onCharacterAdd.add((character: Character) => {
        console.info("The player's character has been successfully created!");
    });
});Player.onPlayerAdd.add((player: Player) => {
console.info("A player has joined the game!");
// Listen for the character creation event
player.onCharacterAdd.add((character: Character) => {
console.info("The player's character has been successfully created!");
});
});When a player logs off, their corresponding character model will be automatically destroyed. If you have attached items to certain players on the client side, you may need to destroy or reclaim those attachments. In this case, you can listen to the onCharacterRemove event, and it can be handled similarly within the character entry callback.
Player.onPlayerAdd.add((player: Player) => {
    console.info("A player has joined the game!");
    player.onCharacterAdd.add((character: Character) => {
        console.info("The player's character has been successfully created!");
    });

    player.onCharacterRemove.add((character: Character) => {
        console.info("The player's character is about to be destroyed!");
    });
});Player.onPlayerAdd.add((player: Player) => {
console.info("A player has joined the game!");
player.onCharacterAdd.add((character: Character) => {
console.info("The player's character has been successfully created!");
});
player.onCharacterRemove.add((character: Character) => {
console.info("The player's character is about to be destroyed!");
});
});5. Switching Control
As mentioned in the first section, a character is an attribute of a player, which means you can dynamically switch the character that the player currently controls. This functionality is useful for implementing features like switching between different athletes in sports simulation games.
TIP
Control must be switched on the server side. The following code demonstrates how to create a new character and switch control to it. If you don't fully understand the code at this stage, that's okay—this is just an introduction to the player's capabilities. After completing the chapter on network functionality, you'll be able to understand the code below.
@Component
export default class PlayerCharacter extends Script {

    protected onStart(): void {
        // The following code is executed only on the server
        if (SystemUtil.isServer()) {
            // Add an event listener on the server for "SpawnCharacterAndControl"
            Event.addClientListener("SpawnCharacterAndControl", (player) => {
                const newPawn = Player.spawnDefaultCharacter();
                newPawn.worldTransform.position = new Vector(200, 0, 500);
                player.control(newPawn);
            });
        }
        // The following code is executed only on the client
        if (SystemUtil.isClient()) {
            // Get the current client's player (yourself)
            const myPlayer = Player.localPlayer;
            // Add a function to the player's "onPawnChange" delegate to play an effect at the new character's position
            myPlayer.onPawnChange.add(async (pawn) => {
                await AssetUtil.asyncDownloadAsset("7750")
                EffectService.playAtPosition("7750", new Vector(200, 0, 500));
            });

            // Add a keybinding: pressing "1" sends the "SpawnCharacterAndControl" event to the server
            InputUtil.onKeyDown(Keys.One, () => {
                Event.dispatchToServer("SpawnCharacterAndControl");
            });
        }
    }
}
@Component
export default class PlayerCharacter extends Script {
protected onStart(): void {
// The following code is executed only on the server
if (SystemUtil.isServer()) {
// Add an event listener on the server for "SpawnCharacterAndControl"
Event.addClientListener("SpawnCharacterAndControl", (player) => {
const newPawn = Player.spawnDefaultCharacter();
newPawn.worldTransform.position = new Vector(200, 0, 500);
player.control(newPawn);
});
}
// The following code is executed only on the client
if (SystemUtil.isClient()) {
// Get the current client's player (yourself)
const myPlayer = Player.localPlayer;
// Add a function to the player's "onPawnChange" delegate to play an effect at the new character's position
myPlayer.onPawnChange.add(async (pawn) => {
await AssetUtil.asyncDownloadAsset("7750")
EffectService.playAtPosition("7750", new Vector(200, 0, 500));
});
// Add a keybinding: pressing "1" sends the "SpawnCharacterAndControl" event to the server
InputUtil.onKeyDown(Keys.One, () => {
Event.dispatchToServer("SpawnCharacterAndControl");
});
}
}
}After the game is running, press "1" to create a new character and switch control from the current character to the newly created one. Once the switch is made, the original character will remain in place and become an NPC. A character can only be controlled by one player at any given time.
 Editor Doc